How to Plant Coral Bell Seeds
Growing coral bells from seed is rewarding but requires patience and specific conditions. This guide covers everything from seed stratification and sowing techniques to seedling care and transplanting. Follow these steps for healthy, vibrant heuchera plants in your garden.
Key Takeaways
- Cold stratification is essential: Coral bell seeds need 4-8 weeks of cold treatment to break dormancy and germinate properly.
- Surface sow only: Do not cover seeds with soil; they need light to germinate successfully.
- Maintain consistent moisture: Keep the growing medium damp but never waterlogged during germination.
- Provide bright, indirect light: Seedlings need 12-16 hours of light daily but avoid direct sun that can scorch them.
- Transplant after true leaves appear: Move seedlings to individual pots once they develop 2-3 sets of true leaves.
- Harden off before planting outdoors: Gradually acclimate young plants to outdoor conditions over 7-10 days.
- Expect variability: Seed-grown coral bells may not look exactly like the parent plant due to genetic diversity.
Quick Answers to Common Questions
How long does it take for coral bell seeds to germinate?
After cold stratification, coral bell seeds typically germinate in 10-21 days at 65-70°F, though some varieties may take 30+ days.
Do coral bell seeds need light to germinate?
Yes, coral bell seeds require light to germinate. They must be surface sown and not covered with soil.
How long should I cold stratify coral bell seeds?
Cold stratify coral bell seeds for 4-8 weeks at 35-40°F in moist growing medium to break dormancy.
When should I transplant coral bell seedlings to the garden?
Transplant hardened-off seedlings to the garden after all danger of frost has passed and they have 3-4 sets of true leaves.
Will coral bells grown from seed look like the parent plant?
Hybrid coral bells will not come true from seed. Seedlings show genetic variation in foliage color, shape, and size.
📑 Table of Contents
- Introduction to Growing Coral Bells from Seed
- Understanding Coral Bell Seeds and Their Needs
- Preparing for Seed Starting Success
- The Critical Step: Cold Stratification
- Sowing and Germination
- Seedling Care and Development
- Hardening Off and Garden Planting
- Troubleshooting Common Issues
- Advanced Techniques and Tips
- Conclusion
Introduction to Growing Coral Bells from Seed
There is something deeply satisfying about growing plants from seed. You watch tiny specks transform into thriving beauties that grace your garden for years. Coral bells, botanically known as Heuchera, are no exception. These shade-loving perennials offer stunning foliage in shades of purple, silver, caramel, lime green, and near-black. While most gardeners buy established plants, learning how to plant coral bell seeds opens up a world of possibilities. You can grow unique varieties, save money, and experience the full life cycle of these remarkable plants.
But let me be honest with you. Growing coral bells from seed is not the fastest route to a full garden bed. It takes patience. It takes attention to detail. And it takes a willingness to follow nature’s timeline rather than your own. The good news? The process is straightforward once you understand the key requirements. Cold stratification. Surface sowing. Consistent moisture. Bright light. Master these four elements, and you will be well on your way to raising healthy heuchera seedlings. This guide walks you through every step, from seed preparation to garden planting, with practical tips learned from experience.
Understanding Coral Bell Seeds and Their Needs
What Coral Bell Seeds Look Like
If you have never seen coral bell seeds before, prepare for a surprise. They are incredibly tiny. Like dust. Like fine powder. A single seed pod contains hundreds of seeds, each barely visible to the naked eye. This miniscule size means they have very little stored energy. They cannot push through soil. They need light to trigger germination. And they dry out in minutes if left exposed to air. Understanding this physical reality shapes every decision you make during the planting process.
Natural Germination Requirements
In nature, coral bells drop their seeds in late summer or fall. The seeds land on the soil surface. Winter arrives. Cold temperatures and moisture work on the seed coat. This period of cold, damp conditions is called stratification. It breaks the seed’s internal dormancy. Come spring, warming temperatures and increasing daylight signal the seed to sprout. The tiny root emerges first, anchoring into the soil surface. Then the first leaves appear. This natural cycle tells us exactly what we need to replicate. Cold stratification. Surface sowing. Spring-like warmth and light.
Seed Viability and Storage
Fresh seeds germinate best. Coral bell seeds remain viable for about one to two years if stored properly. Keep them in a paper envelope inside an airtight container in the refrigerator. Avoid plastic bags directly against seeds as they can trap moisture and cause mold. Label everything with the variety name and collection date. If you are buying seeds, purchase from reputable sources that indicate harvest year. Older seeds may still sprout but at lower rates. Plan to sow more seeds than you need plants to account for this natural variability.
Preparing for Seed Starting Success
Timing Your Seed Starting
When to start depends on your climate and setup. Indoor seed starting typically begins 10-12 weeks before your last frost date. This gives seedlings time to develop strong root systems before transplanting outdoors. If you live in zones 7-9, you might start seeds in January for April planting. In zones 4-6, February to March works well. Some gardeners also direct sow in fall, letting winter handle stratification naturally. This method works but offers less control and lower germination rates. For beginners, controlled indoor starting yields more predictable results.
Gathering Your Supplies
You do not need fancy equipment. Here is what works well:
- Seed starting trays or shallow containers with drainage holes
- Fine-textured seed starting mix (not garden soil)
- Clear plastic dome or plastic wrap for humidity
- Spray bottle for gentle watering
- Grow lights or bright windowsill
- Small fan for air circulation
- Labels and waterproof marker
- Refrigerator space for stratification
Clean everything with a 10% bleach solution before use. This prevents damping off disease, a fungal issue that kills seedlings at the soil line. Rinse well and let dry. Clean containers give your tiny seeds the best chance.
Choosing the Right Growing Medium
This matters more than you might think. Coral bell seeds need a medium that holds moisture but drains instantly. It must be fine enough that tiny roots make contact but not so dense that it compacts. A commercial seed starting mix works perfectly. These mixes typically contain peat moss or coconut coir, perlite, and vermiculite. Avoid mixes with fertilizer added. Seeds contain all nutrients needed for initial growth. Fertilizer can actually inhibit germination or burn delicate roots. If you prefer to make your own, combine equal parts peat moss or coir, perlite, and vermiculite. Moisten the mix before filling containers. It should feel like a wrung-out sponge. Damp but not dripping.
The Critical Step: Cold Stratification
Why Stratification Cannot Be Skipped
This is where most beginners go wrong. They sow seeds directly into warm soil and wait. And wait. And wait. Nothing happens. Coral bell seeds have evolved a dormancy mechanism that prevents sprouting at the wrong time. Without cold stratification, germination rates hover near zero. The cold period triggers biochemical changes inside the seed. Enzymes activate. Growth inhibitors break down. The seed becomes ready to respond to warmth and light. Skipping this step wastes time and seeds. Do not skip it.
Method 1: Refrigerator Stratification (Most Reliable)
This method gives you control and high success rates. Start by moistening your seed starting mix. Fill your containers. Press the surface gently to create a firm, level bed. Now comes the tricky part. Sowing dust-like seeds evenly. Mix the seeds with a small amount of fine sand or vermiculite. This helps you see where you have sown. Sprinkle the mixture evenly over the surface. Do not cover. Press the seeds gently into the mix with a flat board or your hand. Good contact matters. Mist the surface thoroughly. Cover with a clear dome or plastic wrap. Label the container. Place in the refrigerator at 35-40°F (2-4°C). Not the freezer. The refrigerator. Check weekly. Mist if the surface looks dry. After 4-8 weeks, remove from the refrigerator.
Method 2: Winter Sowing (Natural Approach)
Winter sowing uses recycled containers as mini greenhouses outdoors. Cut a gallon milk jug horizontally, leaving a hinge. Punch drainage holes in the bottom. Fill with moist seed starting mix. Sow seeds on the surface. Tape the jug closed. Set outside in a protected spot. Snow and rain provide moisture. Fluctuating winter temperatures provide stratification. As spring warms, seeds germinate naturally. This method works well for gardeners with limited indoor space. However, you cannot control temperature swings. A warm spell followed by deep freeze can damage emerging seedlings. It also makes it harder to monitor moisture and protect from pests.
Method 3: Paper Towel Stratification (Space Saver)
If refrigerator space is tight, try this. Moisten a paper towel. Squeeze out excess water. Spread seeds on one half. Fold the towel over. Place in a labeled zip-top bag. Leave a small air gap. Refrigerate for 4-8 weeks. Check weekly for mold. If mold appears, rinse seeds in diluted hydrogen peroxide (1 teaspoon per cup water) and transfer to fresh towel. After stratification, carefully transfer seeds to prepared containers. Use a damp toothpick to pick up individual seeds. This method lets you stratify many varieties in minimal space. But handling germinated seeds risks damaging the tiny root. Proceed with extreme care.
Sowing and Germination
Moving from Cold to Warm
After 4-8 weeks of cold stratification, bring containers to room temperature. 65-70°F (18-21°C) is ideal. Place under grow lights or on a bright windowsill. Lights should be 2-3 inches above the container tops. Run lights 12-16 hours daily. A timer makes this effortless. Remove the humidity dome gradually over several days. Day one: prop open slightly. Day two: open more. Day three: remove completely. This prevents shock from sudden humidity drop. Keep the surface moist. Mist once or twice daily. Do not let it dry out. Do not let it stay soggy. This balance is the art of seed starting.
What to Expect During Germination
Germination typically begins 10-21 days after warming. But it can take longer. Some varieties take 30 days or more. Do not give up too soon. The first sign is tiny green specks on the soil surface. These are cotyledons, the seed leaves. They look nothing like mature coral bell leaves. They are small, rounded, and often pale green. True leaves follow weeks later. These show the characteristic ruffled shape and color hints. Germination is often uneven. Seeds from the same pod sprout at different times. This is normal. Continue caring for the tray until all viable seeds have had their chance.
Common Germination Problems
Damping off is the biggest threat. This fungal disease causes seedlings to collapse at soil level. Prevention is everything. Use sterile mix. Provide air circulation with a small fan on low. Avoid overwatering. Water from the bottom by placing containers in a tray of water until the surface darkens. Then remove. Never let containers sit in standing water. If you see fuzzy white growth on the soil surface, that is mold. Increase airflow. Reduce watering. Sprinkle a thin layer of cinnamon on the surface. It has natural antifungal properties. Algae growth on the soil surface indicates too much moisture and light. Scrape it off gently. Let the surface dry slightly between waterings.
Seedling Care and Development
Light Requirements for Strong Growth
Once germinated, coral bell seedlings need abundant light. Insufficient light causes leggy, weak stems that topple over. Grow lights are ideal. Position LED or fluorescent lights 2-3 inches above seedlings. Raise lights as plants grow. 14-16 hours of light daily mimics long spring days. If using a windowsill, choose south-facing. Rotate trays daily so plants grow straight. Monitor for signs of light stress. Bleached or brown leaf edges mean lights are too close or too intense. Stretching toward light means they need more. Adjust accordingly.
Watering and Feeding Young Seedlings
Watering seedlings is a daily check, not a daily task. Check the soil surface. If it looks dry and feels dry to a light touch, water. Bottom watering remains best. It encourages roots to grow downward. It keeps foliage dry, reducing disease risk. Once true leaves appear, begin feeding. Use a balanced liquid fertilizer at quarter strength. Once every two weeks is plenty. Fish emulsion or seaweed extract works well. Avoid high nitrogen formulas. You want compact, sturdy growth, not lush foliage with weak roots. Flush with plain water monthly to prevent salt buildup.
Transplanting to Individual Pots
When seedlings have 2-3 sets of true leaves, they are ready for their own pots. This usually occurs 6-8 weeks after germination. Prepare 3-4 inch pots with moistened potting mix. A quality potting soil with compost works well now. Make a small hole. Gently lift seedlings by the leaves, never the stem. The stem is the lifeline. If you crush it, the plant dies. Leaves can regrow. Use a small spoon or dibber to scoop under roots. Place in the new pot at the same depth. Firm soil gently around roots. Water from the bottom. Keep newly transplanted seedlings out of direct light for a few days. They will recover and resume growth.
Managing Growth Before Outdoor Planting
Indoor seedlings often grow faster than outdoor conditions warrant. If plants become large before frost danger passes, you have options. Pinch back leggy growth to encourage bushiness. Move to larger pots if roots fill the current ones. Begin fertilizing at half strength. Most importantly, start hardening off on schedule. Do not delay outdoor transition because plants look happy indoors. They need to adapt to real sun, wind, and temperature fluctuations. A plant that stays indoors too long suffers transplant shock more severely.
Hardening Off and Garden Planting
The Hardening Off Process
Hardening off is the gradual acclimation of indoor-grown plants to outdoor conditions. Skip this, and your tender seedlings will likely sunburn, wind-burn, or cold-shock. Start 7-10 days before your planned planting date. Day one: place plants in full shade, protected from wind, for 1-2 hours. Bring them back inside. Day two: 3-4 hours in shade. Day three: 5-6 hours with dappled morning sun. Day four: 7-8 hours with some direct morning sun. Continue increasing exposure daily. By day 7-10, they should handle full day outdoors in their final planting conditions. Watch weather forecasts. Bring plants in if temperatures drop near freezing or heavy storms threaten.
Choosing the Perfect Garden Location
Coral bells thrive in partial shade. Morning sun with afternoon shade is ideal. In cooler climates (zones 3-5), they tolerate more sun. In hot climates (zones 7-9), they need more shade. Avoid deep, dark shade under dense evergreens. Flower production and foliage color suffer. Soil should be well-draining, rich in organic matter, and slightly acidic to neutral (pH 6.0-7.0). Heavy clay? Amend with compost and coarse sand. Sandy soil? Add compost and peat moss. Test drainage by digging a hole, filling with water, and timing how long it takes to drain. More than 4 hours means poor drainage. Consider raised beds or mounds.
Planting in the Garden
Plant on a cloudy day or in late afternoon to reduce stress. Space plants 12-18 inches apart depending on mature size. Dig holes twice as wide as the root ball. Same depth. Remove plant from pot. Loosen circling roots gently. Place in hole. Backfill with amended soil. Firm gently. Water thoroughly to settle soil and eliminate air pockets. Apply 2 inches of mulch around plants, keeping it away from crowns. Shredded leaves, pine straw, or bark mulch all work well. Mulch conserves moisture, suppresses weeds, and moderates soil temperature. Label each variety if you are growing multiple types.
First Season Care
The first growing season is about establishment. Water deeply once or twice weekly during dry spells. Check soil moisture 2 inches down. Do not rely on surface appearance. Fertilize lightly in early summer with balanced slow-release fertilizer. Avoid late-season feeding. It encourages tender growth that winter kills. Remove any flower spikes that appear the first year. This directs energy to root and crown development. You want strong plants for next year’s show. In fall, do not cut back foliage. The leaves protect the crown over winter. Apply extra mulch after ground freezes in cold climates.
Troubleshooting Common Issues
Poor Germination Rates
If few or no seeds sprout, review the basics. Were seeds fresh? Was stratification long enough and cold enough? Was the surface kept consistently moist? Did seeds get light? Were they buried? Even one missed factor can cause failure. Keep a seed starting journal. Record dates, temperatures, varieties, and results. Patterns emerge over seasons. You learn what works in your specific conditions. Some varieties are simply more difficult. Species types often germinate more readily than fancy hybrids. Adjust expectations accordingly.
Leggy, Weak Seedlings
Leggy seedlings have long, thin stems with wide gaps between leaves. They fall over easily. The cause is almost always insufficient light. Increase light intensity. Lower lights closer. Extend light duration. Add a fan for gentle air movement. This strengthens stems. If seedlings are already leggy, you can transplant deeper. Bury the stem up to the lowest leaves. New roots may form along the buried stem. But prevention is far better than correction.
Pest Problems
Indoors, fungus gnats are the most common pest. They thrive in constantly wet soil. Their larvae feed on roots. Let the soil surface dry between waterings. Use yellow sticky traps. Apply beneficial nematodes if infestation is severe. Outdoors, slugs and snails love young coral bells. Use copper tape, diatomaceous earth, or beer traps. Deer and rabbits may browse foliage. Fencing or repellents help. Vine weevil larvae eat roots. Beneficial nematodes applied in spring and fall control them biologically.
Disease Issues
Crown rot occurs in poorly drained soil or when mulch piles against the crown. Plant high. Ensure drainage. Keep mulch pulled back. Powdery mildew appears as white powder on leaves in humid conditions with poor airflow. Space plants properly. Water at soil level. Choose resistant varieties. Rust shows as orange pustules on leaf undersides. Remove affected leaves. Improve air circulation. Avoid overhead watering. Most diseases are preventable with good cultural practices.
Advanced Techniques and Tips
Collecting Your Own Seeds
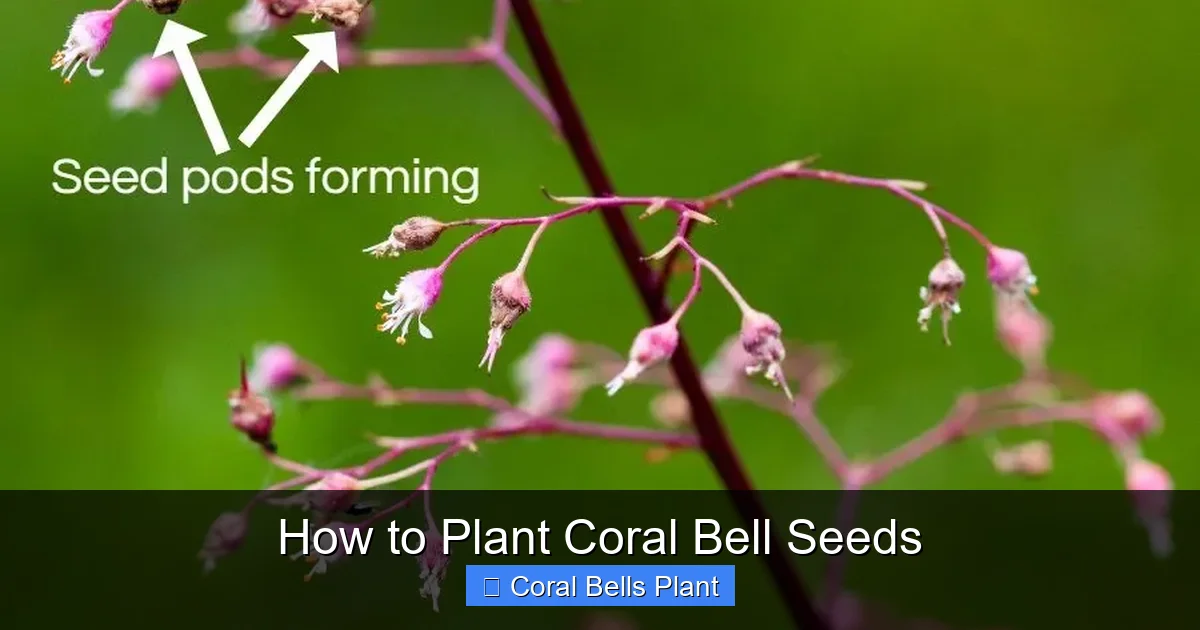
Once you have mature plants, you can collect seeds. Let flower spikes remain after blooming. Seed pods form and turn brown. When pods split open, seeds are ready. Cut entire spikes. Place upside down in a paper bag. Label. Store in a dry place for a week. Shake the bag. Seeds fall to the bottom. Separate from chaff. Store as described earlier. Remember that hybrid varieties will not come true from seed. Seedlings will vary. This is not a flaw. It is an opportunity. You might discover a stunning new combination. Many named cultivars started as chance seedlings.
Creating Your Own Hybrids
Hand pollination lets you play plant breeder. Choose two parent plants with traits you want to combine. When flowers open, transfer pollen from one to the stigma of the other using a small brush. Tag the pollinated flower. Cover with a fine mesh bag to prevent insect cross-pollination. Wait for seed pods to develop. This process connects you to generations of plant breeders. It requires patience. Most crosses yield ordinary results. But the occasional exceptional seedling makes it worthwhile. Keep detailed records. Photograph parents and offspring.
Using Coral Bells in Garden Design
While waiting for seedlings to mature, plan their garden roles. Coral bells excel as edging plants along shaded paths. Their mounding habit creates clean lines. Plant in drifts of 3-5 for impact. Combine with contrasting foliage. Ferns, hostas, brunnera, and Japanese forest grass make beautiful companions. Use dark-leaved varieties to highlight chartreuse neighbors. Silver-leaved types brighten dark corners. Container planting works beautifully. Coral bells are perfect thriller or filler components in shaded mixed pots. Their evergreen nature provides winter interest when annuals are gone.
Extending the Season
In mild climates, coral bells remain evergreen year-round. In cold climates, foliage may die back but crowns survive. Some gardeners pot up plants in fall and overwinter in an unheated garage or cold frame. This yields larger plants for spring containers. Others use cloches or row covers for early spring protection. Experiment with what works in your zone. The joy of growing from seed includes learning the plant’s full personality across seasons.
Conclusion
Learning how to plant coral bell seeds connects you to the ancient rhythm of seed, soil, and season. Yes, it takes months from stratification to garden-ready plant. Yes, it demands attention to moisture, light, and temperature. But the reward goes far beyond saving money at the nursery. You gain intimate knowledge of a plant’s life cycle. You develop skills that transfer to countless other species. And perhaps most importantly, you create plants that are uniquely yours. Each seedling carries a genetic combination that has never existed before and will never exist again. When that tiny speck becomes a mature clump of ruffled, colorful foliage catching morning light in your garden, you will know every step of its journey. You will have earned it.
Start small. Try one variety. Master the process. Then expand. Keep notes. Take photos. Celebrate successes. Learn from failures. Share seedlings with gardening friends. The community built around growing from seed is as rewarding as the plants themselves. Your garden will reflect your patience, your care, and your growing expertise. And those coral bells? They will thrive because you understood what they needed from the very beginning. Happy growing.
Frequently Asked Questions
Can I direct sow coral bell seeds in the garden?
Yes, you can direct sow in fall for natural winter stratification. However, germination rates are lower and seedlings face more competition from weeds and weather extremes.
What is the best temperature for germinating coral bell seeds?
After stratification, maintain 65-70°F (18-21°C) for optimal germination. Consistent warmth signals the seeds that spring has arrived.
How often should I water coral bell seedlings?
Check daily and water when the soil surface appears dry. Bottom water to keep foliage dry and encourage deep root growth. Never let seedlings sit in standing water.
Why are my coral bell seedlings falling over?
Leggy, falling seedlings indicate insufficient light. Lower grow lights to 2-3 inches above plants, increase light duration to 14-16 hours, and add a gentle fan for stem strength.
Do coral bells bloom the first year from seed?
Most coral bells grown from seed will not bloom until their second year. Remove any first-year flower spikes to direct energy into root and foliage development.
How do I know when coral bell seeds are ripe for collecting?
Seed pods turn brown and split open when ripe, usually 4-6 weeks after flowering. Cut entire spikes and shake seeds into a paper bag for cleaning and storage.