How to Divide Coral Bells Plant
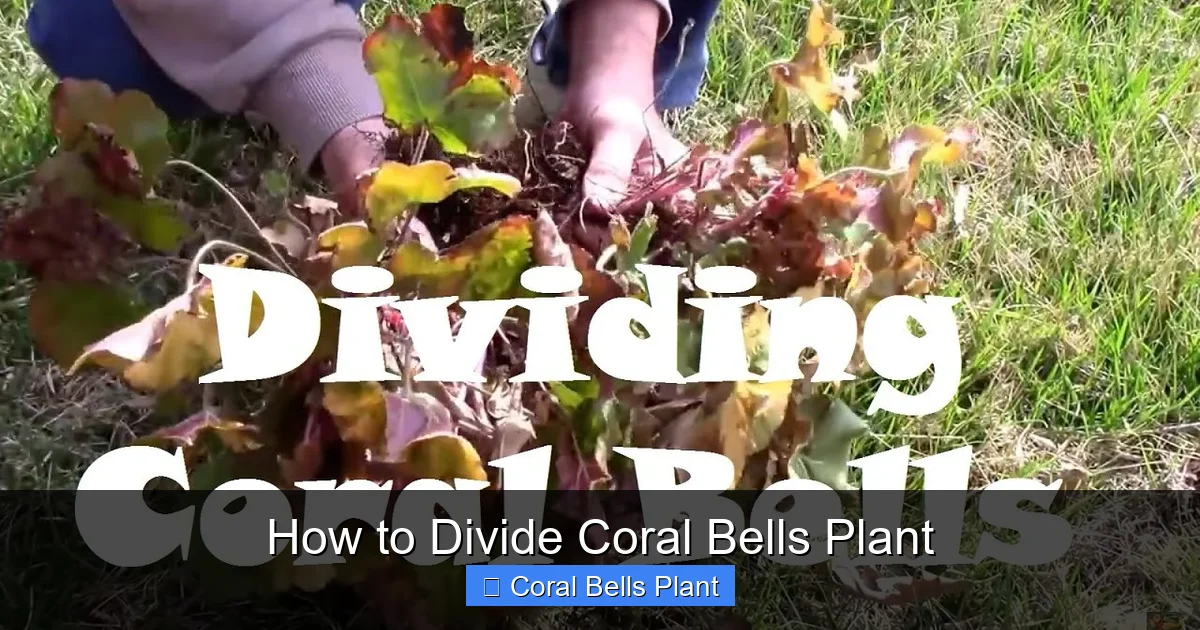
Dividing coral bells every 3-4 years rejuvenates the plant, prevents center die-out, and gives you free new plants for your garden. The best time to divide is early spring or early fall when temperatures are mild and the plant can establish roots before extreme weather hits.
Key Takeaways
- Divide every 3-4 years: Coral bells benefit from regular division to maintain vigor and prevent the center from becoming woody and dying out.
- Best timing is spring or fall: Early spring before new growth emerges or early fall with 6-8 weeks before frost gives divisions the best chance to establish.
- Use clean, sharp tools: A sharp spade or garden knife prevents damage and reduces disease risk when separating the crowns.
- Each division needs roots and crown: Ensure every piece has at least 2-3 healthy shoots with attached roots for successful transplanting.
- Plant at the same depth: Keep the crown at soil level — planting too deep causes rot, too shallow exposes roots to drying out.
- Water consistently after dividing: Keep soil evenly moist for 4-6 weeks until new roots establish, then transition to normal watering.
- Mulch but don’t bury the crown: Apply 1-2 inches of mulch around divisions, keeping it away from the crown to prevent rot and crown damage.
Quick Answers to Common Questions
When is the absolute best time to divide coral bells?
Early spring before new growth fully emerges or early fall with 6-8 weeks before first frost. Both give roots time to establish before extreme temperatures.
How many divisions can I get from one mature coral bells plant?
A 3-4 year old plant typically yields 4-8 healthy divisions, each with 2-3 shoots and a good root system. Larger, older plants produce more.
Can I divide coral bells in summer if I keep them watered?
You can, but success rates drop significantly. Heat stress combined with root disturbance often causes failure. If forced, provide shade cloth and water daily.
How deep should I plant coral bells divisions?
The crown must sit at soil level — not buried, not exposed. Planting too deep causes crown rot, the most common reason divisions fail.
Do I need to fertilize newly divided coral bells right away?
No. Wait 4-6 weeks until new growth appears. The compost in the planting hole provides sufficient nutrients initially. Early fertilizing can burn tender roots.
📑 Table of Contents
- Why Dividing Coral Bells Matters for Your Garden
- When Is the Best Time to Divide Coral Bells
- Tools and Materials You Need
- Step-by-Step Guide to Dividing Coral Bells
- Aftercare for Newly Divided Coral Bells
- Common Mistakes to Avoid
- Special Considerations for Different Varieties
- Propagating vs. Dividing: What Is the Difference
- Signs Your Coral Bells Need Dividing
- Overwintering Newly Divided Plants
- Creative Ways to Use Your Divisions
- Troubleshooting Division Problems
- Long-Term Care for Divided Coral Bells
- Conclusion
Why Dividing Coral Bells Matters for Your Garden
If you have grown coral bells for a few seasons, you have probably noticed the center of the plant getting a bit woody and bare. That is completely normal. These beautiful perennials, also known as heuchera, naturally grow outward from the center. Over time, the middle dies back while the outer edges stay fresh and vibrant. Learning how to divide coral bells plant properly solves this problem and gives you more plants for free.
I remember the first time I divided my coral bells. I was nervous about damaging the roots. But the process turned out to be straightforward, and the results were amazing. The divided sections bounced back quickly and filled in bare spots in my shade garden. Now I divide them every few years as part of my regular garden routine. Once you understand the timing and technique, you will feel confident doing it too.
When Is the Best Time to Divide Coral Bells
Spring Division Advantages
Early spring is an excellent time for dividing coral bells. The soil is warming up, but the plant has not put out much new growth yet. This means less stress on the foliage. Aim for when you see the first new leaves emerging from the crown. In most zones, this falls between March and April. The plant has the entire growing season ahead to establish strong roots before winter arrives.
Visual guide about How to Divide Coral Bells Plant
Image source: images.ctfassets.net
Spring division also lets you see the plant structure clearly before the leaves get large. You can easily identify where to make your cuts. Just make sure the ground is not frozen or waterlogged. Working wet soil damages its structure and compacts around the roots.
Fall Division Benefits
Early fall works beautifully too, especially in zones 5-8. Target September through early October. The soil is still warm from summer, which encourages root growth. Cooler air temperatures reduce water loss through the leaves. The plant can focus energy on root establishment rather than top growth.
Give your divisions at least 6-8 weeks before your average first frost date. This buffer ensures they anchor in before the ground freezes. In warmer zones 9-10, you have a longer window. Fall-divided plants often show stronger spring growth because they spent winter developing roots.
Times to Avoid Division
Summer division is risky. High heat and intense sun stress the plant while it tries to regrow roots. If you must divide in summer, provide shade cloth and water daily. Winter division does not work in cold climates because the ground is frozen. In mild winter areas, the plant is semi-dormant and won’t root well until spring.
Tools and Materials You Need
Essential Tools for Clean Division
Having the right tools makes how to divide coral bells plant much easier and protects the plant from damage. Start with a sharp garden spade or shovel. A clean, sharp edge slices through roots cleanly rather than tearing them. Dull tools crush root tissue and invite disease. Clean your spade with rubbing alcohol or a 10% bleach solution before starting, especially if you have divided other plants recently.
A garden knife or hori hori knife is invaluable for separating crowns. Its serrated edge saws through tough root masses. For smaller divisions, a clean pair of pruning shears works well. Have a garden fork on hand too. It helps lift the plant with less root damage than a spade alone.
Preparation Materials
Prepare your planting sites before you dig up the mother plant. Have compost or well-rotted manure ready to amend the soil. Coral bells love rich, well-draining soil with plenty of organic matter. A bucket or wheelbarrow helps transport divisions. Keep a watering can or hose nearby. You will want to water each division immediately after planting.
Gather some mulch — shredded leaves, pine bark, or straw work well. Avoid heavy mulches that mat down and hold moisture against the crown. Label stakes and a permanent marker help you track different varieties if you are dividing multiple cultivars.
Step-by-Step Guide to Dividing Coral Bells
Step 1: Water the Plant Thoroughly
Water the coral bells deeply the day before you plan to divide. Moist soil holds together better around the roots. It also reduces transplant shock. The plant will be fully hydrated going into the process. If the soil is already moist from recent rain, you can skip this step.
Step 2: Dig Around the Plant
Start digging about 6-8 inches out from the outer leaves. Drive your spade straight down to its full depth. Work your way around the entire plant in a circle. Once you have cut the perimeter, slide the spade under the root ball at an angle. Gently lever the plant up. A garden fork inserted around the edges helps lift without breaking roots.
For large, established clumps, you may need to slice the root ball into halves or quarters while it is still in the ground. This makes lifting manageable. Just be sure each section has plenty of roots and crowns.
Step 3: Clean and Inspect the Root Ball
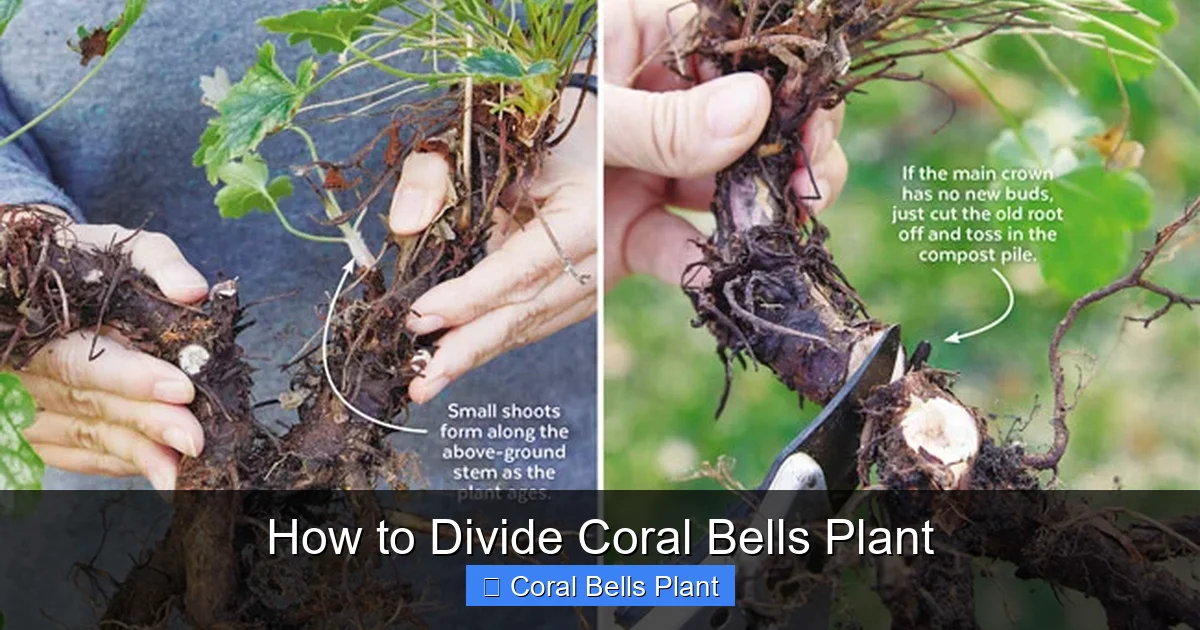
Shake or gently rinse excess soil from the roots. This lets you see the structure clearly. Look for the crowns — the points where leaves emerge from the root system. Healthy crowns feel firm and have plump, white or light tan roots. Discard any sections that are mushy, black, or smell bad. Those indicate rot.
Remove any dead leaves or woody, leafless stems from the center. This old material will not regrow. Removing it now prevents decay from spreading to healthy tissue.
Step 4: Separate Into Divisions
This is the core of how to divide coral bells plant successfully. Pull the crowns apart with your hands where they naturally separate. For tight clusters, use your garden knife to cut between crowns. Each division should have at least 2-3 healthy shoots with a good root system attached. Smaller divisions take longer to fill out. Larger ones establish faster but yield fewer new plants.
Aim for divisions roughly 4-6 inches across. This size balances quick establishment with maximizing plant numbers. Trim any excessively long roots to about 6 inches. This encourages new feeder root growth and makes planting easier.
Step 5: Prepare Planting Holes
Dig holes twice as wide as the root spread and just deep enough so the crown sits at soil level. Mix compost into the removed soil at roughly a 1:3 ratio. Create a small mound in the center of each hole. This supports the crown and lets roots drape downward naturally.
Space divisions 12-18 inches apart depending on the mature size of your variety. Check the plant tag or look up your specific cultivar. Some compact types only need 10 inches. Larger varieties like ‘Palace Purple’ appreciate 18-24 inches.
Step 6: Plant at Correct Depth
This step is critical. Place each division on its soil mound. Spread the roots outward and downward. Backfill with amended soil, firming gently with your fingers — not your foot. The crown must sit at or very slightly above the surrounding soil line. Planting too deep is the number one reason divided coral bells fail. The crown will rot if buried.
If you are unsure, err on the side of slightly high. You can always add a thin layer of soil later if roots become exposed. But you cannot easily fix a buried crown without digging the plant up again.
Step 7: Water and Mulch
Water each division thoroughly after planting. This settles the soil around roots and eliminates air pockets. Apply 1-2 inches of mulch around the plant, keeping it 1-2 inches away from the crown. Mulch conserves moisture, moderates soil temperature, and suppresses weeds. But mulch touching the crown holds moisture and causes rot.
Aftercare for Newly Divided Coral Bells
Watering Schedule
Consistent moisture is key for the first 4-6 weeks. Check soil daily by sticking your finger in 2 inches deep. Water when the top inch feels dry. Do not let the soil dry out completely, but avoid soggy conditions. After new growth appears and the plant resists a gentle tug, you can reduce watering frequency. Established coral bells prefer evenly moist but well-drained soil.
Morning watering is best. It lets foliage dry before evening, reducing fungal disease risk. Water at the base of the plant, not over the leaves. A soaker hose or drip irrigation works perfectly.
Fertilizing New Divisions
Hold off on fertilizer for the first 4-6 weeks. The fresh compost in the planting hole provides enough nutrients. Fertilizing too early can burn tender new roots. Once you see active new growth, apply a balanced, slow-release fertilizer at half the recommended rate. A 10-10-10 or 5-10-5 formula works well. Organic options like compost tea or fish emulsion are gentle and effective.
Monitoring for Stress
Some wilting in the first week is normal, especially on warm days. The roots are not fully functional yet. If wilting persists into the morning, increase watering. Watch for yellowing leaves — this can indicate overwatering or planting too deep. Slugs and snails love tender new growth. Check at night with a flashlight and hand-pick or use organic slug bait.
Common Mistakes to Avoid
Dividing Too Small
Tiny divisions with only one shoot and minimal roots struggle to survive. They have no energy reserves. Each division needs enough root mass to support the foliage while new roots grow. If you have a small plant, wait another year before dividing. Patience yields better results.
Planting Too Deep
I cannot emphasize this enough. The crown must be at soil level. Coral bells have a low-growing crown that rots easily when buried. Even half an inch too deep can cause problems. Check the planting depth by laying your spade handle across the hole — the crown should touch the handle.
Dividing at the Wrong Time
Mid-summer division in hot climates often fails. The plant loses water through leaves faster than damaged roots can absorb it. Late fall division in cold zones does not allow enough root establishment before freezing. Stick to early spring or early fall for the highest success rate.
Skipping Soil Preparation
Coral bells hate heavy clay and pure sand. Both cause problems. Clay holds too much water and suffocates roots. Sand drains too fast and lacks nutrients. Amend your soil with compost regardless of your soil type. It improves structure, drainage, and fertility all at once.
Neglecting Aftercare
The work is not done when the plant is in the ground. Those first 6 weeks are critical. Set a reminder on your phone to check moisture daily. A few minutes of attention now prevents losing the division later.
Special Considerations for Different Varieties
Large-Leaved Varieties
Varieties like ‘Palace Purple,’ ‘Bronze Wave,’ and ‘Mocha’ have larger leaves and more vigorous root systems. They tolerate division well and bounce back quickly. You can make slightly larger divisions from these. They also handle a bit more sun if kept moist.
Compact and Miniature Types
Small varieties like ‘Petite Pearl Fairy,’ ‘Little Cutie’ series, and ‘Berry Smoothie’ have finer root systems. Be extra gentle when separating. Make divisions a bit larger to ensure enough roots. These types are more sensitive to planting depth errors.
Ruffled and Fancy-Leaved Cultivars
Heavily ruffled varieties like ‘Caramel,’ ‘Peach Flambe,’ and ‘Fire Alarm’ are prized for their foliage. They can be slower to establish after division. Give them extra attention to watering and shade during the first month. Avoid dividing these in fall in zones 4-5 — spring is safer.
Propagating vs. Dividing: What Is the Difference
Dividing creates clones of the parent plant. Every division is genetically identical. This is the only way to preserve a specific cultivar’s traits. Seed propagation produces variable offspring. The seedlings will not look exactly like the parent. If you want more of that exact ‘Obsidian’ or ‘Lime Rickey,’ division is your method.
Division also gives you mature-sized plants much faster. Seed-grown coral bells take 2-3 years to reach flowering size. Divisions often bloom the same season or the next. For gardeners wanting quick impact, division wins hands down.
Signs Your Coral Bells Need Dividing
Center Die-Out
The classic sign is a donut shape — healthy growth around the edges, dead center. This happens because the plant grows outward. The oldest part in the middle becomes woody and stops producing leaves. Division resets the clock.
Reduced Vigor and Flowering
If your plant produces fewer flower spikes each year, or the leaves look smaller and less colorful, it may be overcrowded. The roots are competing for limited resources. Division gives each section fresh soil and space.
Plant Heaving Out of Ground
In freeze-thaw cycles, the woody crown can push upward. You see the base of the plant above soil level. This exposes roots to drying and freezing. Division and replanting at correct depth fixes this.
Overcrowding Neighbors
Coral bells spread slowly but steadily. After 3-4 years, they may encroach on nearby plants. Division controls their footprint and keeps your garden design intentional.
Overwintering Newly Divided Plants
Fall Division Winter Protection in Cold Zones
If you divided in early fall in zones 3-5, extra winter protection helps. After the ground freezes, apply 3-4 inches of loose mulch like straw or shredded leaves over the crown. This prevents freeze-thaw cycles from heaving the shallow roots. Remove the heavy mulch gradually in early spring as temperatures rise.
Do not apply heavy mulch before the ground freezes. It keeps the soil warm and delays dormancy, making the plant more susceptible to cold damage. Wait for hard freeze.
Container Divisions
Divisions potted up for spring planting or sharing need winter protection too. In zones 6 and colder, sink pots into the ground or group them in a sheltered spot. Mulch heavily around the pots. An unheated garage works if it stays above 20°F. Water monthly if the soil is not frozen.
Creative Ways to Use Your Divisions
Expand Your Shade Garden
Coral bells thrive in part shade to full shade. Use divisions to fill bare spots under trees, along north-facing foundations, or in woodland gardens. Their colorful foliage brightens dark areas all season.
Create a Foliage Tapestry
Mix different coral bells varieties for a tapestry effect. Combine purple, chartreuse, caramel, and silver-leaved types. The contrasting colors and textures create a living mosaic. Space them 12 inches apart for a dense mat.
Container Gardens
Smaller divisions work beautifully in containers. Pair them with ferns, hostas, or trailing plants like creeping jenny. Use a high-quality potting mix with perlite for drainage. Containers let you move the color where you need it.
Share with Friends
Extra divisions make wonderful gifts. Pot them in decorative containers with a care tag. Gardeners love receiving named varieties. It is a great way to connect with fellow plant lovers.
Troubleshooting Division Problems
Divisions Wilt and Do Not Recover
If a division wilts and stays wilted after 2 weeks despite proper watering, check the roots. Gently dig it up. Black, mushy roots indicate rot — usually from planting too deep or overwatering. Dry, brittle roots mean it dried out. Trim dead tissue, replant at correct depth, and adjust watering. Sometimes a division just does not have enough root mass. Learn from it and make larger divisions next time.
No New Growth After a Month
In spring, you should see new leaves within 3-4 weeks. In fall, growth may be minimal until spring. If absolutely nothing happens by the expected time, the crown may have been damaged during division. Check for firmness. A mushy crown will not recover. A firm crown may just be slow — give it more time.
Leaves Turn Yellow or Brown
Yellowing lower leaves often mean overwatering or poor drainage. Reduce watering and check that soil drains well. Brown crispy edges suggest underwatering or too much sun. Increase water and provide afternoon shade. Fertilizer burn shows as brown leaf tips — flush soil with water and hold off on feeding.
Long-Term Care for Divided Coral Bells
Annual Maintenance
Once established, divided coral bells need minimal care. Remove spent flower stalks to redirect energy to foliage. In late winter or early spring, cut back any tattered evergreen leaves before new growth emerges. This keeps the plant tidy and reduces disease carryover.
Mulch Renewal
Refresh mulch annually in spring. Maintain that 1-2 inch layer, keeping it off the crown. As mulch breaks down, it feeds the soil. This mimics the forest floor conditions coral bells love.
Plan for Next Division
Mark your calendar for 3-4 years from now. Healthy coral bells will be ready to divide again. You will have even more plants to work with. It is a cycle that keeps your garden vibrant and your plant collection growing.
Conclusion
Learning how to divide coral bells plant is one of the most rewarding skills a gardener can master. It turns one healthy plant into several, rejuvenates aging specimens, and costs nothing but a little time and effort. The keys are simple: choose the right season, use clean tools, plant at the correct depth, and provide consistent aftercare.
Do not be intimidated if this is your first time. Coral bells are forgiving plants. Even if a division does not make it, the mother plant usually survives, and you gain experience for next time. Most gardeners find their success rate improves quickly. By your second or third division session, you will be confidently multiplying your collection.
Your shade garden will thank you. Those colorful mounds of foliage — whether deep purple, bright lime, warm caramel, or frosty silver — will fill in beautifully. And you will have the satisfaction of knowing you propagated them yourself. Happy dividing!
Frequently Asked Questions
How often should I divide my coral bells plants?
Divide coral bells every 3-4 years to maintain vigor and prevent center die-out. Signs it is time include a woody, bare center, reduced flowering, or the plant heaving out of the ground.
What tools do I need to divide coral bells successfully?
You need a sharp garden spade or shovel, a garden knife or hori hori for separating crowns, a garden fork for lifting, and clean pruning shears. Sanitize tools with alcohol or bleach solution before use.
Can I divide coral bells that are growing in containers?
Yes, container-grown coral bells divide the same way. Tip the plant out, separate crowns, and repot divisions in fresh potting mix. Ensure containers have drainage holes and use well-draining mix.
Why did my divided coral bells rot after planting?
The most common cause is planting the crown too deep. Coral bells crowns must sit at soil level. Buried crowns trap moisture and rot. Poor drainage and overwatering also contribute to rot.
Will divided coral bells bloom the same year?
Spring divisions often bloom the same season, though possibly with fewer flower spikes. Fall divisions typically bloom the following spring. The plant focuses energy on root establishment first.
Can I divide coral bells by just pulling them apart with my hands?
For loose crowns, yes — gently pull apart by hand where they naturally separate. For tight, woody centers, use a clean garden knife to cut between crowns. Avoid tearing roots.