How to Prevent Cacti Root Rot
Cacti root rot is the number one killer of these resilient plants, but it is entirely preventable with the right knowledge. This guide covers everything from choosing the perfect gritty soil mix and mastering the “soak and dry” watering method to spotting early warning signs like mushy stems and yellowing bases. Follow these steps to keep your desert dwellers thriving for decades.
Key Takeaways
- Use gritty, fast-draining soil: Standard potting soil holds too much moisture; amend with perlite, pumice, or coarse sand for optimal drainage.
- Master the “soak and dry” method: Water deeply only when the soil is completely bone-dry to mimic natural desert rainfall patterns.
- Choose pots with drainage holes: Never plant cacti in containers without holes; terracotta pots are ideal because they wick away excess moisture.
- Provide bright light and airflow: Strong light speeds up evaporation, and good air circulation prevents fungal spores from settling.
- Adjust care by season: Drastically reduce or stop watering during winter dormancy when the plant is not actively growing.
- Inspect roots during repotting: Check for brown, mushy roots annually; trim damaged tissue with sterile tools and let cuts callus before replanting.
- Act fast at the first sign of rot: If the base turns yellow or feels soft, unpot immediately, cut away rot, treat with fungicide, and reroot in dry medium.
Quick Answers to Common Questions
How often should I water my cactus to prevent root rot?
Water only when the soil is completely dry to the bottom of the pot, which typically means every 10-14 days in summer and every 4-6 weeks (or not at all) in winter. Always use the chopstick test rather than a fixed schedule.
What is the best soil mix to prevent cacti root rot?
A gritty mix of 60-80% inorganic material (pumice, perlite, coarse sand) and 20-40% organic matter (pine bark fines, coconut coir) provides the fast drainage and aeration essential for preventing rot.
Can I save a cactus that already has root rot?
Yes, if caught early. Unpot the plant, wash roots, cut away all mushy brown tissue with sterile tools, dust cuts with sulfur or cinnamon, let the wounds callus for days to weeks, then reroot in barely moist pure pumice.
Do cacti need drainage holes in their pots?
Absolutely. Never plant cacti in containers without drainage holes. Without an exit for excess water, the bottom soil stays saturated, creating the anaerobic conditions that cause root rot.
Why is my cactus rotting even though I water it very little?
Small, frequent sips keep the soil constantly damp without flushing salts. The soil mix may be too organic (peat-based), the pot may lack drainage, or the plant may lack sufficient light and airflow to drive evaporation.
📑 Table of Contents
- Introduction: The Silent Killer in Your Pot
- Understanding What Root Rot Actually Is
- Building the Perfect Drainage Foundation
- Mastering the Art of Watering
- Choosing the Right Pot and Placement
- Proactive Maintenance and Inspection
- Environmental Controls for High-Risk Situations
- Emergency Triage: Saving a Rotting Cactus
- Conclusion: Thriving, Not Just Surviving
Introduction: The Silent Killer in Your Pot
You bought a beautiful cactus. You placed it on the sunniest windowsill. You watered it faithfully every week because you wanted to take good care of it. Then, one day, you noticed the base turning a sickly yellow-brown. It felt squishy. A foul smell rose from the soil. Your heart sank. You have just met cacti root rot, the most common cause of death for these tough plants.
The irony is painful. Cacti survive scorching deserts, months without rain, and poor soil. Yet, they often die in our living rooms from too much love. Overwatering is the culprit in 90 percent of cases. The good news? Root rot is almost entirely preventable. You do not need a green thumb. You just need to understand what these plants actually want. They want neglect. They want grit. They want to dry out completely.
In this comprehensive guide, we will walk through every strategy to prevent cacti root rot before it starts. We will cover soil science, watering schedules, pot selection, environmental controls, and emergency triage. Whether you are a beginner with a single mammillaria or a collector with a greenhouse full of rare astrophytums, these principles will keep your collection healthy. Let us dig in.
Understanding What Root Rot Actually Is
The Science Behind the Rot
Root rot is not a single disease. It is a condition caused by several soil-borne pathogens. The main villains are fungi like Pythium, Phytophthora, Rhizoctonia, and Fusarium. Bacteria like Erwinia can join the party too. These organisms exist in almost all soil. They are usually harmless. They become killers only when conditions favor them.
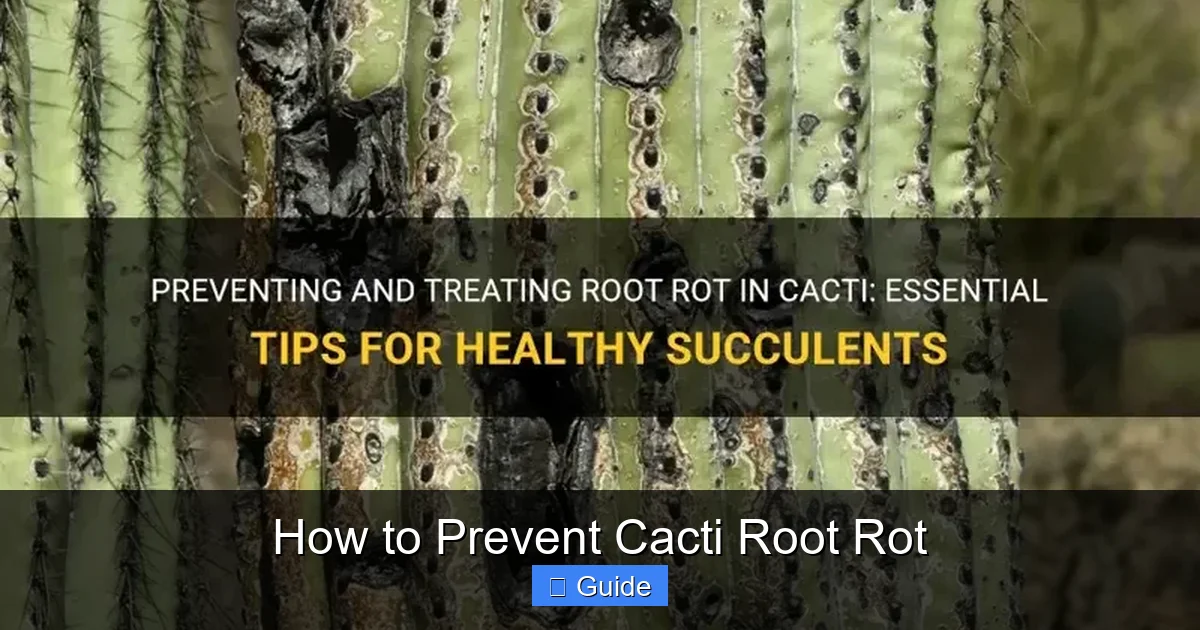
Visual guide about How to Prevent Cacti Root Rot
Image source: shuncy.com
What conditions? Standing water. Low oxygen. When soil stays wet, air pockets disappear. Cactus roots need oxygen to respire. Without it, they suffocate and die. Dead tissue becomes a buffet for pathogens. The fungi produce swimming spores called zoospores. They move through water films between soil particles. They infect healthy roots nearby. The rot spreads upward into the stem. By the time you see symptoms above ground, the root system is often destroyed.
Why Cacti Are Uniquely Vulnerable
Most houseplants come from rainforests or temperate zones. They evolved in moist, organic-rich soil. Their roots expect constant moisture. Cacti are different. They come from arid regions. Their roots are adapted to grab water fast during rare rains. Then they expect the soil to dry completely within days. Their root cortex stores water. Their epidermis is thick to prevent loss. They have no defense against constant dampness.
When we pot them in moisture-retentive peat-based soil, we create a swamp. The roots cannot handle it. They rot. Understanding this evolutionary mismatch is the first step to prevention. You are not growing a typical houseplant. You are growing a desert specialist. Treat it like one.
Early Warning Signs You Must Not Ignore
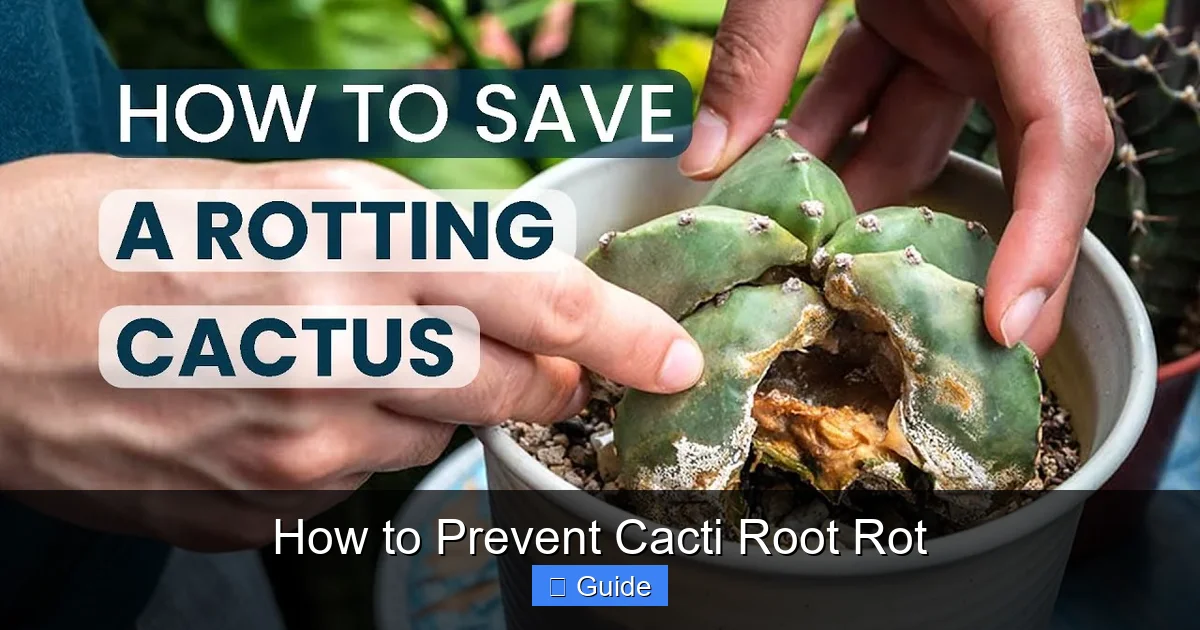
Catching rot early saves the plant. Watch for these signals. The soil stays damp for more than three days after watering. The pot feels heavy. The base of the cactus turns yellow, then brown. The skin looks wrinkled but feels soft, not firm. A faint musty or swampy smell comes from the drainage holes. The plant leans or becomes unstable in the pot. New growth is stunted, pale, or deformed. If you see any of these, unpot immediately and inspect roots. Healthy roots are white or light tan, firm, and crisp. Rotted roots are brown, black, mushy, and slip off the central core when tugged.
Building the Perfect Drainage Foundation
Why Standard Potting Soil Fails
Walk into any garden center. You will see bags labeled “Cactus Soil.” Read the ingredients. Most are peat moss, compost, and a little sand. Peat moss is the enemy. It holds 20 times its weight in water. Once it dries completely, it becomes hydrophobic. It repels water. Then you water again. The water runs down the sides of the pot. The root ball stays dry. You think it is watered. You water more. The bottom stays soggy. This cycle creates the perfect storm for cacti root rot.
Compost and forest products break down fast. They compact. They eliminate air pockets. They feed fungi. You need a mix that mimics desert alluvial fans. Think rocky washes. Think grit. Think air.
The Ideal Gritty Mix Recipe
There is no single perfect recipe. But the principle is universal. You want 60 to 80 percent inorganic grit. The remaining 20 to 40 percent can be organic matter. Here is a reliable starter mix. Two parts pumice or perlite. One part coarse sand (not play sand). One part pine bark fines or coconut coir. Pumice is heavier than perlite. It stays in the pot. It provides trace minerals. Perlite floats to the top over time. Both work. Coarse sand means particles 2 to 4 millimeters. Poultry grit works. Crusher run works. Avoid fine sand. It creates concrete. Pine bark fines hold some moisture but drain well. Coconut coir is a peat alternative. It rewets easier.
Mix it in a wheelbarrow or large tub. Wear a mask. Dust is irritating. Wet the mix slightly to bind dust. Fill your pots. Do not add a layer of gravel at the bottom. That creates a perched water table. It raises the saturation zone closer to the roots. Just use the same mix top to bottom.
Testing Your Mix Before Planting
Do a simple test. Fill a clear plastic cup with your moist mix. Poke holes in the bottom. Water it thoroughly. Watch how fast it drains. It should run out in seconds. Not minutes. Seconds. Tip the cup. The mix should not clump. It should crumble. Squeeze a handful. It should fall apart when you open your hand. If it forms a ball, add more grit. This test saves you from discovering bad drainage after your prized cactus is potted.
Mastering the Art of Watering
The “Soak and Dry” Method Explained
Forget schedules. Forget “once a week.” Forget “one cup per plant.” The only rule that matters: Water only when the soil is completely dry. Not mostly dry. Not dry on top. Bone dry all the way to the bottom. How do you know? Use a wooden chopstick. Push it to the bottom. Leave it for a minute. Pull it out. If it comes out clean and dry, water. If any soil sticks, wait. A moisture meter works too. But cheap ones are unreliable. The chopstick never lies.
When you water, water thoroughly. Place the pot in a sink or tub. Run water through the soil until it pours out the bottom holes. Let it drain completely. Do not let the pot sit in a saucer of water. Empty the saucer. This deep watering encourages roots to grow deep. Shallow sips encourage shallow roots. Shallow roots dry fast but also rot fast. Deep roots are resilient.
Seasonal Adjustments Are Critical
Cacti have a growing season and a dormant season. For most, spring and fall are active growth. Summer can be too hot. Winter is rest. During active growth, the dry cycle might be 7 to 14 days. During dormancy, it might be 4 to 8 weeks. Some desert cacti need zero water from November to March. Research your specific species. A generic schedule kills plants. Keep a journal. Note when you water. Note the weather. Note the plant response. Patterns emerge. You will learn your plants’ rhythm.
Water Quality Matters More Than You Think
Tap water varies. Hard water leaves mineral salts. These build up in soil. They burn roots. They raise pH. Cacti prefer slightly acidic soil (pH 5.5 to 6.5). High pH locks out nutrients. If your tap water is very hard, consider rainwater. Or distilled water. Or reverse osmosis water. Let tap water sit overnight to off-gas chlorine. Better yet, use a filter. Avoid softened water. Sodium is toxic to cacti. Water temperature matters too. Ice water shocks roots. Use room temperature water. Warm water in winter prevents cold shock.
Choosing the Right Pot and Placement
Terracotta vs. Plastic vs. Glazed Ceramic
Pot material changes everything. Unglazed terracotta is the gold standard. It is porous. Water evaporates through the walls. This pulls moisture from the soil. It creates a gentle airflow around the root zone. It keeps roots cooler in summer. It is heavy, so tall cacti do not tip over. The downside? It dries fast. You water more often. It breaks if dropped. Salt crusts form on the outside. That is actually good. It means salts are leaving the soil.
Plastic pots retain moisture. They are light. They are cheap. They are fine for very gritty mixes in humid climates. But they increase rot risk. Glazed ceramic is pretty but non-porous. It acts like plastic. If you love the look, use it as a cache pot. Keep the cactus in a terracotta pot inside. Never, ever use a pot without drainage holes. No exceptions. No “I will be careful.” Drill holes if you must. A diamond drill bit costs ten dollars. A dead cactus costs more.
Pot Size: The Goldilocks Rule
Bigger is not better. A pot too large holds excess soil. That soil stays wet. The roots cannot reach it. It becomes a anaerobic zone. Pathogens thrive. Choose a pot just 1 to 2 inches wider than the root ball. For slow growers like Ariocarpus or Lophophora, even less. Shallow pots are often better than deep ones. Cactus roots spread laterally. Deep pots leave a wet bottom zone. Azalea pots or bulb pans work well. They are wider than tall.
Location, Light, and Airflow
Light drives photosynthesis. Photosynthesis drives water uptake. A cactus in low light uses less water. The soil stays wet longer. Rot risk skyrockets. Give your cacti the brightest light you have. South-facing windows are best. East or west works. North is usually too dim. Outdoors is best of all. Morning sun plus afternoon shade is ideal for many. Acclimate slowly to prevent sunburn.
Airflow is the unsung hero. Moving air evaporates surface moisture. It prevents fungal spores from settling. It strengthens plant tissue. A small fan on low, running a few hours a day, works wonders in a crowded grow shelf. Space your pots. Do not let them touch. Touching leaves trap moisture. Pests spread. Rot spreads. Give them breathing room.
Proactive Maintenance and Inspection
The Annual Repotting Ritual
Repotting is not just for size upgrades. It is a health check. Do it every 12 to 18 months. Early spring is best. The plant is waking up. It will heal fast. Gently remove the plant. Use tongs or rolled newspaper for spiny ones. Shake off old mix. Inspect every root. Healthy roots are firm, white to tan. Trim any brown, black, hollow, or mushy roots. Use sterilized scissors. Wipe blades with isopropyl alcohol between cuts. Dust cuts with cinnamon powder or sulfur. Both are natural antifungals. Let the plant sit bare-root in shade for 3 to 7 days. This allows cuts to callus. Callusing is essential. Planting wet wounds invites infection.
Top Dressing: Beauty and Function
Top dressing is a layer of decorative gravel on the soil surface. It looks clean. It prevents perlite from floating. It deters fungus gnats. It reflects light up into the plant. It keeps the crown dry. The crown is where stem meets soil. It is the most rot-prone spot. Use pea gravel, crushed granite, or aquarium gravel. Avoid organic mulches like bark. They hold moisture against the stem. Keep the top dressing 1/2 inch back from the stem. Do not bury the cactus deeper.
Fertilizing Without Inviting Rot
Fertilizer salts accumulate. They burn roots. Burned roots rot. Use a low-nitrogen cactus fertilizer. Something like 2-7-7 or 1-7-6. Dilute to quarter strength. Fertilize only during active growth. Maybe 2 to 3 times per season. Never fertilize a dry plant. Water first. Then fertilize. Never fertilize a sick or newly repotted plant. Flush the pot monthly. Run extra water through to leach salts. This prevents buildup. It mimics desert flash floods.
Environmental Controls for High-Risk Situations
Managing Humidity and Rain
Humidity is a rot accelerator. High humidity slows evaporation. Soil stays wet. Fungal spores germinate. If you live in a humid climate (Florida, Gulf Coast, tropics), you must compensate. Use grittier mix. 80 to 90 percent inorganic. Use smaller pots. Use terracotta. Increase airflow with fans. Grow under cover. A clear polycarbonate roof keeps rain off but lets light in. Move plants under eaves during rainy spells. Do not let them sit in saucers of rainwater.
Cold and Wet: The Deadly Combo
Cold wet soil is a death sentence. Cactus roots stop functioning below 50°F (10°C). They cannot take up water. The water just sits. Pathogens love cool dampness. If you have cold winters, keep cacti dry. Bone dry. Many species survive freezing if dry. Wet roots freeze and burst. This is why winter watering is usually zero. If you must water in winter (some winter growers like Conophytum), do it on a warm sunny morning. Soil must dry by nightfall.
Greenhouse and Grow Tent Strategies
Enclosed spaces trap humidity. Ventilation is non-negotiable. Exhaust fans. Intake vents. Circulation fans. Aim for air exchange every few minutes. Horizontal airflow fans (HAF) keep air moving at plant level. This dries the boundary layer on leaves and soil. Monitor humidity with a hygrometer. Target 30 to 50 percent. Use a dehumidifier if needed. Space plants. Benches with wire mesh tops allow air under pots. This dries the bottom fastest.
Emergency Triage: Saving a Rotting Cactus
Surgery: Cut, Clean, Callus
You found rot. Do not panic. Act fast. Unpot the plant. Wash all soil off roots. Use a hose sprayer. Be gentle but thorough. You must see all damage. Sterilize a sharp knife or pruning shears. Flame or alcohol. Cut away all brown, black, mushy tissue. Cut into healthy green tissue by at least 1/4 inch. If the rot is in the main stem, you may need to behead the plant. Cut the top off above the rot. Discard the bottom. The top is a cutting now. Dust all cuts with sulfur or cinnamon. Lay the plant on its side in a dry, shaded, airy spot. Do not pot it. Do not water it. Wait. Small cuts callus in 3 to 5 days. Large beheadings need 2 to 4 weeks. The cut must be hard, dry, and slightly concave. Only then can it root.
Rerooting in Pure Pumice
Once callused, place the cutting in barely moist pure pumice. Or perlite. Or coarse sand. No organic matter. No nutrients. Just sterile moisture holder. Do not water. Mist the surface lightly every few days. Roots will seek moisture. They emerge in 2 to 8 weeks depending on species and season. Tug gently to test. Resistance means roots. Once rooted, transition to your standard gritty mix. Water sparingly at first. The new root system is fragile.
When to Say Goodbye
Sometimes the rot wins. If the rot reaches the growing point (apex), the plant cannot be saved. If the entire root ball is mush, it is gone. If the stem collapses entirely, it is over. Do not keep a rotting plant near healthy ones. Spores spread. Bag it. Trash it. Do not compost. Clean the pot with 10 percent bleach. Rinse well. Learn the lesson. Move on. Every grower loses plants. The best growers lose fewer because they learn from each loss.
Conclusion: Thriving, Not Just Surviving
Preventing cacti root rot is not about luck. It is about replicating the desert in a pot. Fast drainage. Deep, infrequent water. Bright light. Moving air. Cool, dry winters. Respect the biology. These plants have survived millions of years in the harshest places on Earth. They know how to live. Our job is to get out of their way. Stop killing them with kindness. Give them grit. Give them drought. Give them sun.
Start today. Check your soil. Check your pots. Check your watering habit. Make one change. Maybe swap to terracotta. Maybe add more pumice. Maybe buy a chopstick. Small changes compound. A year from now, your cacti will be plumper, brighter, flowering more. You will see new spines. You will see growth. That is the reward. Not just survival. Thriving. And when a friend asks why their cactus turned to mush, you will know exactly what to say. “It is not the water you gave it. It is the water you did not let leave.”
Happy growing. May your roots stay white and your crowns stay dry.
Frequently Asked Questions
What are the first visible signs of cacti root rot?
The first signs are usually a yellowing or browning base that feels soft or mushy to the touch, soil that stays damp for days, a musty smell from the pot, and a plant that becomes wobbly or leans in its container.
Can I use regular potting soil for cacti if I water less?
No, regular potting soil retains too much moisture and compacts over time, creating anaerobic conditions even with infrequent watering. You must amend it heavily with pumice, perlite, or coarse sand to create a suitable fast-draining mix.
Is terracotta better than plastic for preventing root rot?
Yes, unglazed terracotta is superior because its porous walls allow moisture to evaporate through the sides of the pot, increasing airflow to the root zone and significantly reducing the risk of waterlogged soil.
Should I water my cactus during winter dormancy?
Most desert cacti should receive zero water during winter dormancy (typically November through March). Keeping them completely dry and cool mimics their natural cycle and prevents cold, wet soil conditions that cause rot.
Can a cactus recover from root rot on its own?
No, a cactus cannot recover from active root rot without intervention. The rot will continue spreading upward through the stem. You must surgically remove all infected tissue, let the wounds callus, and reroot the healthy portion.
Does top dressing with gravel help prevent root rot?
Yes, a layer of inorganic gravel (top dressing) keeps the crown of the cactus dry, prevents lightweight perlite from floating, deters fungus gnats, and reflects light, but it does not replace the need for a fast-draining soil mix throughout the pot.