How Far Apart Should Coral Bells Be Planted
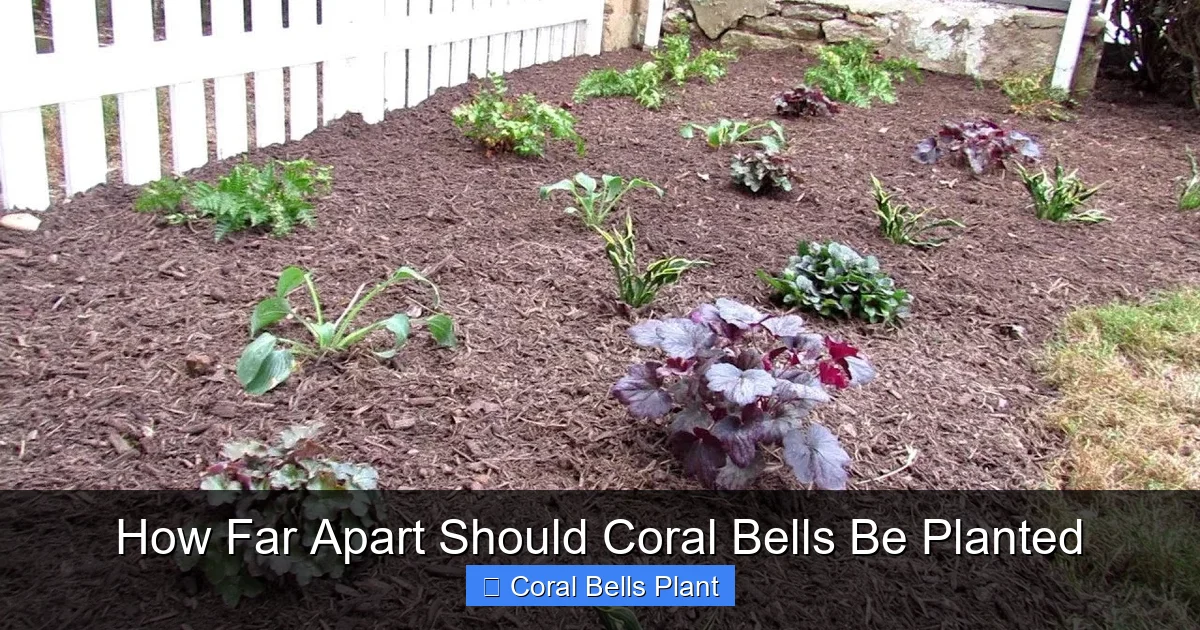
Coral bells (Heuchera) should typically be planted 12 to 18 inches apart to allow for mature spread and good air circulation. Spacing varies by variety with compact types needing less room and larger cultivars requiring more space for optimal health and visual impact.
You just brought home a flat of gorgeous coral bells. Their ruffled leaves shimmer in shades of caramel, purple, lime, and silver. You can already picture them lining your shady path or spilling over a rock wall. But then the question hits you. How far apart should coral bells be planted? It seems simple, but the answer makes all the difference between a thriving tapestry and a struggling, crowded mess.
I have been there. Standing in the garden with a trowel in hand, wondering if I should tuck them close for instant impact or give them room to breathe. The truth is, coral bells are forgiving, but they have preferences. Get the spacing right from the start, and you save yourself years of extra work. You avoid fungal issues. You reduce the need for constant dividing. And you let each plant show off its true form. Let us walk through everything you need to know about spacing these shade garden superstars.
Key Takeaways
- Standard spacing is 12 to 18 inches: Most coral bells varieties thrive when planted at this distance for proper air flow and growth.
- Check the plant tag for mature width: Specific cultivars can range from 8 inches to over 24 inches wide at maturity.
- Closer spacing creates faster ground cover: Planting 10 to 12 inches apart fills in quickly but may require division sooner.
- Wider spacing reduces disease risk: Giving plants 18 to 24 inches improves air circulation and lowers humidity around foliage.
- Container planting needs less space: In pots, coral bells can be placed 6 to 8 inches apart for a lush, full look.
- Consider companion plants when spacing: Leave room for neighboring perennials and their root systems to coexist peacefully.
- Divide clumps every 3 to 4 years: Regular division maintains vigor and prevents overcrowding in established plantings.
Quick Answers to Common Questions
What is the standard spacing for planting coral bells?
The standard spacing for coral bells is 12 to 18 inches apart, measured from crown to crown, which accommodates the mature width of most varieties and ensures good air circulation.
Can I plant coral bells closer together for faster ground cover?
Yes, you can plant them 10 to 12 inches apart for quicker coverage, but this increases the risk of fungal diseases and requires more frequent division every 2 to 3 years.
How far apart should coral bells be planted in containers?
In containers, coral bells can be spaced 6 to 8 inches apart for a full, lush display since they will not reach full garden maturity and are typically replaced or divided annually.
Does spacing change for different coral bells varieties?
Absolutely. Compact varieties like ‘Petite Pearl Fairy’ need only 8 to 10 inches, while large cultivars like ‘Brownies’ or ‘Grande’ series require 20 to 24 inches. Always check the plant tag for mature spread.
What happens if coral bells are planted too close together?
Overcrowding leads to poor air circulation, increased humidity, fungal diseases like powdery mildew, crown rot, leggy growth, and the need for premature division.
📑 Table of Contents
- Understanding Coral Bells Growth Habits
- The Golden Rule: 12 to 18 Inches Apart
- Spacing for Specific Design Goals
- Container Spacing: A Different Ballgame
- Common Spacing Mistakes to Avoid
- Adjusting Spacing for Climate and Conditions
- Measuring and Layout Techniques
- Care After Planting: The First Year
- Long-Term Management: Division and Renovation
- Companion Planting and Spacing Synergy
- Special Situations: Slopes, Walls, and Edges
- Buying Tips: Reading Labels and Asking Questions
- Designing with Color and Spacing
- Troubleshooting Spacing Issues
- Frequently Asked Questions About Coral Bells Spacing
- Conclusion: Space for Success
Understanding Coral Bells Growth Habits
Before we talk numbers, we need to understand the plant. Coral bells, or Heuchera, are clump-forming perennials. They grow from a central crown. Leaves radiate outward in a mound. Flower spikes rise above the foliage in late spring to summer. The key word here is mound. They do not run underground like mint. They do not spread aggressively by rhizomes. They simply get wider each year as the crown expands.
Mature Size Varies Wildly by Variety
This is the single biggest factor. A tiny ‘Petite Pearl Fairy’ might top out at 8 inches wide. A robust ‘Brownies’ or ‘Grande’ series cultivar can sprawl to 24 inches or more. Most common garden varieties fall in the 12 to 18 inch range. Always check the plant tag. It lists the mature spread. That number is your starting point for spacing. If the tag says 14 inches wide, the center of the next plant should be at least 14 inches away. Better yet, add a few inches.
The Crown Tells the Story
Look at the base of the plant. The crown is where stems meet roots. It sits at or just above soil level. As the plant ages, the crown gets woody and rises. It can push itself right out of the ground. This is called “heaving.” Good spacing lets you see the crown. It lets you mulch properly without burying it. Buried crowns rot. Exposed crowns freeze. Proper spacing gives you room to manage this critical zone.
The Golden Rule: 12 to 18 Inches Apart
For the vast majority of coral bells in a standard garden bed, 12 to 18 inches on center is the sweet spot. “On center” means measuring from the center of one plant to the center of the next. This distance accommodates the mature width of most popular cultivars. It allows air to move between plants. It lets light reach the lower leaves. It gives you space to weed and mulch without stepping on crowns.
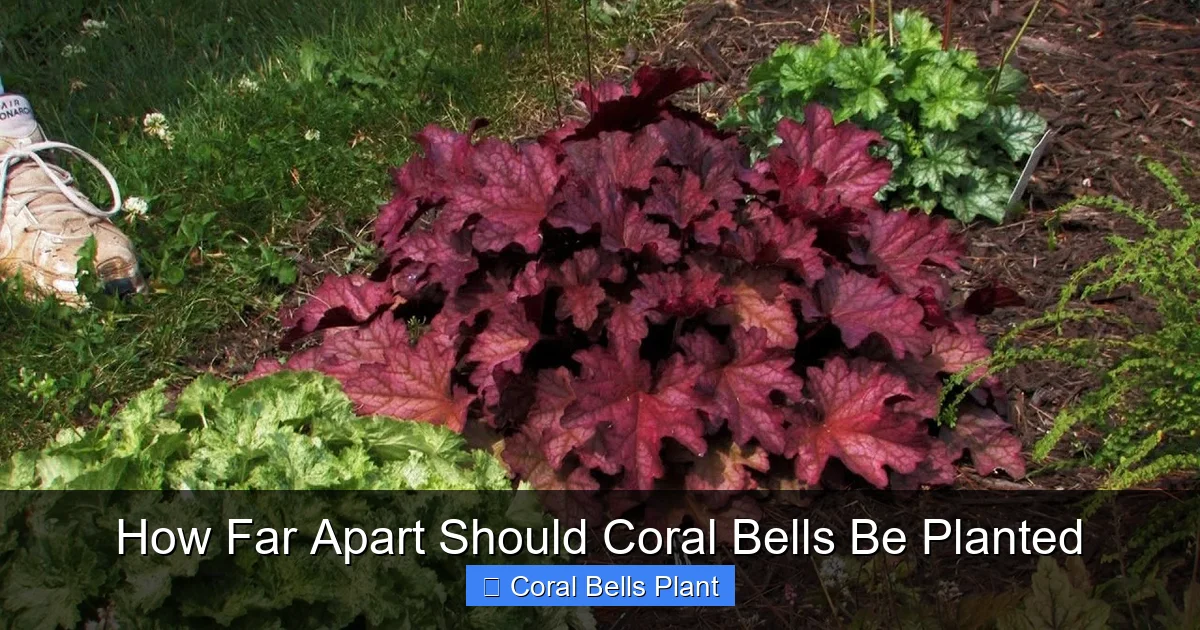
Visual guide about How Far Apart Should Coral Bells Be Planted
Image source: i.ytimg.com
Why 12 Inches Is the Minimum
Planting closer than 12 inches creates problems. The foliage mats together. Air stagnates. Moisture lingers on leaves after rain or watering. This is a perfect recipe for fungal diseases like powdery mildew or rust. Heuchera are prone to these issues in humid, still conditions. Tight spacing also makes it hard to inspect the crown. You cannot see early signs of vine weevil larvae or crown rot. Twelve inches is the absolute floor for healthy long-term growth.
Why 18 Inches Is Often Better
Eighteen inches gives you a buffer. The plants touch at maturity but do not smother each other. Air flows freely. The crowns remain visible. You can slip a hand trowel between them for weeding. This spacing also looks more natural. It mimics how they grow in the wild, as distinct clumps in a woodland matrix. If your variety is listed at 16 inches wide, go with 18. If it is 12 inches wide, 15 to 16 inches works well. Err on the side of slightly wider.
Spacing for Specific Design Goals
Your garden goal changes the math. Are you planting a border? A ground cover? A container? Each scenario shifts the ideal distance.
Mass Planting for Ground Cover
If you want a solid carpet of foliage fast, you can cheat closer. Plant at 10 to 12 inches on center. The leaves will knit together within a single season. Weeds get shaded out quickly. The visual impact is immediate. But know the trade-off. You will need to divide these clumps in two to three years instead of four to five. You must be vigilant about airflow. Water at the base, not overhead. Remove any yellowing leaves promptly. This approach works best with compact, disease-resistant varieties like the ‘Dolce’ series.
Specimen Planting for Foliage Display
Maybe you bought a showstopper like ‘Black Pearl’ or ‘Electric Lime’. You want that perfect mound shape to be the star. Give it 24 to 30 inches of clear space all around. No neighbors crowding its shoulders. This lets the plant achieve its full genetic potential. The symmetry stays intact. The color saturates fully with proper light exposure. It becomes a living sculpture. Use this spacing for focal points in a shade garden or at the front of a border where it can be appreciated up close.
Mixed Border Integration
In a mixed perennial bed, coral bells play a supporting role. They knit the front edge. They hide the bare legs of taller plants behind them. Here, spacing depends on the neighbors. If paired with hostas, leave 18 to 24 inches from the hosta crown. Hostas expand aggressively. If paired with ferns or astilbe, 15 inches works. Visualize the mature width of every plant in the combination. Draw circles on paper. Overlap them slightly. That overlap is where the magic happens. But do not let the circles swallow each other whole.
Rock Gardens and Slopes
On a slope or in a rock garden, drainage is sharp. Plants may stay smaller due to leaner soil and less moisture. You can space at 10 to 14 inches. The good airflow on a slope mitigates disease risk. The rocks keep roots cool. The plants form a living mulch that prevents erosion. Choose varieties bred for heat and sun tolerance if the slope gets afternoon light. ‘Citronelle’ and ‘Lime Rickey’ handle these tough spots well.
Container Spacing: A Different Ballgame
Pots change everything. The root zone is confined. The soil volume is limited. Nutrients and water deplete faster. But you also control the environment completely. For containers, 6 to 8 inches apart is standard. You are creating a temporary, high-impact display. The plants will not reach full garden maturity. They will be replaced or divided annually.
Thriller, Filler, Spiller Formula
In a mixed container, coral bells are usually the “filler.” They mound around the base of a taller “thriller” like a fern grass or small shrub. Plant them 6 inches from the thriller’s base. Plant them 6 inches from each other. Plant trailing “spillers” like creeping jenny or ivy at the pot rim, 4 inches from the coral bells. This tight packing looks lush immediately. It shades the soil, reducing watering needs. Just remember to fertilize monthly and repot next spring.
Single Variety Pots
A pot filled with just one coral bells variety is stunning. Use a 12-inch pot for three plants spaced in a triangle. Use a 16-inch pot for five plants. The centers form an equilateral triangle or a pentagon. This geometric spacing ensures even growth. Rotate the pot weekly so all sides get equal light. The mounds will merge into a perfect dome of color.
Common Spacing Mistakes to Avoid
Even experienced gardeners get this wrong. Here are the pitfalls I see most often, and how to sidestep them.
Planting Too Close to Hardscape
You tuck a coral bell right against the edging stone. Or flush with the sidewalk. Two years later, the crown is spilling onto the pavers. The leaves get shredded by the lawn mower. The roots bake against the hot concrete. Leave a 6 to 8 inch buffer between the plant center and any hard edge. This gives the mound room to expand naturally. It keeps foliage off the hardscape. It makes edging easier.
Ignoring the “In-Between” Years
You space at 18 inches. The bed looks sparse. You see mulch. You panic. You buy more plants to fill the gaps. Stop. Year one sleeps, year two creeps, year three leaps. That gap is temporary. Fill it with annuals like impatiens or begonias if you must. Or use a decorative mulch. Do not add permanent perennials that will fight for root space later. Patience pays off with healthier plants.
Forgetting Root Competition
You plant 18 inches from a mature maple tree. The coral bells struggle. The leaves are small. The color is washed out. Tree roots are stealing water and nutrients. If planting under trees, increase spacing to 24 inches and amend the planting hole heavily with compost. Or better yet, use containers sunk into the ground. This creates a root barrier. Coral bells are tough, but they cannot outcompete a tree.
Measuring From the Pot Edge
You set the pots on the ground. You measure 12 inches from pot rim to pot rim. You plant. But the plant in the pot is off-center. Or the pot is 6 inches wide. The actual crowns are now only 6 inches apart. Always measure from crown to crown. Gently pull back the foliage. Find the center of the plant. That is your measuring point. Use a tape measure. Do not eyeball it. Precision now prevents crowding later.
Adjusting Spacing for Climate and Conditions
Your local weather plays a role. What works in Seattle fails in Atlanta. What works in a cool, coastal garden fails in a hot, inland valley.
Humid Climates Need More Air
In the Southeast, Midwest, or Pacific Northwest, summer humidity is high. Fungal spores love still, damp air. Add 2 to 4 inches to standard spacing. Go for 16 to 22 inches. Prune any leaves that touch a neighbor. Water early in the day so foliage dries fast. Choose mildew-resistant varieties like ‘Caramel’ or ‘Mocha’. Wide spacing is your best defense without chemicals.
Arid Climates Can Go Tighter
In the Southwest or high desert, air is dry. Fungal pressure is low. Plants may stay smaller due to water stress. You can plant at 10 to 14 inches. The foliage creates beneficial shade on the soil. This reduces evaporation. It keeps roots cooler. Just ensure your irrigation delivers water evenly to each root zone. Drip emitters at each plant center work best.
Cold Climates and Frost Heaving
In zones 3 and 4, freeze-thaw cycles push crowns up. Wide spacing lets you see this happening. You can gently press crowns back down in early spring. Mulch heavily after the ground freezes with straw or shredded leaves. Space at 18 inches minimum. This gives you room to apply and remove winter mulch without damaging neighbors. Snow cover is the best insulator. Wide spacing allows snow to drift evenly between plants.
Measuring and Layout Techniques
You have your spacing number. Now how do you actually lay it out in the bed? A few simple tricks make it fast and accurate.
The String Line Method
For straight rows along a path, run a string line. Mark the spacing on the string with a permanent marker. Or use colored zip ties every 12 or 18 inches. Place each plant at a mark. This keeps your row perfectly straight and evenly spaced. It looks professional. It prevents the “drift” that happens when you plant by eye.
The Triangle Grid for Mass Plantings
For large areas, a triangular grid covers ground most efficiently. Plants are equidistant from each other in all directions. Start with a row along one edge. Space at your chosen distance. The next row starts halfway between the first row plants. Offset by half the spacing. The third row aligns with the first. This pattern minimizes gaps and maximizes airflow. It is the same math nature uses in forests.
Using a Spacing Stick
Cut a stick or PVC pipe to your spacing length. 18 inches? Cut it 18 inches. Place the first plant. Lay the stick against its crown. Place the next plant at the stick’s end. Move the stick. Repeat. It is faster than a tape measure. It keeps your hands free for the trowel. Make a few sticks in different lengths for different varieties.
Laying Out in Pots First
Before digging any holes, set the plants in their nursery pots on the bed. Stand back. Look from the house. Look from the street. Look from the patio. Adjust. Step back. Adjust again. Live with the layout for an hour. Check the light at different times. You will see spacing issues you missed on paper. This is the single best way to avoid regret.
Care After Planting: The First Year
Spacing sets the stage. Care writes the play. The first growing season determines long-term success.
Watering for Root Establishment
New plants have roots only in the original pot shape. They cannot reach the surrounding soil yet. Water at the base of each plant. Use a watering can or wand, not a sprinkler. Wet the root ball and the planting hole interface. Do this every 2 to 3 days for the first month. Then weekly. Check soil moisture with your finger. The top inch can dry. The root zone must stay damp. Proper spacing lets you target each plant without waste.
Mulching Without Smothering
Apply 2 inches of shredded bark or leaf mold. Keep mulch 2 inches away from the crown. This is why spacing matters. If plants are too close, you cannot see the crown. You pile mulch against the stems. Rot follows. With good spacing, you see a clear ring around each plant. Mulch conserves moisture. It suppresses weeds. It feeds the soil as it breaks down. But it must not touch the crown.
First Year Fertilizing
Go easy. The planting hole compost is enough for month one. Then apply a balanced slow-release fertilizer. Scatter granules at the drip line, not at the crown. The drip line is where rain falls off the outer leaves. That is where feeder roots grow. Spacing gives you a clear drip line target. If plants are crowded, drip lines overlap. You over-fertilize some roots, miss others.
Long-Term Management: Division and Renovation
Even with perfect spacing, coral bells need division. The crown gets woody. The center dies out. The plant becomes a donut. Flowers diminish. Foliage loses color. Division resets the clock.
When to Divide
Early spring is best. Just as new growth emerges. The plant has stored energy. Cool weather reduces transplant shock. Fall works too, 6 weeks before ground freeze. Divide every 3 to 4 years for standard spacing. Every 2 to 3 years for tight spacing. Every 5 years for wide specimen spacing. Mark your calendar. It is easy to forget.
How to Divide
Dig the whole clump. Lift it gently. Shake off loose soil. Look at the crown. You will see multiple growing points. Each has its own roots. Pull or cut apart with a sharp knife. Each division needs 3 to 5 shoots and a good root mass. Discard the woody center. Replant the vigorous outer sections. Space them at the original distance. Water well. Mulch. They barely skip a beat.
Rejuvenating Overcrowded Beds
Inherited a mess? Plants piled on top of each other? No flowers? Yellow leaves? Dig the whole bed in spring. Amend the soil with compost. Sort the divisions. Keep the best. Compost the rest. Replant at proper spacing. It feels brutal. But the bed will look better in 6 weeks than it has in 6 years. And you will have dozens of free plants for friends or other beds.
Companion Planting and Spacing Synergy
Coral bells shine in company. The right neighbors at the right distances create a community that supports itself.
Shade Perennials with Similar Needs
Hostas, ferns, astilbe, brunnera, hellebores. These share the love of moisture, organic soil, and dappled light. Space coral bells 12 to 18 inches from fern crowns. Ferns arch outward. Give them room. Space 18 inches from hosta eyes. Hostas expand relentlessly. Space 12 inches from brunnera or hellebore crowns. These are clumpers like coral bells. They play nice.
Spring Bulbs for Early Color
Plant daffodils, scilla, or chionodoxa between coral bells in fall. The bulbs bloom in April. Coral bells foliage emerges late. Space bulbs 4 to 6 inches apart within the coral bells grid. The dying bulb foliage hides behind the expanding Heuchera leaves. No gap in the show. The bulbs naturalize. The coral bells cover their messy exit. Perfect timing.
Ground Covers as Living Mulch
Creeping phlox, tiarella, or sweet woodruff can fill the gaps between young coral bells. Plant the ground cover plugs 6 inches apart. Plant coral bells at 18 inches. The ground cover suppresses weeds while coral bells establish. As coral bells widen, they shade out the ground cover. It retreats naturally. Or you edit it back. This layered approach mimics a forest floor.
Special Situations: Slopes, Walls, and Edges
Some spots demand custom spacing.
Retaining Wall Tops
Planting along a wall top? The soil is shallow. It dries fast. Roots hang over the edge. Space at 12 inches. The plants will cascade slightly. They soften the hard line. Choose trailing varieties like ‘Plum Cascade’ or ‘Redstone Falls’. Their stems hang 12 to 18 inches. The tight spacing ensures a continuous curtain of foliage. Water frequently. Wall tops are the driest spot in the garden.
Steep Slopes
On a 45-degree slope, erosion is the enemy. Plant in a staggered grid. 12 inches on center. Use erosion control fabric. Cut X slits. Plant through them. The tight spacing creates root mat fast. The foliage slows rain impact. Mulch heavily with shredded bark that locks together. Avoid cocoa hulls; they wash away. The coral bells become the anchor.
Path Edges
Along a stepping stone path, you want to touch the foliage. It releases scent. It invites interaction. Plant 8 inches from the stone edge. The mound will spill onto the stone by mid-summer. You brush it as you walk. It feels abundant. But the crown stays safe in the soil. Use tough varieties like ‘Obsidian’ or ‘Palace Purple’ that handle foot traffic vibration.
Buying Tips: Reading Labels and Asking Questions
Good spacing starts at the nursery. The label is your contract with the plant.
Decode the Label
Look for “Spread,” “Width,” or “Spacing.” Use the larger number if a range is given. “12-18 inches” means plan for 18. “Mature width 14 inches” means space at 16 to 18. If no width is listed, search the variety name on your phone. Reputable growers like Proven Winners, Terra Nova, or Walters Gardens have detailed specs online. Do not guess.
Ask the Staff
Local nursery staff know what works in your zone. Ask: “How wide does this get here?” Not “How wide does the tag say?” Local conditions change everything. A variety that hits 12 inches in Oregon might hit 18 in Virginia with humidity and long seasons. They also know which varieties resist local diseases. That knowledge is worth the price of the plant.
Buy in Odd Numbers
Design rule: 3, 5, 7, 9. Odd numbers look natural. Even numbers look formal. Buy enough for your spacing plan plus one. The extra is insurance. One might be weak. One might get stepped on. Or you find a perfect spot you missed. Having a spare avoids a second trip or a gap in the design.
Designing with Color and Spacing
Spacing affects color perception. Too close, and colors blur. Too far, and the impact scatters.
Monochromatic Drifts
Plant 5 or 7 of the same variety. Space at 15 inches. The color reads as a single brushstroke. ‘Caramel’ becomes a river of amber. ‘Black Pearl’ becomes a shadow pool. The eye moves smoothly. The repetition calms the garden. This works best in larger beds where the drift can be 6 feet long or more.
Contrasting Pairs
Alternate ‘Lime Rickey’ (chartreuse) and ‘Plum Pudding’ (purple). Space at 14 inches. The complementary colors vibrate. Each plant defines the other. The pattern reads like a checkerboard at first. Then the mounds merge into a tapestry. This high-contrast pairing wakes up a dark corner.
Gradient Transitions
Plant a sequence: ‘Peach Flambe’ (orange) to ‘Caramel’ (amber) to ‘Citronelle’ (gold) to ‘Lime Rickey’ (chartreuse). Space at 16 inches. The color shifts like a sunset. The eye follows the gradient. It makes a small bed feel larger. The spacing lets each color hold its territory before blending at the edges.
Troubleshooting Spacing Issues
Problems appear. Here is how to read the signs and fix the spacing.
Leaves Touching Constantly
If foliage mats together all season, they are too close. Solution: Remove every other plant in spring. Transplant them elsewhere. Or give them away. The remaining plants will thank you. Air returns. Disease drops. Color deepens.
Bare Centers, Leggy Stems
If plants stretch tall with naked stems at the base, they are fighting for light. Solution: Thin neighboring plants. Or limb up overhead trees. Or move the coral bells to a brighter spot. Spacing cannot fix too much shade. But good spacing ensures each plant gets its fair share of what light exists.
Crowns Pushing Up
If you see woody stems rising above soil, the plant is heaving or aging. Solution: Mulch around crowns in fall. In spring, dig and replant deeper. Or divide. Wide spacing lets you see this early. Crowded beds hide it until the plant dies.
Weeds Taking Over
If weeds thrive between plants, the canopy has not closed. Solution: Plant annuals as temporary fillers. Or mulch heavier. Or accept that you spaced too wide for ground cover goals. Adjust next time. There is no shame in learning.
Frequently Asked Questions About Coral Bells Spacing
Let me address the questions I hear most often from fellow gardeners.
Can I plant coral bells 6 inches apart for instant coverage?
You can, but it is a short-term fix. At 6 inches, the crowns will collide within a year. You will see powdery mildew by July. The centers will rot. You will be dividing by next spring. If you need instant coverage for an event, use annuals between properly spaced coral bells. Remove the annuals after the event. Do not compromise the perennials.
Do different colored varieties need different spacing?
Color does not dictate spacing. Genetics do. A purple variety and a lime variety from the same breeding series have the same width. But a purple ‘Palace Purple’ (18 inches) and a lime ‘Petite Pearl Fairy’ (8 inches) differ wildly. Always go by the specific cultivar name, not the color.
How far from the house foundation should I plant?
At least 18 inches from the foundation wall. This keeps foliage off the siding. It allows air flow behind the plants. It keeps roots away from the footer drain. It gives you room to wash windows or paint. If the roof overhang creates a dry shadow, move out 24 inches to catch rain.
Can I plant coral bells under a black walnut tree?
Yes, Heuchera is juglone tolerant. But the root competition is fierce. Space at 24 inches. Amend heavily. Water religiously. Use containers if the tree roots are a solid mat. The coral bells will survive, but they will not thrive like they would in open ground.
What if I planted too close last year?
Fix it this spring. Dig the crowded clumps. Divide them. Replant at proper spacing. Amend the soil while you are at it. Spring division is a reset button. The plants recover fast. You lose maybe two weeks of bloom. You gain years of health. It is the kindest cut.
Conclusion: Space for Success
We have covered a lot of ground. From the basic 12 to 18 inch rule to the nuances of climate, containers, and design. The thread connecting it all is simple. Coral bells need room to be themselves. They are not soldiers in a row. They are not carpet fibers. They are individual clumps with crowns that breathe, roots that explore, and leaves that catch light.
When you space them well, you honor their nature. You reduce your labor. You amplify their beauty. You create a garden that looks better each year instead of worse. The tape measure is your friend. The plant tag is your guide. The patience to let them fill in is your virtue.
Next time you stand with that flat of ruffled jewels, you will know exactly what to do. You will measure from crown to crown. You will leave space for air and light and time. You will plant for the garden of year three, not the photo of day one. And your coral bells will reward you with mounds of color so perfect, they look like they grew there forever. Because with the right spacing, they practically did.
Happy planting. Your shade garden is about to get its glow on.
Frequently Asked Questions
How do I measure spacing correctly when planting coral bells?
Measure from the center of the crown (where stems meet roots) of one plant to the center of the crown of the next plant. Do not measure from pot edges or outer leaf tips. Use a tape measure or a pre-cut spacing stick for accuracy.
Should I adjust coral bells spacing for my climate zone?
Yes. In humid climates, increase spacing by 2 to 4 inches to improve airflow and reduce fungal pressure. In arid climates, you can plant slightly closer (10 to 14 inches) since disease risk is lower and foliage helps shade the soil.
Can coral bells be planted under trees with surface roots?
They can, but increase spacing to 24 inches and amend planting holes generously with compost. Better yet, plant in containers sunk into the ground to avoid direct root competition from the tree.
How often should I divide coral bells based on spacing?
Divide every 3 to 4 years at standard 18-inch spacing. Divide every 2 to 3 years if planted at 12 inches or closer. Divide every 5 years if given 24 inches or more as specimen plants.
What is the best time of year to correct overcrowded coral bells?
Early spring, just as new growth emerges, is the ideal time to dig, divide, and replant overcrowded coral bells at proper spacing. The cool weather and spring rains support quick recovery.
Do coral bells spread by runners or rhizomes underground?
No, coral bells are clump-forming perennials that expand slowly from a central crown. They do not run or spread aggressively underground, so spacing only needs to account for the mature width of the above-ground mound.