Coral Bells Planting
Coral bells planting brings stunning foliage color to shady gardens with minimal effort. These hardy perennials thrive in well-drained soil and partial shade, offering year-round interest through their ruffled leaves and delicate flower spikes.
There is something magical about coral bells. One day you plant a modest little perennial. The next season it explodes into a mound of ruffled leaves in shades you did not know existed. Lime green. Deep purple. Caramel. Silver. Almost black. The flowers are nice too. Tiny bells on wiry stems that hummingbirds love. But let us be honest. We grow these plants for the foliage. The leaves stay gorgeous from spring through frost. In mild winters they barely blink. If you have shade, you need coral bells. If you have sun, you can grow them too with the right variety. This guide walks you through everything. Soil prep. Planting depth. Watering. Dividing. Pest control. Design ideas. By the end you will feel confident adding these superstars to your garden beds, containers, and woodland edges.
Let us start with a quick reality check. Coral bells are tough. They handle neglect better than most perennials. But they have one non-negotiable. Drainage. Wet crowns rot. That is the number one killer. Everything else is manageable. Light requirements vary by variety. Some want deep shade. Others take full sun in cool climates. Colors shift with light exposure. A chartreuse variety turns greener in shade. A purple one may green out in too much sun. This is not a flaw. It is a feature. You can play with placement to get different looks from the same plant. Ready to dig in? Let us go step by step.
Key Takeaways
- Choose the right spot: Coral bells prefer partial shade with morning sun and afternoon protection for best leaf color.
- Soil matters most: Well-drained, humus-rich soil prevents crown rot and supports healthy root development.
- Plant at crown level: Keep the crown slightly above soil line to avoid moisture buildup and rot issues.
- Water consistently: New plants need regular moisture until established, then tolerate brief dry spells.
- Divide every few years: Division in spring or fall rejuvenates clumps and prevents center die-out.
- Watch for pests: Vine weevils and foliar nematodes are common threats that need early detection.
- Mulch wisely: Light mulch retains moisture but keep it away from the crown to prevent fungal problems.
Quick Answers to Common Questions
When is the best time to plant coral bells?
Spring and fall are both ideal for coral bells planting. Spring gives roots time to establish before summer heat, while fall allows root growth in cool soil. Avoid planting during summer heat waves.
How deep should I plant coral bells?
Plant coral bells with the crown at or slightly above soil level. The crown is where stems meet roots. Planting too deep causes crown rot, which is the number one killer of these plants.
Do coral bells need full sun or shade?
Most coral bells prefer morning sun with afternoon shade. Dark-leaved varieties need some direct sun for best color, while chartreuse and silver types prefer more shade. Check your specific variety’s needs.
How often should I water newly planted coral bells?
Water new coral bells every other day for the first two weeks, then twice a week for a month, then weekly. Established plants only need water during drought, but consistent moisture produces the best foliage.
Why is the center of my coral bells plant dying?
A dead center with a living outer ring means the plant needs division. This typically happens every three to four years. Dig the clump, discard the woody dead center, and replant the healthy outer sections.
📑 Table of Contents
- Understanding Coral Bells Basics
- Selecting The Perfect Planting Site
- Step By Step Coral Bells Planting Guide
- Ongoing Care And Maintenance
- Common Problems And Solutions
- Design Ideas And Companion Planting
- Seasonal Care Calendar
- Propagation Methods
- Buying Healthy Plants
- Troubleshooting Quick Reference
- Conclusion
Understanding Coral Bells Basics
What Are Coral Bells
Coral bells belong to the genus Heuchera. They are native to North America. You will find them growing wild on rocky cliffs, in woodlands, and along stream banks from Canada to Mexico. The common name comes from the flowers. Tiny bell shaped blooms in coral pink, red, or white dangle on slender stems above the foliage. But modern breeding has exploded the color palette. Foliage now steals the show. Breeders cross species like Heuchera sanguinea, Heuchera americana, Heuchera villosa, and Heuchera micrantha. The result? Hundreds of cultivars. New ones arrive every year. Some are bred for heat tolerance. Others for cold hardiness. Many for outrageous leaf color. There is a coral bell for almost every garden situation.
Why Gardeners Love Them
First, the season of interest. Most perennials bloom for two weeks. Coral bells look good for nine months. In warm zones they are evergreen. Second, versatility. They work in borders, rock gardens, containers, and mass plantings. Third, low maintenance. No deadheading required. No staking. Minimal fertilizing. Fourth, pollinators adore the flowers. Hummingbirds, bees, and butterflies visit regularly. Fifth, deer and rabbits usually leave them alone. The leaves have a slightly fuzzy, astringent texture that critters dislike. Not guaranteed, but a strong selling point. Sixth, they play well with others. Pair them with hostas, ferns, astilbes, foamflowers, and Japanese forest grass. The texture contrast is stunning.
Popular Varieties To Consider
Choosing a variety can feel overwhelming. Here are reliable performers grouped by color family. For lime green to chartreuse: ‘Lime Rickey’, ‘Electra’, ‘Citronelle’. These brighten dark corners. For purple to near black: ‘Palace Purple’, ‘Obsidian’, ‘Black Pearl’, ‘Forever Purple’. Dramatic and sophisticated. For caramel, peach, amber: ‘Caramel’, ‘Georgia Peach’, ‘Marmalade’, ‘Peach Flambe’. Warm tones that glow in autumn light. For silver and pewter: ‘Silver Scrolls’, ‘Appletini’, ‘Steel City’. Cool elegance for modern gardens. For ruffled texture: ‘Berry Smoothie’, ‘Fire Alarm’, ‘Wild Rose’. The leaves look like crinkled fabric. For sun tolerance: villosa hybrids like ‘Autumn Bride’, ‘Brownies’, ‘Cajun Fire’. These handle more light in northern zones. For heat and humidity: ‘Southern Comfort’, ‘Delta Dawn’, ‘Fire Chief’. Bred for the Deep South. Check plant tags for your zone. Most are hardy zones 4 through 9. Some push to zone 3 with mulch.
Selecting The Perfect Planting Site
Light Requirements Decoded
Light is the trickiest part of coral bells planting. General rule: morning sun, afternoon shade. This gives the best color without scorching. But variety matters enormously. Dark leaved types like ‘Obsidian’ need some direct sun to develop deep pigment. In full shade they turn muddy green. Chartreuse types like ‘Citronelle’ bleach to yellow in hot sun. They want dappled shade all day. Silver varieties hold color best in part shade. Too much sun burns the metallic sheen. Villosa hybrids with hairy leaves tolerate more sun than micrantha types with thin leaves. If you are unsure, start with part shade. You can always move the plant later. Coral bells transplant easily. Watch the leaves. Bleached patches mean too much sun. Stretching stems and dull color mean too little. Adjust accordingly.
Soil Conditions For Success
Drainage. Drainage. Drainage. Say it three times. Coral bells hate wet feet. The crown sits at soil level. Water pooling there causes crown rot fast. Heavy clay is a death sentence unless amended. Sandy soil works great but dries fast. Loam with organic matter is ideal. Aim for soil that holds moisture but drains within an hour after rain. Test by digging a hole twelve inches deep. Fill with water. If it drains in under an hour, you are good. If it sits for hours, amend heavily or build a raised bed. Organic matter is your friend. Compost, leaf mold, aged manure, pine bark fines. Work in two to three inches before planting. This improves drainage in clay and water retention in sand. It also feeds soil microbes that support root health. Soil pH between 6.0 and 7.0 is perfect. Slightly acidic to neutral. Most garden soils fall in this range. A soil test never hurts.
Spacing And Air Circulation
Give them room. Crowded plants develop fungal issues. Powdery mildew loves stagnant humid air. Space plants twelve to eighteen inches apart depending on mature size. Check the label. Some varieties spread twenty-four inches. Others stay compact at ten inches. Good air flow also reduces foliar nematode spread. These microscopic worms swim in water films on leaves. They move plant to plant when leaves touch. Spacing breaks the highway. If planting in rows, stagger them. Triangular spacing looks more natural than soldier lines. In containers, one plant per twelve inch pot. Two in a sixteen inch bowl. Do not cram three in a small pot. They will decline fast.
Step By Step Coral Bells Planting Guide
When To Plant
Spring and fall are both excellent. Spring planting gives roots time to establish before summer heat. Fall planting lets roots grow in cool soil while tops go dormant. Avoid summer planting in hot climates. The stress of heat plus transplant shock kills many plants. If you must plant in summer, choose a cloudy week. Water daily for two weeks. Provide temporary shade cloth. In zone 7 and warmer, fall is actually better. Roots grow all winter. Plants explode in spring. In zone 5 and colder, spring is safer. Fall planted crowns can heave out of frozen ground. If planting fall in cold zones, do it six weeks before hard freeze. Mulch heavily after ground freezes.
Preparing The Planting Hole
Dig a hole twice as wide as the root ball. Same depth. No deeper. This is critical. Coral bells crowns must sit at or slightly above soil level. Planting deep buries the crown. Rot follows. Wide holes encourage lateral root spread. Roots grow outward, not down. Break up the sides of the hole with your shovel. Smooth walls create a bathtub effect in clay. Roots circle instead of penetrating. If your soil is poor, mix compost with the native soil. Fifty fifty ratio. Do not fill the hole with pure compost. Roots will refuse to leave the rich zone. They circle in the planting hole like a pot bound plant. Native soil contact teaches roots to explore.
Removing The Plant From Its Pot
Water the pot thoroughly an hour before planting. Moist root balls hold together. Dry ones crumble. Turn the pot sideways. Tap the bottom and sides. Slide the plant out. Never pull by the stems. If roots circle the bottom, tease them apart gently. Use your fingers or a cultivator. A few torn roots are fine. They regenerate fast. If the plant is severely root bound, make four vertical slices an inch deep around the root ball. Cut an X across the bottom. This signals roots to grow outward. Do not shred the root ball. Coral bells have fine fibrous roots. They resent brutal handling.
Setting The Crown Correctly
This is the make or break moment. Place the plant in the hole. Check the crown level. The crown is where stems meet roots. It should sit at soil grade or a hair higher. Not below. Not an inch above. Lay a straight stick across the hole. The crown touches the stick. Backfill with your soil mix. Firm gently with your hands. Do not stomp. Air pockets kill roots. Water halfway through backfilling to settle soil. Finish filling. Water again. The soil will settle. Check crown level again. Add soil if it sunk. Mulch around but not over the crown. Keep mulch two inches away from the base.
Watering In And Initial Care
Water deeply after planting. Soak the root zone. This eliminates air pockets and ensures soil contact. For the first two weeks, water every other day unless it rains. Check soil with your finger. Top inch dry? Water. After two weeks, stretch to twice a week. After a month, once a week. Established plants need water only in drought. But here is the nuance. Consistent moisture produces the best foliage. Drought stressed plants go semi dormant. Leaves crisp at edges. Color dulls. They recover but look ratty for weeks. A soaker hose or drip irrigation is ideal. Keeps water off leaves. Wet foliage invites disease. Morning watering lets leaves dry fast. Avoid evening watering.
Ongoing Care And Maintenance
Fertilizing For Lush Growth
Coral bells are light feeders. Too much fertilizer makes weak, floppy growth. It also reduces winter hardiness. One application in spring is plenty. Use a balanced slow release granular fertilizer. Something like 10-10-10 or 14-14-14. Scratch it into the soil surface around the drip line. Water in. Alternatively, top dress with an inch of compost in spring. This feeds slowly all season. Improves soil structure too. Container plants need more frequent feeding. Nutrients leach out. Use half strength liquid fertilizer monthly April through August. Stop fertilizing by September. You want plants hardening off for winter. Soft new growth freezes and rots.
Mulching Done Right
Mulch is great. Mulch against the crown is fatal. Keep a two inch moat clear around each plant. Use shredded leaves, pine straw, bark fines, or compost. Avoid wood chips. They tie up nitrogen as they break down. Avoid cocoa hulls. They mold in wet weather and can be toxic to dogs. One to two inches is enough. More invites voles and crown rot. Refresh mulch annually in spring. Pull back old mulch first. Do not just pile new on old. Thick layers become water repellent. They also bury the crown slowly over years. Check crown depth each spring. Add soil if mulch has buried it.
Deadheading And Grooming
Flower stems can be removed after blooming. Or leave them for seed and winter interest. Birds eat the seeds. The stems catch frost beautifully. Your choice. Cut stems at the base with clean scissors. Do not pull. You might uproot the plant. Remove tattered or damaged leaves anytime. Cut at the base. New leaves emerge from the crown continuously. In late winter, do a cleanup. Remove all dead leaves. Cut back any winter damaged foliage. This prevents disease carryover. It also lets you see the crown. Check for heaving. If the crown has pushed up, gently press it back down. Top dress with soil if roots are exposed.
Dividing To Rejuvenate
Every three to four years, the center of the clump dies out. You get a donut shape. Outer leaves look great. Middle is bare. This is normal. Division fixes it. Spring or fall. Spring is easier. You see the growth points. Dig the whole clump. Shake off soil. Pull apart with your hands. Or cut with a sharp knife. Each division needs roots and at least three growth points. Growth points are the little buds at the crown. Replant immediately. Water well. Divisions may sulk for a week. Then they take off. Fall division works too but do it early. Roots need time to anchor before freeze. Discard woody dead centers. Compost them.
Common Problems And Solutions
Crown Rot The Silent Killer
Crown rot is the number one cause of coral bells death. It starts at the soil line. The crown turns brown and mushy. Leaves yellow and collapse. The plant pulls out with no roots. Causes: planting too deep, heavy soil, overwatering, mulch against crown, poor air circulation. Prevention is everything. Plant high. Amend clay. Water at soil level. Mulch away from crown. Space properly. If you catch it early, you might save the plant. Dig it up. Cut away all rotten tissue. Dust with sulfur or cinnamon. Replant in fresh dry soil. Keep barely moist mix. Cross fingers. Often it is too late. Replace the plant. Fix the drainage first.
Foliar Nematodes Invisible Damage
Foliar nematodes are microscopic roundworms. They live inside leaves. They swim in water films. Damage appears as angular brown patches between leaf veins. The patches stop at veins because nematodes cannot cross them. Lower leaves affected first. Spreads upward. Infected leaves die and drop. The plant weakens. No chemical cure exists for home gardeners. Management only. Remove and destroy infected leaves. Do not compost. Water at soil level only. Never overhead. Space plants for air flow. Avoid working with wet foliage. Sanitize tools between plants. Buy from reputable nurseries. Inspect new plants carefully. Quarantine new arrivals two weeks. Some varieties show resistance. Villosa types tend to be less susceptible.
Vine Weevil Notching And Root Damage
Vine weevils are beetles. Adults notch leaf edges at night. Damage is cosmetic. C shaped notches along margins. Larvae are the real problem. White grubs with brown heads. They eat roots and crown tissue. Plants wilt suddenly. Pull easily from soil. You find grubs in the root zone. Adults emerge late spring. Lay eggs in soil. Larvae feed all summer. Overwinter in soil. Pupate spring. One generation per year. Control: beneficial nematodes (Steinernema kraussei) applied to soil in spring and fall. They parasitize larvae. Sticky traps catch adults. Diatomaceous earth around plants deters egg laying. Check roots when dividing. Destroy any grubs found. Birds eat adults. Encourage birds.
Powdery Mildew And Leaf Spots
Powdery mildew looks like white dust on leaves. Favors humid, still air. Warm days, cool nights. Rarely kills but weakens plants. Prevention: space for air flow. Water at base. Morning sun dries dew. Resistant varieties help. ‘Caramel’, ‘Citronelle’, and villosa hybrids show good resistance. Treatment: remove badly infected leaves. Spray neem oil or potassium bicarbonate. Homemade spray: one tablespoon baking soda, one teaspoon horticultural oil, one gallon water. Spray weekly. Leaf spots are fungal or bacterial. Brown or black spots with yellow halos. Same prevention. Copper fungicide helps bacterial spots. Rotate fungicides to prevent resistance.
Sun Scorch And Heat Stress
Bleached white patches on leaves. Crispy brown edges. Leaves curl. Plant looks fried. This is sun scorch. Happens when shade plants get sudden intense sun. Or when drought combines with heat. Immediate fix: water deeply. Provide temporary shade cloth. Do not fertilize. Remove badly damaged leaves. They will not recover. Long term: move to shadier spot in fall. Or plant taller companions to cast shade. Some varieties simply cannot take your sun. Accept it. Move them. Replace with sun tolerant types. Villosa hybrids. ‘Autumn Bride’. ‘Brownies’. ‘Cajun Fire’. These have thicker, hairier leaves that resist scorch.
Design Ideas And Companion Planting
Shade Garden Combinations
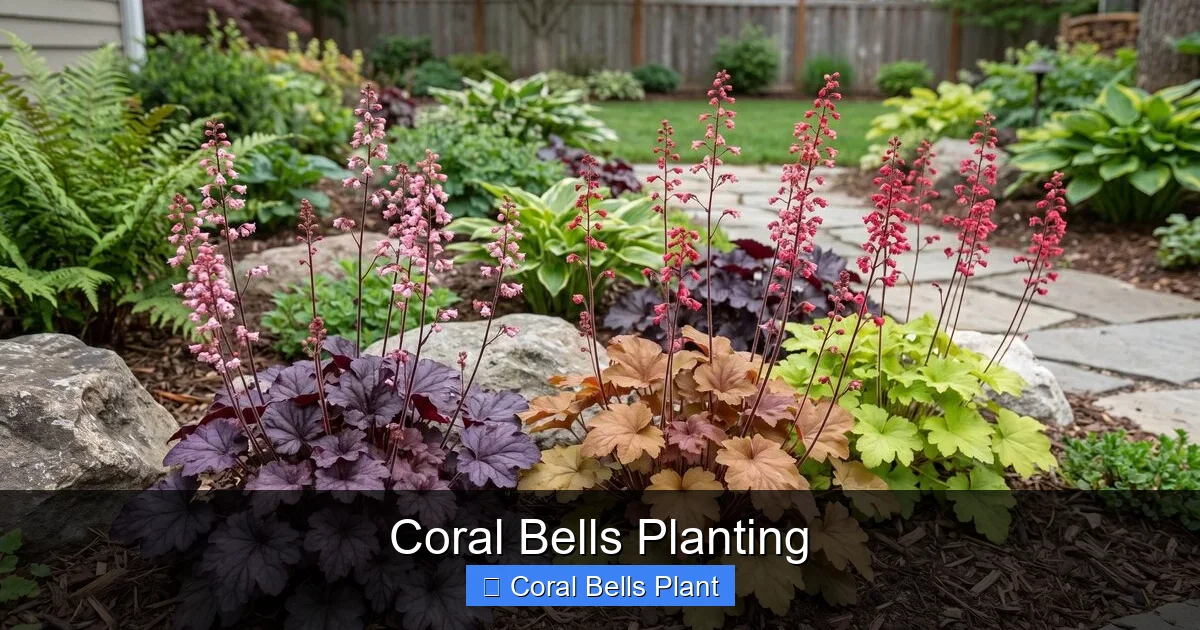
Coral bells are shade garden anchors. Their mounding habit fills the middle layer. Pair with upright plants behind. Low spreaders in front. Classic combo: hostas behind, coral bells middle, foamflower or wild ginger front. Texture contrast is key. Hostas have big smooth leaves. Coral bells have ruffled textured leaves. Ferns add feathery fronds. Japanese forest grass cascades. Astilbes bring feathery plumes. Heucherella (foamy bells) are hybrids with similar needs. Mix coral bells with different leaf colors. Dark purple ‘Obsidian’ next to lime ‘Citronelle’ pops. Silver ‘Silver Scrolls’ bridges them. Repeat colors down the bed for rhythm. Three of each variety minimum. Onesies look busy.
Container Recipes
Coral bells shine in pots. They are the perfect filler. Mounding habit hides pot rims. Foliage lasts all season. Choose a twelve inch minimum pot. Drainage holes mandatory. Use high quality potting mix. Not garden soil. Add perlite for drainage. Recipe one: ‘Caramel’ coral bells, purple fountain grass, trailing sweet potato vine, white calibrachoa. Warm sunset tones. Recipe two: ‘Obsidian’ coral bells, silver dichondra, black mondo grass, white bacopa. Dramatic monochrome. Recipe three: ‘Lime Rickey’ coral bells, blue lobelia, white impatiens, variegated ivy. Bright shade combo. Water containers daily in heat. Fertilize monthly. Overwinter pots in garage in cold zones. Or plant in ground for winter.
Rock Garden And Edge Planting
Species types like Heuchera sanguinea and Heuchera pulchella love rocky slopes. They are native to cliffs. Perfect for rock gardens. Plant in crevices between stones. Lean soil. Sharp drainage. Full sun in cool climates. Afternoon shade in hot. The flowers are showier on species types. Bright coral bells on red stems. Hummingbird magnets. Mix with sedums, sempervivums, dwarf conifers, creeping thyme, and ice plants. Low maintenance tapestry. Edge a pathway with a single variety. ‘Palace Purple’ makes a stunning dark ribbon. ‘Citronelle’ glows at dusk. Space twelve inches. They knit together in two years. Mow or weed whack edges once a year to keep crisp.
Woodland And Naturalistic Plantings
In woodland gardens, coral bells mimic native understory plants. Heuchera americana and Heuchera villosa are native to eastern woodlands. Plant in drifts under deciduous trees. They get spring sun before leaf out. Summer shade. Fall leaf mulch feeds them naturally. Combine with native ferns, trilliums, bloodroot, Virginia bluebells, and Solomon’s seal. Let them self sow. Species types seed gently. Cultivars do not come true from seed. But seedlings often have interesting leaves. Thin volunteers. Transplant extras. This creates a living carpet that evolves. Low work. High reward. Deer resistant bonus in rural areas.
Seasonal Care Calendar
Spring Awakening
March to May. Clean up winter debris. Remove dead leaves. Check crowns for heaving. Press down gently. Apply compost top dressing. One inch around plants. Not on crowns. Apply slow release fertilizer if desired. Divide overcrowded clumps. Plant new purchases. Water new plants regularly. Watch for vine weevil notching. Apply beneficial nematodes if history of problems. Enjoy fresh new growth. Colors are most intense in spring. Cool nights enhance pigment. Take photos. Note which combinations work.
Summer Maintenance
June to August. Water during dry spells. Deep soak weekly. Morning best. Deadhead flower stems if desired. Or leave for pollinators. Scout for foliar nematode damage. Remove affected leaves. Check for powdery mildew in humid weather. Improve air flow if needed. Thin neighboring plants. Mulch if soil exposed. Container plants need daily checks. Fertilize pots monthly. Move pots to shadier spot in heat waves. Enjoy hummingbirds on flowers. Cut a few stems for bouquets. They last a week in water.
Fall Preparation
September to November. Stop fertilizing. Let plants harden. Plant new divisions early fall. Six weeks before freeze. Mulch after ground freezes in cold zones. Two to three inches. Keep off crowns. Leave foliage standing. It protects crowns. It catches snow for insulation. It looks pretty frosted. Collect seed if you want. Species come true. Hybrids surprise you. Sow fresh seed in pots. Cold stratify outdoors. Mark plant locations. Winter mulch can hide them.
Winter Rest
December to February. Do nothing. Seriously. In zones 6 and up, plants stay evergreen. Leaves may look ratty by February. That is fine. In zones 4 and 5, leaves may die back. Crown survives underground. Snow cover is best insulation. If no snow, check for heaving during thaw cycles. Press crowns down gently. Brush heavy wet snow off if it bends stems. Plan next year’s additions. Browse catalogs. Dream of spring.
Propagation Methods
Division The Reliable Method
We covered division in maintenance. It is the fastest way to get mature plants. True to type. Done in spring or fall. Three year old clumps divide best. Younger plants may not have enough crown material. Older woody centers are hard to separate. Water the day before. Dig wide. Keep root ball intact. Shake soil. Pull apart. Replant immediately. Water. Simple. High success rate. Ninety percent plus.
Seed Starting For Adventure
Species coral bells grow true from seed. Cultivars do not. But seedlings are fun. Collect seed when capsules turn brown. Split open. Tiny black seeds. Sow fresh on moist seed starting mix. Do not cover. Light aids germination. Bottom heat seventy degrees. Germination in two to four weeks. Prick out seedlings when two true leaves. Grow in pots first year. Plant out year two. Flower year three. You might discover a gem. Most will be muddy green. But the lottery is free.
Leaf Cuttings Advanced Technique
Leaf cuttings work for some varieties. Villosa types root best. Take a mature leaf with petiole. Cut petiole to one inch. Dip in rooting hormone. Stick in perlite peat mix. Cover with humidity dome. Bright indirect light. Bottom heat helps. Roots in four to six weeks. Tiny plantlet forms at leaf base. Pot up. Grow on. Not all varieties work. Success rate lower than division. But you get many plants from one leaf. Fun experiment.
Tissue Culture Commercial Method
This is how nurseries produce thousands of identical plants. Meristem tissue grown in sterile agar. Hormones trigger multiplication. Not for home gardeners. But good to know. This is why new cultivars cost more initially. Years of lab work. Then mass production. Prices drop after patent expires. Patents last twenty years. During that time, propagation is illegal. Respect plant patents. Buy licensed plants. Support breeders.
Buying Healthy Plants
What To Look For At The Nursery
Healthy coral bells have firm crowns. No mush. Leaves turgid. Not wilted. Color true to label. Some varieties look different in pots than in ground. Ask staff. Check roots. Pop the pot. Roots should be white or tan. Not brown and mushy. Not circling tightly. A few roots out the bottom is fine. Masses mean root bound. Avoid plants with yellow lower leaves. Could be nematodes. Avoid powdery mildew. White dust. Avoid vine weevil notching. Notched edges. Buy from reputable local nurseries. They acclimate plants to your climate. Big box stores often ship from different zones. Plants may struggle to adjust.
Mail Order Tips
Mail order offers huge selection. Bare root or small plugs. Order spring for spring planting. Fall for fall planting. Avoid summer shipping. Heat kills in transit. Open box immediately. Water if dry. Pot up plugs in four inch pots. Grow two weeks before planting out. Bare root plants soak two hours. Plant same day. Keep roots moist. Mulch well. Expect some transplant shock. They recover fast. Reputable companies guarantee live arrival. Photos help claims. Keep receipts.
Reading Plant Labels
Labels tell you zone, size, light, spacing. Patent numbers mean propagation prohibited. PP followed by numbers. Trademark names are marketing. The cultivar name in single quotes is the real ID. ‘Palace Purple’ not Palace Purple™. Series names like Dolce® or Primo® indicate breeding lines. Dolce are compact. Primo are large. Both from Walters Gardens. Other breeders: Terra Nova, Heuger, French breeders. Each has style. Terra Nova: wild colors. Heuger: tough European genetics. French: refined habits. Try different breeders. See what thrives for you.
Troubleshooting Quick Reference
Leaves Turning Yellow
Yellow leaves have many causes. Bottom leaves yellow naturally as they age. Pull them off. Whole plant yellow? Could be overwatering. Check soil. Soggy? Stop watering. Improve drainage. Could be nutrient deficiency. Nitrogen or iron. Fertilize lightly. Could be root damage. Vine weevil larvae. Check roots. Could be too much sun. Bleached yellow. Move to shade. Could be crown rot starting. Check crown. Mushy? Too late.
Plant Not Growing
Stunted growth. Small leaves. No new growth. Check planting depth. Crown buried? Lift and replant higher. Check soil. Compacted? Aerate with fork. Add compost. Check roots. Circling? Tease out. Replant. Check light. Too dark? Move. Too bright? Move. Check water. Bone dry? Water. Swampy? Drain. Check fertilizer. Too much? Flush with water. None in years? Feed lightly. Check competition. Tree roots stealing? Root prune or move plant.
Leaves With Holes
Irregular holes. Slugs or earwigs. Night feeders. Beer traps. Diatomaceous earth. Copper tape. Round holes. Flea beetles. Tiny jumpers. Neem oil. Row cover. Notched edges. Vine weevil adults. Beneficial nematodes for larvae. Skeletonized leaves. Japanese beetles. Hand pick. Milky spore for grubs. Deer browse. Ragged tears. Fencing. Repellents. Rabbits. Clean cuts at forty five degrees. Fencing. Cats. Digging. Pine cones. Chicken wire.
Center Of Plant Dying
Donut shape. Dead center. Live ring. Classic sign of age. Time to divide. Dig. Discard dead center. Replant healthy pieces. Do this every three to four years. Prevents the donut. Also prevents crown rot in dense centers. Air flows through divided plants. Healthier all around.
Colors Not As Expected
Purple plant looks green. Chartreuse looks yellow. Silver looks green. Light issue. Dark colors need sun to develop pigment. Light colors burn in sun. Move plant. Or accept the shift. Some varieties change seasonally. ‘Peach Flambe’ is peach in spring, red in summer, purple in fall. This is normal. Enjoy the show. Labels show mature color in ideal conditions. Your conditions differ. That is gardening.
Conclusion
Coral bells planting rewards you with years of foliage drama for minimal effort. The secret is simple. Drainage. Crown high. Mulch off the crown. Water at the roots. Divide every few years. Everything else is details. Choose varieties for your light. Play with color combinations. Mix textures. Use them in beds, pots, rocks, woods. They are the most versatile perennial you will grow. Hummingbirds will thank you. Your neighbors will ask what that amazing plant is. You will smile and say coral bells. Then you will share a division. Because gardeners share. That is the real harvest. Happy planting.
Frequently Asked Questions
Can coral bells grow in full shade?
Yes, many coral bells tolerate full shade, but foliage color may be less vibrant. Chartreuse varieties like ‘Citronelle’ actually prefer shade to prevent bleaching. Dark purple varieties may turn muddy green in deep shade. Villosa hybrids generally handle shade well.
Are coral bells deer resistant?
Coral bells are considered deer resistant due to their slightly fuzzy, astringent foliage. However, hungry deer may still browse them, especially in winter or during drought. No plant is completely deer proof. Repellents and fencing provide better protection.
Do coral bells spread aggressively?
No, coral bells are clump-forming perennials that spread slowly. They do not run or invade. The clump widens gradually over years. Some species may self-seed lightly, but cultivars do not come true from seed. They are well-behaved garden citizens.
Can I grow coral bells in containers year-round?
In zones 6 and warmer, coral bells overwinter well in containers with protection. In zones 5 and colder, pots freeze solid and kill roots. Move containers to an unheated garage, bury pots in the ground, or transplant into the garden for winter.
Why are my coral bells leaves turning brown and crispy?
Brown crispy edges usually indicate sun scorch, drought stress, or both. Move the plant to a shadier location, increase watering, and ensure good soil moisture retention with compost and mulch. Remove damaged leaves; they will not recover.
How do I prevent crown rot in coral bells?
Plant with the crown slightly above soil level. Amend heavy clay soil with compost for drainage. Water at the base, not overhead. Keep mulch two inches away from the crown. Space plants for air circulation. Avoid low spots where water collects.