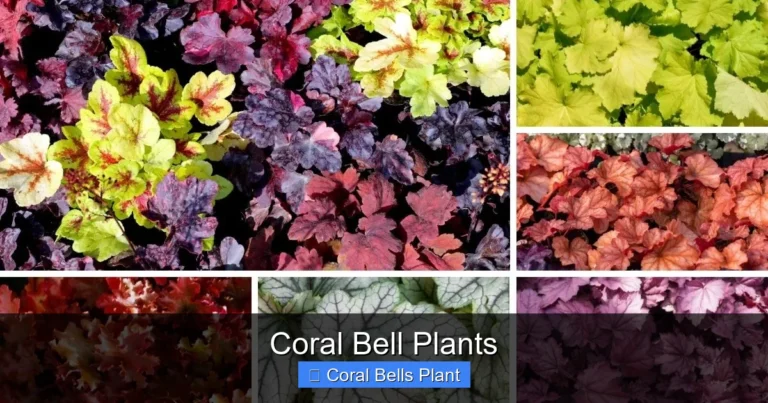
Coral Bells Indoor Plant
Coral bells (Heuchera) make spectacular indoor plants with their vibrant, ruffled foliage in shades of purple, silver, caramel, and lime green. These adaptable perennials thrive inside with bright indirect light, well-draining soil, and consistent moisture. Follow our complete guide to keep your coral bells indoor plant healthy and colorful year-round.
Key Takeaways
- Light Needs: Coral bells indoor plant varieties prefer bright indirect light; avoid harsh direct sun that scorches delicate leaves.
- Watering Schedule: Keep soil evenly moist but never soggy; water when the top inch feels dry to prevent root rot.
- Soil Mix: Use a well-draining potting blend with perlite or orchid bark to mimic their native woodland conditions.
- Temperature Range: Maintain 60-75°F (15-24°C); protect from cold drafts and heating vents that cause stress.
- Humidity Preference: Moderate to high humidity (40-60%) keeps foliage lush; use a pebble tray or humidifier in dry homes.
- Feeding Routine: Apply diluted balanced fertilizer monthly during spring and summer; stop feeding in fall and winter.
- Common Issues: Watch for crown rot, spider mites, and leaf scorch; early detection prevents serious damage to your plant.
Quick Answers to Common Questions
Can coral bells grow indoors year-round?
Yes, coral bells adapt well to indoor conditions and can thrive year-round with proper light, watering, and humidity. They may go semi-dormant in winter but will rebound in spring.
How much light does a coral bells indoor plant need?
Bright indirect light is ideal. East or north-facing windows work best. Avoid harsh direct afternoon sun which can scorch the colorful foliage.
Why are my coral bells leaves turning brown at the edges?
Brown edges usually indicate low humidity, underwatering, or fertilizer salt buildup. Increase humidity, check soil moisture, and flush the soil with clean water.
How often should I water my coral bells indoor plant?
Water when the top inch of soil feels dry. Frequency depends on your home conditions. Check every few days rather than watering on a fixed schedule.
Are coral bells toxic to pets?
No, coral bells (Heuchera) are non-toxic to cats and dogs, making them a safe choice for pet-friendly households.
📑 Table of Contents
- Welcome to the World of Coral Bells Indoor Plant Care
- Understanding Your Coral Bells Indoor Plant
- Light Requirements for a Thriving Coral Bells Indoor Plant
- Watering Your Coral Bells Indoor Plant Correctly
- Soil, Potting, and Repotting Essentials
- Temperature and Humidity for Optimal Growth
- Fertilizing Your Coral Bells Indoor Plant
- Common Problems and How to Fix Them
- Propagating Your Coral Bells Indoor Plant
- Choosing the Best Varieties for Indoor Growing
- Seasonal Care Calendar
- Designing with Coral Bells Indoors
- Troubleshooting Quick Reference
- Conclusion: Your Coral Bells Indoor Plant Journey
Welcome to the World of Coral Bells Indoor Plant Care
If you have ever walked through a shaded garden and spotted those gorgeous mounds of ruffled leaves in impossible shades of purple, caramel, silver, and electric lime, you have met coral bells. Known botanically as Heuchera, these North American natives have long been shade garden superstars. But here is a secret many plant parents are just discovering: a coral bells indoor plant can thrive beautifully inside your home, bringing that same dramatic foliage color to your living room, office, or bedroom.
Growing coral bells as houseplants is not only possible, it is deeply rewarding. Unlike many flowering houseplants that bloom for a few weeks and then fade into green anonymity, coral bells deliver year-round visual interest through their foliage alone. The leaves emerge in spring with intense coloration, shift through summer tones, and often deepen dramatically in fall. Some varieties even hold their color through winter. Whether you are a seasoned plant collector or someone who has killed every succulent you have ever owned, this guide will walk you through everything you need to know to keep a coral bells indoor plant happy, healthy, and stunningly colorful.
Understanding Your Coral Bells Indoor Plant
What Exactly Is Heuchera?
Coral bells belong to the genus Heuchera, a group of roughly 50 species of herbaceous perennials native to North America. They earned their common name from the delicate, bell-shaped flowers that rise on wiry stems above the foliage in late spring to early summer. Those flowers attract hummingbirds and pollinators outdoors, but indoors, they are a lovely bonus rather than the main event.
The real show is the foliage. Modern breeding has produced an astonishing array of leaf colors, patterns, and textures. You can find coral bells indoor plant varieties with leaves in deep plum, bright chartreuse, warm caramel, metallic silver, rich chocolate, and even near-black. Many have contrasting veins, ruffled edges, or a subtle sheen that catches the light. The leaves form a tidy mound, typically 8 to 18 inches tall and wide, making them perfect for tabletops, shelves, or as part of a mixed indoor arrangement.
Why Grow Coral Bells Indoors?
There are compelling reasons to bring these garden favorites inside. First, their foliage provides consistent color without relying on flowers. Second, they are naturally compact and well-behaved, unlike vining plants that need constant pruning or tall floor plants that outgrow their space. Third, they tolerate lower light better than many colorful foliage plants, making them suitable for homes without south-facing windows. And fourth, they are non-toxic to cats and dogs, a huge plus for pet owners.
Another advantage is their seasonal dynamism. A coral bells indoor plant responds to changing light and temperature throughout the year, often shifting leaf color in ways that feel like getting a new plant every season. That caramel variety you bought in spring might turn rich amber by October. The silver-veined purple you loved in summer may deepen to near-black in winter’s cooler temperatures. This ever-changing nature keeps the plant interesting long after the novelty of a new purchase wears off.
Light Requirements for a Thriving Coral Bells Indoor Plant
Finding the Sweet Spot
Light is the single most important factor for a happy coral bells indoor plant. In nature, these plants grow on woodland edges and rocky slopes where they receive dappled sunlight filtered through tree canopies. Recreate that environment indoors with bright, indirect light. An east-facing window is ideal, providing gentle morning sun followed by bright ambient light all day. North-facing windows work well too, especially for darker-leaved varieties that need less light to maintain color.
South and west-facing windows can work if you provide protection. Sheer curtains, a slight setback from the glass, or positioning the plant to the side of the direct beam will prevent leaf scorch. Remember that light intensity changes with seasons. A spot that is perfect in October might become too intense in June. Observe your plant and adjust its position as needed.
Signs Your Light Is Right or Wrong
Your coral bells indoor plant will tell you if the light is suitable. Leaves that maintain their variety’s characteristic color, grow in a compact mound, and feel firm to the touch indicate good light. If the plant stretches toward the window with elongated stems and sparse foliage, it needs more light. If leaf edges turn brown and crispy, or if vibrant colors fade to dull green, the light is too intense.
Different varieties have different tolerances. Generally, darker leaves like ‘Obsidian’ or ‘Palace Purple’ handle more shade, while lighter colors like ‘Lime Rickey’ or ‘Caramel’ need brighter light to maintain their hue. Silver-leaved varieties such as ‘Silver Scrolls’ can tolerate quite low light but develop their best metallic sheen in brighter conditions. When in doubt, err on the side of slightly less light rather than more. A coral bells indoor plant can adapt to lower light by producing more chlorophyll, but sunburned leaves never recover.
Supplemental Lighting Options
If your home lacks suitable natural light, do not despair. Coral bells respond beautifully to grow lights. A full-spectrum LED grow light positioned 12 to 18 inches above the plant for 12 to 14 hours daily works wonderfully. This is especially useful in winter when daylight hours are short. Many plant parents successfully grow coral bells indoor plant collections entirely under artificial light in basements or interior rooms. Just ensure the light is not so intense or close that it generates heat on the foliage.
Watering Your Coral Bells Indoor Plant Correctly
The Goldilocks Principle
Watering is where many coral bells indoor plant owners go wrong. These plants want consistently moist soil, but they absolutely cannot tolerate standing water or soggy conditions. Their crowns, the point where stems meet roots, are prone to rot if kept wet. Think of the moist but well-drained forest floor they call home. Your goal is to keep the soil evenly damp like a wrung-out sponge, never bone dry and never waterlogged.
Check moisture by inserting your finger about an inch into the soil. If it feels dry at that depth, it is time to water. If it feels damp, wait another day or two. The frequency will vary wildly based on your home’s humidity, temperature, pot size, and soil mix. In a warm, dry home with a small terracotta pot, you might water every three days. In a cool, humid room with a large plastic pot, it could be every ten days. Never water on a fixed schedule. Always check the soil first.
How to Water Properly
When you do water, water thoroughly. Pour room-temperature water evenly over the soil surface until it flows freely from the drainage holes. This ensures the entire root ball is moistened and flushes out accumulated salts from fertilizer. Allow the pot to drain completely. Never let your coral bells indoor plant sit in a saucer of water. Empty the saucer within 30 minutes of watering.
Water at the soil level, not over the foliage. Wet leaves, especially in the crown center, invite fungal diseases and crown rot. If water accidentally splashes into the crown, gently blot it with a paper towel or use a turkey baster to remove excess. In winter, reduce watering frequency as growth slows, but never let the soil dry out completely. The roots remain active year-round and need some moisture even during dormancy.
Water Quality Matters
Coral bells prefer slightly acidic to neutral water. If your tap water is heavily chlorinated, let it sit overnight before using to allow chlorine to dissipate. Very hard water with high mineral content can gradually raise soil pH, which may affect nutrient uptake and leaf color. If you notice white crust on the soil surface or leaf tips browning despite proper watering, consider using filtered water, rainwater, or distilled water occasionally to flush the soil.
Soil, Potting, and Repotting Essentials
The Perfect Potting Mix
Your coral bells indoor plant needs a potting mix that holds moisture yet drains instantly. Standard bagged potting soil is often too dense and moisture-retentive on its own. Create your own blend by mixing two parts high-quality potting soil, one part perlite or pumice, and one part fine orchid bark or coconut coir. This mimics the loose, humus-rich, well-aerated soil of their native habitat.
The perlite or pumice creates air pockets for root respiration. The orchid bark or coir holds moisture while maintaining structure and breaking down slowly. Some growers add a handful of worm castings or compost for gentle nutrition. Avoid mixes with water-retaining crystals or heavy peat content. If you must use a commercial mix, choose one labeled for African violets or orchids, then amend with extra perlite.
Choosing the Right Container
Container choice significantly impacts your coral bells indoor plant health. The pot must have drainage holes. No exceptions. Terracotta pots are excellent because their porous walls allow air exchange and wick away excess moisture, reducing rot risk. However, they dry out faster, requiring more frequent watering. Glazed ceramic or plastic pots retain moisture longer, which can be helpful in dry homes but demands careful watering discipline.
Size matters too. Choose a pot only one to two inches larger in diameter than the current root ball. Coral bells have relatively shallow, fibrous root systems. An oversized pot holds too much soil that stays wet too long, a recipe for crown rot. A snug pot also encourages the plant to focus energy on foliage rather than root expansion. Ensure the pot is deep enough to accommodate the roots without bending them, but remember these are not deep-rooted plants.
When and How to Repot
Repot your coral bells indoor plant every two to three years in early spring, just as new growth emerges. Signs it is time include roots circling the pot bottom, water running straight through without absorbing, or the plant looking tired despite good care. Gently remove the plant, loosen the root ball, and shake off old soil. Inspect roots for rot (brown, mushy) and trim any damaged sections with clean scissors.
Place fresh soil in the new pot, position the plant so the crown sits at the same level as before, and backfill with your mix. Do not bury the crown. Water lightly to settle the soil, then keep the plant in slightly lower light for a week to recover. Avoid fertilizing for four to six weeks after repotting to let roots establish. Spring repotting aligns with the plant’s natural growth cycle and minimizes transplant shock.
Temperature and Humidity for Optimal Growth
Ideal Temperature Range
Coral bells indoor plant varieties thrive in typical home temperatures between 60 and 75 degrees Fahrenheit (15 to 24 degrees Celsius). They can tolerate brief dips into the 50s but suffer below 50°F. Protect them from cold drafts near exterior doors, single-pane windows in winter, and air conditioning vents. Similarly, keep them away from heating vents, radiators, and fireplaces. Hot, dry air from heating systems causes leaf edges to brown and crisp.
Temperature fluctuations affect leaf color intensity. Many varieties develop their richest hues in cooler temperatures, especially in fall and winter. If your home stays consistently warm year-round, you might notice less dramatic color shifts. A slight nighttime temperature drop of 5 to 10 degrees can enhance coloration, mimicking natural conditions. Just avoid sudden extreme changes.
Humidity Needs and Solutions
While coral bells tolerate average home humidity (30 to 40 percent), they truly flourish at 50 to 60 percent. Higher humidity keeps leaves supple, prevents spider mites, and enhances color vibrancy. In winter, when indoor heating drops humidity to desert levels, your coral bells indoor plant will appreciate intervention.
Group plants together to create a humid microclimate through transpiration. Place the pot on a pebble tray filled with water, ensuring the pot bottom sits above the water line. Run a humidifier nearby, especially overnight. Misting provides only temporary relief and can promote fungal issues if water sits in the crown. If you mist, do so in the morning so foliage dries completely by evening. A bathroom with good light can be an excellent location for a coral bells indoor plant, benefiting from shower humidity.
Fertilizing Your Coral Bells Indoor Plant
Less Is More
Coral bells are not heavy feeders. In their native rocky, nutrient-poor soils, they evolved to thrive on minimal nutrition. Over-fertilizing causes lush but weak growth, reduces leaf color intensity, and increases susceptibility to pests and diseases. A light hand yields the best results.
Feeding Schedule and Products
Feed your coral bells indoor plant monthly during active growth, typically March through September. Use a balanced, water-soluble fertilizer diluted to half the label strength. A 10-10-10 or 20-20-20 formula works fine. Alternatively, use a fertilizer formulated for foliage plants with slightly higher nitrogen. Organic options like fish emulsion or seaweed extract are excellent gentle choices.
Apply fertilizer to moist soil, never dry, to prevent root burn. In fall, taper off feeding as growth slows. Stop entirely in winter. Resume in spring when you see new leaves emerging. If you repot in fresh mix with compost or slow-release fertilizer, skip feeding for the first two months. Always err on the side of under-feeding. A slightly hungry coral bells indoor plant maintains better color and form than an overfed one.
Signs of Nutrient Issues
Yellowing older leaves with green veins often indicate nitrogen deficiency. Pale new growth may signal iron deficiency, especially if soil pH has crept too high. Brown leaf tips and margins can mean fertilizer salt buildup. Flush the soil by watering thoroughly until water runs freely from drainage holes for several minutes. If leaves become unusually large, floppy, and lose their characteristic color, you are likely over-fertilizing. Cut back immediately.
Common Problems and How to Fix Them
Crown Rot: The Number One Killer
Crown rot is the most serious threat to a coral bells indoor plant. It occurs when the crown stays wet, allowing fungal pathogens to attack the tissue where leaves emerge. Symptoms include mushy, brown or black crown tissue, leaves that pull away easily with a foul smell, and sudden plant collapse. Prevention is everything. Never water into the crown. Ensure excellent drainage. Use well-aerated soil. Provide good air circulation. If you catch it early, you might save the plant by removing all rotted tissue, dusting with cinnamon or fungicide, and replanting in fresh sterile mix. But often, by the time symptoms appear, it is too late.
Pest Issues
Spider mites are the most common pest on coral bells indoor plant specimens, especially in dry, warm conditions. Look for fine webbing, stippled leaves, and tiny moving dots on leaf undersides. Increase humidity immediately. Wash the plant thoroughly with lukewarm water, targeting leaf undersides. Treat with insecticidal soap or neem oil weekly for three weeks. Mealybugs appear as white cottony masses in leaf axils and crown. Remove with alcohol-dipped cotton swabs and treat systemically. Aphids occasionally attack new growth. Blast off with water and treat with soap spray.
Fungus gnats indicate overly wet soil. Let the top inch dry completely between waterings. Use yellow sticky traps for adults. Apply mosquito bits (Bacillus thuringiensis israelensis) to the soil to kill larvae. Scale insects look like small brown bumps on stems and leaf veins. Scrape off gently and treat with horticultural oil. Regular inspection catches problems early. Wipe leaves monthly with a damp cloth to remove dust and check for pests simultaneously.
Leaf Problems and Environmental Stress
Brown crispy leaf edges usually mean low humidity, underwatering, or fertilizer burn. Address the root cause. Brown spots with yellow halos suggest fungal leaf spot from wet foliage. Remove affected leaves, improve air flow, and keep leaves dry. Pale, washed-out color means too much light or nutrient deficiency. Adjust light first, then consider feeding. Small, deformed new growth can indicate cyclamen mites (microscopic) or broad mites. These require miticide treatment. Leggy, stretched growth means insufficient light. Move to a brighter spot or add grow lights.
Seasonal Dieback
Do not panic if your coral bells indoor plant looks rough in late winter. Many varieties go semi-dormant, with older leaves yellowing and dying back. This is normal. Remove dead foliage carefully. New growth will emerge from the crown in spring. If the plant looks completely dead, gently scratch the crown tissue. Green underneath means it is alive. Keep barely moist and wait. Coral bells are remarkably resilient.
Propagating Your Coral Bells Indoor Plant
Division: The Easiest Method
Division is the most reliable way to propagate a coral bells indoor plant and rejuvenate an older specimen. Do this in early spring during repotting. Gently separate the crown into sections, each with several leaves and a healthy root system. Use a clean, sharp knife if roots are tangled. Pot each division immediately in fresh mix. Keep in lower light and high humidity for two weeks. Division every three to four years prevents the center from dying out, a common issue with mature plants.
Leaf Cuttings: A Fun Experiment
You can propagate from leaf cuttings, though success rates vary. Choose a healthy mature leaf with a short petiole (leaf stem). Cut the petiole to about one inch. Insert into moist perlite or a peat-perlite mix. Cover with a clear plastic bag to create a humidity dome. Place in bright indirect light. Roots and a tiny plantlet may form at the petiole base in four to eight weeks. Once the plantlet has several leaves, pot it up. This works best with varieties that have substantial petioles.
Seed: For the Patient Grower
Growing from seed is possible but slow, and seedlings will not come true to the parent variety due to hybridization. If your coral bells indoor plant flowers and sets seed, collect the tiny seeds and sow on the surface of moist seed-starting mix. Do not cover; they need light to germinate. Keep at 65 to 70°F with high humidity. Germination takes two to six weeks. Transplant seedlings when they have true leaves. Expect variability in leaf color and form.
Choosing the Best Varieties for Indoor Growing
Top Picks for Color Impact
With hundreds of named cultivars, choosing can feel overwhelming. For indoor growing, prioritize varieties bred for compact habit and intense color. ‘Obsidian’ offers near-black, glossy leaves that hold color in lower light. ‘Caramel’ delivers warm amber-orange foliage that glows in bright indirect light. ‘Lime Rickey’ brings electric chartreuse that brightens any room. ‘Silver Scrolls’ features metallic silver leaves with charcoal veins. ‘Forever Purple’ maintains rich purple year-round. ‘Peach Flambe’ shifts from peach to red to plum through seasons.
Considerations for Your Space
Match the variety to your light conditions. Dark-leaved types tolerate shadier spots. Light-colored varieties need brighter light to avoid reverting to green. If space is tight, look for “villosa” hybrids like ‘Caramel’ or ‘Citronelle’ which stay naturally compact. For dramatic ruffling, choose ‘Crisp’ series varieties. If you want flowers too, ‘Firefly’ and ‘Splendens’ bloom more reliably indoors. Many garden centers carry coral bells in spring. Specialty nurseries and online retailers offer the widest selection year-round.
Seasonal Care Calendar
Spring: The Growth Surge
Spring is the busiest season for your coral bells indoor plant. As days lengthen, new leaves emerge rapidly. This is the time to repot if needed, divide crowded plants, and resume fertilizing. Increase watering frequency as growth accelerates. Watch for aphids on tender new growth. Move plants closer to windows if they were pulled back for winter. Remove any winter-damaged foliage. Enjoy the fresh, intense colors of spring emergence.
Summer: Maintenance Mode
Summer care focuses on consistency. Water regularly as heat and light increase. Monitor for spider mites in dry, hot conditions. If your plant spends summer outdoors (in shade), acclimate it gradually over two weeks. Bring it back inside before night temperatures drop below 55°F. Inspect thoroughly for pests before returning indoors. Continue monthly feeding. Deadhead flower stems if you prefer foliage focus, or let them bloom for indoor pollinator visits.
Fall: Color Transformation
Fall brings spectacular color changes in many coral bells indoor plant varieties. Cooler nights trigger anthocyanin production, deepening reds, purples, and oranges. Reduce fertilizing by half in early fall, then stop. Water slightly less as growth slows. This is a great time to take divisions or leaf cuttings. Clean up any spent foliage. Prepare for winter by ensuring the plant is pest-free and in its optimal indoor location.
Winter: Rest and Observation
Winter is the resting period. Water sparingly but never let soil dry completely. No fertilizer. Provide maximum available light. Watch for spider mites in dry heated air. Remove yellowing leaves promptly. Do not repot or divide. If the plant looks sad, remember many varieties naturally decline in winter. The crown is alive and gathering energy for spring. Resist the urge to overwater a dormant plant. Patience pays off with vigorous spring growth.
Designing with Coral Bells Indoors
Solo Specimens
A single coral bells indoor plant in a beautiful pot makes a striking focal point. Choose a container that complements the leaf color. Terracotta enhances warm tones like caramel and peach. Glazed ceramic in deep blue or charcoal sets off silver and purple varieties. White or neutral pots let the foliage speak for itself. Place on a plant stand, side table, or desk where the ruffled texture can be appreciated up close.
Mixed Arrangements
Coral bells play well with others in mixed containers. Pair with plants that share similar care needs: ferns for texture contrast, rex begonias for pattern play, or trailing pothos for vertical interest. Ensure all plants want bright indirect light, consistent moisture, and good drainage. Avoid combining with succulents or cacti that need dry conditions. In a large bowl or trough, create a miniature woodland scene with moss, small stones, and a coral bells indoor plant as the centerpiece.
Seasonal Displays
Rotate your coral bells indoor plant into seasonal vignettes. In autumn, pair ‘Peach Flambe’ with mini pumpkins and dried wheat. For winter holidays, ‘Obsidian’ or ‘Forever Purple’ looks elegant with silver ornaments and white lights. Spring calls for ‘Lime Rickey’ alongside forced bulbs and moss. Summer arrangements shine with ‘Caramel’ mixed with flowering annuals in a shaded patio pot that comes indoors for parties. The changing foliage colors make coral bells a dynamic design element year-round.
Troubleshooting Quick Reference
Symptom: Leaves turning green, losing variety color
Cause: Insufficient light. Solution: Move to brighter location or add grow light.
Symptom: Brown crispy leaf edges
Cause: Low humidity, underwatering, or fertilizer burn. Solution: Increase humidity, check watering, flush soil.
Symptom: Yellowing lower leaves
Cause: Natural aging, overwatering, or nitrogen deficiency. Solution: Remove yellow leaves, adjust watering, consider light feeding.
Symptom: Plant collapsing at base, foul smell
Cause: Crown rot. Solution: Emergency surgery – remove rot, treat with fungicide, repot in fresh mix. Often fatal.
Symptom: Fine webbing, stippled leaves
Cause: Spider mites. Solution: Increase humidity, wash plant, treat with insecticidal soap or neem oil.
Symptom: White cottony masses in leaf joints
Cause: Mealybugs. Solution: Remove with alcohol, treat with systemic insecticide or neem oil.
Symptom: Leggy, stretched growth with wide leaf spacing
Cause: Insufficient light. Solution: Move to brighter spot, add grow light, prune back in spring.
Symptom: Small distorted new growth
Cause: Cyclamen or broad mites. Solution: Miticide treatment, isolate plant, discard if severe.
Conclusion: Your Coral Bells Indoor Plant Journey
Growing a coral bells indoor plant is a journey of color, texture, and seasonal rhythm. These remarkable perennials bring a piece of the woodland garden into your home, asking only for bright indirect light, thoughtful watering, well-draining soil, and a bit of humidity in return. They reward your care with foliage that shifts and deepens through the seasons, offering new beauty every month of the year.
Remember that every home is different, and every plant is an individual. Observe your coral bells indoor plant closely. It will communicate its needs through its leaves. Firm, colorful foliage means you are on the right track. Changes in color, texture, or posture are signals to adjust something. Do not be afraid to experiment with location, watering frequency, or humidity methods until you find the sweet spot.
Whether you start with one ‘Caramel’ on your desk or build a collection of ten varieties on a plant shelf, coral bells offer a depth of satisfaction that goes beyond typical houseplants. They connect you to native plant heritage, to the rhythm of seasons even indoors, and to the simple joy of watching a living thing thrive under your care. So find a bright corner, pick a pot you love, and welcome a coral bells indoor plant into your life. Your indoor garden will never be the same.
Frequently Asked Questions
Do coral bells indoor plants flower inside?
Yes, mature coral bells indoor plants can produce delicate bell-shaped flowers on tall wiry stems in late spring to early summer. However, they are grown primarily for their spectacular foliage, and flowering may be less prolific indoors than in the garden.
Can I put my coral bells indoor plant outside in summer?
Absolutely. Coral bells benefit from a summer vacation outdoors in a shaded location. Acclimate gradually over two weeks. Bring them back inside before night temperatures drop below 55°F and inspect carefully for pests.
Why is my coral bells losing its vibrant color and turning green?
Color loss usually means insufficient light. Move the plant to a brighter spot with indirect light or add a grow light. Some varieties naturally shift toward greener tones in low light or high heat.
How do I prevent crown rot on my coral bells indoor plant?
Never water into the crown center. Use well-draining soil with perlite and orchid bark. Ensure the pot has drainage holes. Water at soil level only. Provide good air circulation around the plant.
When should I repot my coral bells indoor plant?
Repot every 2-3 years in early spring when new growth emerges. Signs include roots circling the pot, water running through without absorbing, or the plant looking tired despite good care.
Can I grow coral bells from seeds collected from my indoor plant?
You can, but seedlings will not match the parent plant due to hybridization. Seeds need light to germinate and take 2-6 weeks at 65-70°F. Division is the reliable way to propagate exact clones.