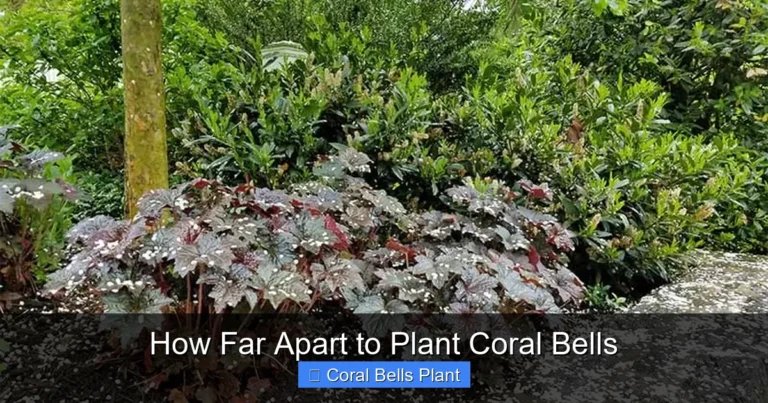
Can Coral Bells Be Planted
Yes, coral bells can be planted successfully in most gardens with proper timing and site preparation. These versatile perennials thrive in partial shade with well-draining soil, offering year-round colorful foliage and delicate flower spikes that attract pollinators.
If you’ve ever wandered through a shade garden and spotted those gorgeous mounds of ruffled leaves in shades of purple, caramel, lime green, or near-black, you’ve met coral bells. These charming perennials, botanically known as Heuchera, have become garden superstars over the past couple of decades. Plant breeders have gone wild creating new varieties, and now there’s a coral bell for practically every garden situation. But the big question on every gardener’s mind remains: can coral bells be planted in my specific yard, and if so, how do I make sure they actually thrive?
The short answer is a resounding yes. Coral bells are remarkably adaptable plants that can be planted successfully across a wide range of growing zones, soil types, and light conditions. Native to North America, these tough little perennials have evolved to handle everything from rocky mountain slopes to woodland edges. Modern breeding has only expanded their versatility. Whether you’re dealing with dry shade under mature trees, a sunny rock garden in the Pacific Northwest, or a container on a balcony, there’s likely a coral bell variety that will make itself right at home. The key lies in understanding their basic needs and matching the right variety to your specific conditions.
Key Takeaways
- Best planting times: Spring and early fall offer ideal temperatures for root establishment before extreme weather arrives.
- Light requirements: Most varieties prefer partial shade, though some newer cultivars tolerate full sun in cooler climates.
- Soil preparation: Well-draining, organic-rich soil with neutral to slightly acidic pH creates the perfect foundation.
- Spacing matters: Plant 12-18 inches apart to allow air circulation and prevent crown rot issues.
- Water wisely: Consistent moisture during establishment, then moderate watering once established prevents stress.
- Division rejuvenates: Divide clumps every 3-4 years in spring to maintain vigor and prevent woody centers.
- Year-round interest: Evergreen to semi-evergreen foliage provides winter color when other perennials disappear.
Quick Answers to Common Questions
Can coral bells be planted in full sun?
Some varieties tolerate full sun in cool climates with adequate moisture, but most prefer partial shade. Dark-leaved and villosa hybrids handle more sun than light-leaved varieties.
Can coral bells be planted in the fall?
Yes, fall is an excellent planting time. Plant 6-8 weeks before first frost for best root establishment. Mulch well after ground freezes to prevent frost heaving.
How deep should coral bells be planted?
The crown (where leaves meet roots) must sit at or slightly above soil level. Planting too deep causes crown rot, the number one killer of coral bells.
Can coral bells be planted in containers?
Absolutely. Their shallow roots and compact size make them ideal container plants. Use well-draining potting mix and water more frequently than in-ground plants.
Do coral bells spread aggressively?
No, coral bells form neat clumps that slowly expand. They don’t run or self-sow aggressively. Divide every 3-4 years to maintain vigor and prevent woody centers.
📑 Table of Contents
- Understanding Coral Bells Before You Plant
- When Can Coral Bells Be Planted for Best Results?
- Choosing the Perfect Spot: Light and Location
- Soil Preparation: The Foundation of Success
- Step-by-Step Planting Guide
- Ongoing Care for Thriving Coral Bells
- Choosing the Right Varieties for Your Garden
- Troubleshooting Common Problems
- Designing with Coral Bells
- Seasonal Interest Through the Year
- Propagation Beyond Division
- Coral Bells in Different Garden Styles
- Conclusion
Understanding Coral Bells Before You Plant
What Exactly Are Coral Bells?
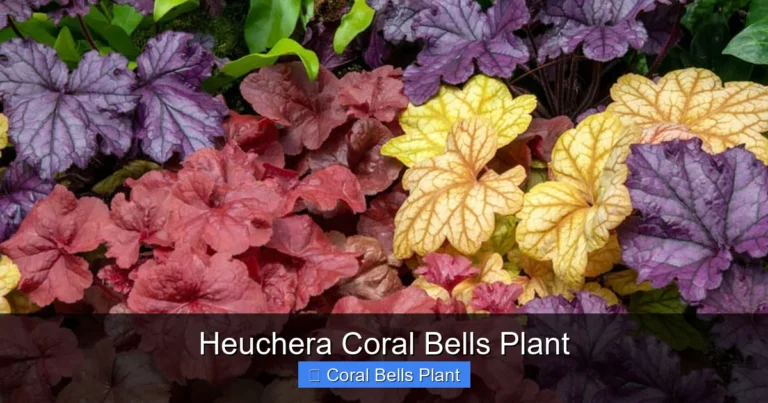
Coral bells belong to the genus Heuchera, part of the Saxifragaceae family. These herbaceous perennials form neat, rounded mounds of lobed or scalloped leaves that emerge from a central crown. The foliage is the real showstopper here. While the original species featured green leaves with subtle silver veining, today’s cultivars display an mind-boggling array of colors. Think deep burgundy, bright chartreuse, warm caramel, silvery pewter, rich chocolate, and even varieties that change color through the seasons. The leaves often feature contrasting veins, ruffled edges, or metallic overlays that catch the light beautifully.
In late spring to early summer, slender stems rise above the foliage bearing clusters of tiny, bell-shaped flowers. These blooms range from white and pink to coral red, hence the common name. While the flowers are lovely and attract hummingbirds and bees, most gardeners grow coral bells primarily for their foliage. The plants typically reach 8-18 inches tall and wide, though some varieties stay more compact while others spread to two feet or more. They’re hardy in USDA zones 4-9, with some varieties pushing into zone 3 with good snow cover.
The Native Advantage
Understanding where coral bells come from helps explain why they’re such garden workhorses. Various Heuchera species are native to different regions across North America. Heuchera americana hails from eastern woodlands. Heuchera sanguinea calls the southwestern mountains home. Heuchera micrantha grows along the Pacific coast. This diverse heritage means the genus as a whole has genetics adapted to a wide range of conditions. Modern hybrids combine traits from multiple species, giving us plants that are more vigorous, more colorful, and more adaptable than their wild ancestors.
This native background also means coral bells support local ecosystems. Their flowers provide nectar for native bees, butterflies, and hummingbirds. The dense foliage offers shelter for beneficial insects. And because they’re not aggressive spreaders, they play nice with other native plants in naturalistic garden designs. When you plant coral bells, you’re not just adding pretty foliage. You’re adding a piece of North American botanical heritage to your landscape.
When Can Coral Bells Be Planted for Best Results?
Spring Planting: The Classic Choice
Spring is the most popular time for planting coral bells, and for good reason. As soil temperatures warm and daylight increases, plants naturally want to grow. Planting in spring gives coral bells a full growing season to establish strong root systems before winter arrives. Aim to plant after your last frost date when the soil has warmed to at least 50°F. In most regions, this means April through early June. The moderate temperatures and typically reliable spring rainfall reduce transplant shock and keep watering duties manageable.
One spring planting advantage is availability. Garden centers stock their best selection of coral bells in spring, so you’ll have the widest variety to choose from. You can see the foliage colors in person rather than relying on catalog photos. Just be aware that spring-planted coral bells may need more frequent watering during their first summer as their root systems develop. Mulch well to conserve moisture and keep roots cool.
Fall Planting: The Secret Weapon
Experienced gardeners often prefer fall planting for perennials, and coral bells are no exception. Planting in early fall, roughly 6-8 weeks before your first hard frost, offers distinct advantages. Soil temperatures remain warm from summer, encouraging root growth even as air temperatures cool. Autumn rains often provide consistent moisture. And the plants face less heat stress than spring plantings facing their first summer. By the time spring arrives, fall-planted coral bells are ready to take off with established root systems.
The trade-off is selection. Fall nursery stock may be picked over, though many garden centers now bring in fresh fall perennials. You’ll also need to be more diligent about winter protection in colder zones. Apply a thick layer of mulch after the ground freezes to prevent frost heaving, which can push shallow-rooted coral bells right out of the ground. In zones 4-5, fall planting should happen by early October. In zones 6-7, you can plant through October. Zone 8 and warmer gardeners can plant well into November.
Summer and Winter Considerations
Can coral bells be planted in summer? Technically yes, but it’s not ideal. Summer heat and drought stress make establishment difficult. If you must plant in summer, choose a cloudy day, provide temporary shade, and commit to daily watering for several weeks. Winter planting is only feasible in the warmest zones (8b and above) where the ground doesn’t freeze. Even then, growth will be minimal until spring. For most gardeners, stick to spring or fall for the highest success rates with the least effort.
Choosing the Perfect Spot: Light and Location
Decoding Light Requirements
The question of where coral bells can be planted often centers on light exposure. The traditional wisdom says “partial shade,” but that term covers a lot of ground. Most coral bells perform best with 4-6 hours of morning sun or dappled light throughout the day. This provides enough light for vibrant foliage color without scorching the leaves. Dark-leaved varieties like ‘Palace Purple’ or ‘Obsidian’ generally tolerate more sun than light-leaved ones like ‘Lime Rickey’ or ‘Electra’. In hot southern climates, afternoon shade is non-negotiable. In cool northern climates, many varieties handle full sun beautifully, especially with adequate moisture.
Some newer introductions are specifically bred for sun tolerance. The ‘Primo’ series, ‘Dolce’ series, and varieties like ‘Forever Purple’ and ‘Black Pearl’ can handle more sun than older cultivars. Conversely, if you have deep shade, look for varieties with larger, thinner leaves like Heuchera villosa hybrids. These Appalachian natives naturally grow in dense woodland conditions. The key is matching the variety to your light conditions rather than forcing a plant into unsuitable light.
Microclimates Matter
Your garden likely has multiple microclimates, and coral bells can be planted strategically to take advantage of them. The east side of a structure gets gentle morning sun and afternoon shade, perfect for most varieties. Under deciduous trees provides spring sun before leaf-out and summer shade after, mimicking their native woodland habitat. North-facing walls offer consistent shade. South-facing slopes in cool climates can work for sun-tolerant varieties. Even dry shade under shallow-rooted trees like maples can work if you choose drought-tolerant varieties like Heuchera villosa ‘Autumn Bride’ and provide supplemental water during establishment.
Container Culture
Don’t overlook containers when considering where coral bells can be planted. Their compact size, shallow roots, and year-round foliage make them exceptional container plants. Use a high-quality potting mix with good drainage. Choose containers at least 12 inches wide and deep. Container-grown coral bells need more frequent watering and fertilizing than in-ground plants, but you gain the ability to move them for optimal seasonal light exposure. In cold zones, containers can be moved to an unheated garage or buried in the ground for winter protection. This flexibility makes containers ideal for gardeners with limited space or challenging soil conditions.
Soil Preparation: The Foundation of Success
Drainage Is Non-Negotiable
If there’s one thing that will kill coral bells faster than anything else, it’s wet feet. These plants absolutely require well-draining soil. Their crowns sit right at soil level, and constant moisture around the crown leads to rot. Before planting, test your drainage by digging a hole 12 inches deep and filling it with water. If it doesn’t drain within a few hours, you have a drainage problem. Solutions include amending heavily with organic matter, creating raised beds, planting on slopes, or choosing container culture. In clay soils, amend with compost, aged bark fines, or perlite to improve structure. Don’t add sand to clay, it creates concrete-like soil.
Soil Chemistry Preferences
Coral bells prefer slightly acidic to neutral soil, ideally pH 6.0-7.0. They’re not as fussy as blueberries or rhododendrons, but strongly alkaline soils (above 7.5) can cause nutrient deficiencies, particularly iron chlorosis, which shows as yellowing leaves with green veins. A simple soil test from your local extension service will tell you exactly where you stand. If your soil is too alkaline, incorporate elemental sulfur or acidic organic materials like pine bark or peat moss. If it’s too acidic (below 5.5), add garden lime. Most garden soils fall in the acceptable range without amendment.
Organic Matter: The Universal Improver
Regardless of your soil type, organic matter improves it. Compost, well-rotted manure, leaf mold, or aged bark fines improve drainage in clay, water retention in sand, and nutrient availability in all soils. Work 2-3 inches of organic matter into the top 8-10 inches of soil before planting. This creates the loose, humus-rich environment coral bells love. If you’re planting in an existing bed, you can top-dress with compost annually rather than disturbing established roots. The organic matter also feeds beneficial soil organisms that help protect plants from disease.
Special Situations: Rocky, Sandy, or Urban Soils
Coral bells can be planted in challenging soils with proper preparation. Rocky soil? Remove the largest rocks and amend the rest. The plants’ shallow roots navigate around smaller stones easily. Sandy soil? Load up on organic matter and plan for more frequent watering and fertilizing. Urban soils often suffer from compaction and contamination. If you suspect contamination, get a soil test for heavy metals. For compaction, double-dig or use a broadfork to loosen soil deeply before amending. Raised beds filled with quality soil mix bypass poor native soil entirely and are an excellent option for difficult sites.
Step-by-Step Planting Guide
Before You Dig
Preparation makes planting day smooth and successful. Water your coral bells thoroughly a few hours before planting. Moist root balls hold together better and experience less transplant shock. Gather your tools: garden spade or trowel, compost, mulch, watering can or hose, and gloves. If planting multiple plants, lay them out in their pots first to finalize spacing and arrangement. Step back and view from different angles. This is much easier than moving planted specimens.
Check the plant tags for mature width and space accordingly. Most coral bells need 12-18 inches between centers. Closer spacing creates faster fill-in but increases disease risk from poor air circulation. Wider spacing allows each plant to develop its natural mound shape. For mass plantings, stagger rows in a triangular pattern rather than straight lines for a more natural look. Consider the viewing angle. Plant taller varieties behind shorter ones. Group odd numbers (3, 5, 7) for more naturalistic drifts.
The Planting Process
Dig holes twice as wide as the root balls but no deeper. You want the plant sitting on firm soil so it doesn’t settle too low. The crown, where leaves emerge from roots, should sit at or slightly above soil level. This is critical. Planting too deep is the number one cause of coral bell failure. Remove the plant from its pot by squeezing the sides and gently tipping it out. If roots are circling the bottom, tease them loose with your fingers. This encourages outward growth into the surrounding soil.
Place the plant in the hole and check the crown level. Adjust by adding or removing soil from the bottom. Backfill with the amended soil you removed, firming gently around the roots to eliminate air pockets. Don’t pack it hard, just firm enough to support the plant. Create a shallow basin around the plant to hold water. Water thoroughly until the soil is moist to the depth of the root ball. This settles the soil and ensures good root-to-soil contact. Apply 2-3 inches of mulch, keeping it pulled back from the crown. Shredded bark, pine straw, or leaf mold all work well.
First Season Care
The first growing season is all about root establishment. Water deeply once or twice a week during dry spells, more often in extreme heat. Check soil moisture by sticking your finger in the soil. If it’s dry an inch down, water. Don’t rely on rain unless you get a good soaking. Avoid fertilizing at planting time. The amended soil provides plenty of nutrients. Wait until the following spring to apply a light feeding of balanced, slow-release fertilizer. Remove any flower stems that appear the first year to direct energy into root and foliage growth. You’ll get better flowers next year anyway.
Ongoing Care for Thriving Coral Bells
Watering Wisdom
Established coral bells are moderately drought tolerant, but they perform best with consistent moisture. Think “evenly moist, not wet.” In average garden soil with mulch, a deep watering once a week during the growing season usually suffices. Sandy soils need more frequent watering. Clay soils need less. Always water at the base of the plant, keeping foliage dry to prevent fungal diseases. Soaker hoses or drip irrigation are ideal. Reduce watering in fall as plants prepare for dormancy. In winter, water only during extended dry spells when the ground isn’t frozen.
Feeding for Fabulous Foliage
Coral bells aren’t heavy feeders, but they appreciate a little nutrition. In early spring, as new growth emerges, apply a balanced slow-release fertilizer (10-10-10 or similar) at half the recommended rate. Alternatively, top-dress with an inch of compost around the plants. This feeds slowly all season and improves soil structure. Avoid high-nitrogen fertilizers, which promote lush, weak growth susceptible to disease and frost damage. If foliage color seems dull or growth is stunted, a foliar feed with liquid seaweed or fish emulsion can provide a quick boost.
Grooming and Maintenance
One of coral bells’ charms is their low maintenance nature. In spring, remove any winter-damaged or dead leaves by gently pulling them from the base. This improves air circulation and reveals fresh growth. Deadhead spent flower stems by cutting them back to the base after blooming. This tidies the plant and may encourage a light rebloom. In late fall, after the ground freezes in cold climates, apply a protective mulch layer over the crowns. Straw, pine boughs, or shredded leaves work well. Remove this extra mulch in early spring as growth resumes.
Division: The Rejuvenation Ritual
Every 3-4 years, coral bells benefit from division. You’ll know it’s time when the center of the clump becomes woody and bare, flowering decreases, or the plant pushes up out of the ground. Spring is the ideal time, just as new growth emerges. Dig up the entire clump. Using a sharp knife or spade, cut it into sections, each with healthy roots and several growth points. Discard the woody center. Replant divisions at the proper depth, water well, and mulch. They’ll establish quickly and reward you with vigorous new growth. Division also gives you free plants to expand your garden or share with friends.
Choosing the Right Varieties for Your Garden
Color Categories
The sheer variety of coral bells can be overwhelming. Breaking them down by foliage color helps narrow choices. Purple to near-black varieties like ‘Palace Purple’, ‘Obsidian’, ‘Black Pearl’, and ‘Forever Purple’ provide dramatic contrast and hold color well in sun. Red and orange tones include ‘Caramel’, ‘Peach Flambe’, ‘Fire Alarm’, and ‘Georgia Peach’. These often shift through multiple shades across seasons. Chartreuse to lime green varieties like ‘Lime Rickey’, ‘Electra’, ‘Lime Marmalade’, and ‘Citronelle’ brighten shady spots. Silver and pewter varieties like ‘Silver Scrolls’, ‘Cinnabar Silver’, and ‘Appletini’ add sophisticated shimmer.
Specialty Types
Beyond color, consider specialty traits. Large-leaved varieties like ‘Mega Caramel’ or ‘Big Top Caramel’ make bold statements. Miniature varieties like ‘Petite Pearl Fairy’ or ‘Little Cutie’ series fit tight spaces and containers. Ruffled-edge varieties like ‘Crème Brûlée’ or ‘Ginger Peach’ add texture. Heat and humidity tolerant varieties, mostly Heuchera villosa hybrids like ‘Autumn Bride’, ‘Brownies’, and ‘Mocha’, thrive in southern gardens. Cold-hardy varieties for zone 3-4 include many Heuchera sanguinea hybrids and the ‘Northern Exposure’ series. For maximum flowers, look at Heuchera sanguinea varieties like ‘Snow Angel’ or ‘Ruby Bells’.
Companion Planting
Coral bells play well with others. Their mounding habit and colorful foliage complement countless shade garden companions. Pair with hostas for contrasting leaf shapes. Ferns add delicate texture. Astilbes provide feathery plumes. Brunnera offers silver-flecked leaves and blue spring flowers. Heucherella (foamy bells), a Heuchera x Tiarella hybrid, bridges coral bells and foamflowers beautifully. Spring bulbs like daffodils and snowdrops bloom before coral bells leaf out fully. Groundcovers like creeping phlox or ajuga fill in around the base. In sunnier spots, pair with sedums, ornamental grasses, or dwarf conifers.
Troubleshooting Common Problems
Frost Heaving
In cold climates with freeze-thaw cycles, coral bells’ shallow roots can be pushed right out of the ground. This exposes roots to drying air and freezing temperatures. Prevention is simple: apply 3-4 inches of mulch after the ground freezes in late fall. If you discover heaved plants in spring, gently press them back into the soil and water well. Don’t try to dig and replant frozen plants. The mulch also moderates soil temperature, reducing the freeze-thaw cycles that cause heaving.
Crown Rot
The crown is the vulnerable junction between roots and leaves. Buried crowns, poor drainage, and excessive mulch against the crown all promote rot. Symptoms include wilting despite moist soil, blackened crown tissue, and leaves pulling away easily. Prevention is far easier than cure. Plant at the correct depth. Ensure excellent drainage. Keep mulch pulled back from crowns. If rot is caught early, you can sometimes save the plant by digging it up, cutting away rotted tissue, dusting with fungicide, and replanting in fresh, well-draining soil. But success rates are low.
Foliar Diseases
Powdery mildew appears as white powdery coating on leaves, usually in humid conditions with poor air circulation. Rust shows as orange pustules on leaf undersides. Leaf spots cause brown or black lesions. Good cultural practices prevent most issues: proper spacing, watering at the base, morning sun to dry foliage, and removing affected leaves promptly. Fungicides containing copper or sulfur can help if applied early. Some varieties have better disease resistance. Heuchera villosa hybrids generally show excellent mildew resistance.
Pest Issues
Coral bells have few serious pests. Root weevils notch leaf edges and larvae feed on roots. Beneficial nematodes applied to soil control larvae. Deer and rabbits occasionally browse, though the fuzzy leaves of some varieties deter them. Slugs and snails may damage leaves in wet conditions. Beer traps, diatomaceous earth, or iron phosphate baits control them. Foliar nematodes cause angular brown lesions between leaf veins. There’s no cure; remove and destroy affected plants. Good sanitation and avoiding overhead watering prevent spread.
Designing with Coral Bells
Mass Plantings for Impact
Nothing beats a drift of coral bells for visual impact. Plant 5, 7, or 9 of the same variety in a sweeping curve along a path or woodland edge. The repetition creates rhythm and draws the eye through the garden. Mass plantings also simplify maintenance since all plants have identical needs. Choose varieties that hold their color well and resist disease for the best long-term show. ‘Caramel’, ‘Palace Purple’, and ‘Lime Rickey’ are reliable massing choices. Space plants at the closer end of their range (12 inches) for faster fill-in.
Mixed Foliage Tapestries
For a more collector’s garden approach, mix multiple coral bell varieties with complementary colors. Combine a dark purple, a chartreuse, a silver, and a caramel variety. The key is ensuring they have similar cultural requirements. Plant in groups of 3 of each variety rather than dotting singles throughout. This creates readable color blocks rather than a chaotic jumble. Add contrasting textures like ferns, hostas, and grasses. The result is a living tapestry that changes through the seasons.
Edge and Border Roles
Coral bells excel as edging plants along paths, beds, and borders. Their neat mounds stay in bounds and provide year-round definition. Plant them 12-15 inches from the edge so mature foliage softens the line without flopping onto paths. They’re tall enough to be visible behind low groundcovers but short enough not to block views of taller plants behind them. In formal gardens, use a single variety for a crisp, uniform edge. In naturalistic gardens, mix two or three varieties for a softer transition.
Container Combinations
In containers, coral bells shine as the “filler” in the classic thriller-filler-spiller formula. Pair a bold coral bell with a tall thriller like a small Japanese maple, ornamental grass, or canna. Add a spiller like creeping jenny, sweet potato vine, or trailing lobelia. The coral bell’s mounding habit fills the middle beautifully. For shade containers, combine with ferns, caladiums, and impatiens. For sun containers (with sun-tolerant varieties), pair with petunias, verbena, and calibrachoa. Remember containers need more frequent watering and fertilizing.
Seasonal Interest Through the Year
Spring Awakening
Spring brings fresh, intensely colored new growth. Many varieties show their brightest colors on new leaves. The mound shape is at its neatest. Flower stems begin to rise, promising blooms to come. This is prime time for division and planting. The garden feels full of possibility.
Summer Blooms
Late spring to early summer brings the delicate flower spikes. Hummingbirds visit regularly. The flowers last several weeks and make charming cut flowers for small arrangements. Foliage color may deepen or shift with summer heat. Some varieties develop more pronounced veining or overlay colors.
Fall Transformation
Many coral bells put on a second color show in fall. Cooler temperatures intensify reds, oranges, and purples. Varieties like ‘Peach Flambe’ and ‘Fire Alarm’ become positively electric. The foliage remains pristine while other perennials decline. This is coral bells’ season to steal the spotlight.
Winter Presence
In milder zones, coral bells remain fully evergreen, providing precious winter color. In colder zones, they’re semi-evergreen, retaining some foliage under snow. The mounds catch frost beautifully. Even when foliage dies back, the crowns remain visible, marking the plant’s location for spring. Few shade perennials offer this level of winter interest.
Propagation Beyond Division
Growing from Seed
Coral bells can be grown from seed, but with a catch. Species come relatively true from seed. Hybrids, which include most named varieties, do not. Seedlings from ‘Caramel’ will vary widely in color and form. This can be fun for experimenters but frustrating if you want a specific look. If you try seed, sow fresh seed on the surface of moist seed-starting mix. Don’t cover, as light aids germination. Keep at 65-70°F. Germination takes 2-8 weeks. Transplant seedlings when they have several true leaves. Expect flowering in year two.
Leaf Cuttings
Some gardeners propagate coral bells from leaf cuttings. Take a healthy leaf with a short piece of petiole (leaf stem). Dip in rooting hormone and insert into moist perlite or vermiculite. Cover with a plastic bag to maintain humidity. Place in bright, indirect light. Roots and a tiny plantlet may form at the base of the petiole in 4-8 weeks. Success rates vary by variety. Heuchera villosa types root more readily than others. This method produces clones of the parent plant.
Tissue Culture
Commercial nurseries propagate coral bells via tissue culture (micropropagation). Tiny pieces of meristematic tissue are grown in sterile laboratory conditions with precise hormone balances. This produces thousands of identical, disease-free plants quickly. It’s how new varieties reach market in large numbers. Not practical for home gardeners, but it’s why you can buy that hot new variety in quantity at reasonable prices.
Coral Bells in Different Garden Styles
Woodland Gardens
This is coral bells’ native habitat, and they look perfectly at home. Plant them along paths, at the base of trees, and in drifts among ferns and wildflowers. Choose varieties with natural-looking colors: greens, silvers, soft purples. Heuchera americana and villosa hybrids fit best. Let them self-sow gently for a naturalized effect. Their flowers support native pollinators. The whole planting feels like it’s always been there.
Modern and Minimalist Gardens
The bold, architectural foliage of coral bells suits contemporary designs beautifully. Use mass plantings of a single dramatic variety like ‘Obsidian’ or ‘Lime Marmalade’. Plant in geometric blocks or clean lines. Pair with ornamental grasses, clipped boxwoods, or architectural hardscape. The intense foliage colors provide the “pop” that minimalist gardens need without clutter.
Cottage Gardens
In cottage gardens, coral bells mingle happily with roses, peonies, delphiniums, and all the classic perennials. Their mounding habit fills gaps between larger plants. The ruffled leaves complement the romantic aesthetic. Choose softer colors: ‘Caramel’, ‘Berry Smoothie’, ‘Paris’. Let them seed around a bit. They’re well-behaved enough not to become thugs but enthusiastic enough to look established.
Rock Gardens
Many coral bells, especially Heuchera sanguinea and its hybrids, originate in rocky mountain habitats. They thrive in the sharp drainage of rock gardens. Tuck them into crevices between stones. Their roots follow cool, moist fissures deep in the rock. The foliage softens hard edges. Flowers wave above the stones. Choose compact varieties for smaller rock gardens.
Conclusion
So, can coral bells be planted in your garden? Almost certainly yes. These remarkably adaptable perennials have earned their place as shade garden staples through sheer versatility, beauty, and reliability. Whether you have a sprawling woodland property, a tiny urban courtyard, or anything in between, there’s a coral bell variety waiting to transform your space with year-round foliage color and delicate blooms.
The keys to success are straightforward: choose the right variety for your light conditions, prepare well-draining soil rich in organic matter, plant at the correct depth with the crown at soil level, water consistently during establishment, and divide every few years to maintain vigor. Follow these basics, and your coral bells will reward you with decades of low-maintenance beauty.
Don’t be afraid to experiment. Try a variety you’ve never seen before. Mix colors boldly. Plant them in unexpected places. Move them if they’re not happy. Gardening with coral bells is a journey of discovery, and these forgiving plants make excellent companions along the way. Your shade garden will never be the same once you experience the magic of Heuchera.
Frequently Asked Questions
What is the best time of year to plant coral bells?
Spring and early fall are the optimal planting times. Spring planting gives a full growing season for establishment. Fall planting allows root growth in warm soil before winter. Avoid summer heat and winter freeze for highest success rates.
How much space do coral bells need between plants?
Space coral bells 12-18 inches apart, depending on the mature width of your variety. Closer spacing (12 inches) creates faster fill-in for mass plantings. Wider spacing (18 inches) allows better air circulation and shows off individual plant forms.
Why are my coral bells dying after planting?
The most common causes are planting too deep (crown rot), poor drainage (wet feet), or insufficient water during establishment. Ensure the crown sits at soil level, amend heavy clay for drainage, and water deeply 1-2 times weekly during the first season.
Can coral bells grow in deep shade?
Yes, certain varieties thrive in deep shade. Heuchera villosa hybrids like ‘Autumn Bride’ and ‘Brownies’ naturally grow in dense woodland conditions. Foliage color may be greener in deep shade, but plants remain healthy.
Do coral bells need to be cut back in winter?
No, don’t cut back coral bells in winter. The foliage protects the crown. In spring, gently remove any winter-damaged leaves. In cold zones, apply protective mulch after ground freezes and remove in early spring.
How often should coral bells be divided?
Divide coral bells every 3-4 years in early spring when the center becomes woody, flowering declines, or the plant heaves out of the ground. Division rejuvenates the plant and provides free plants for expanding your garden.