How Best to Plant Catmint
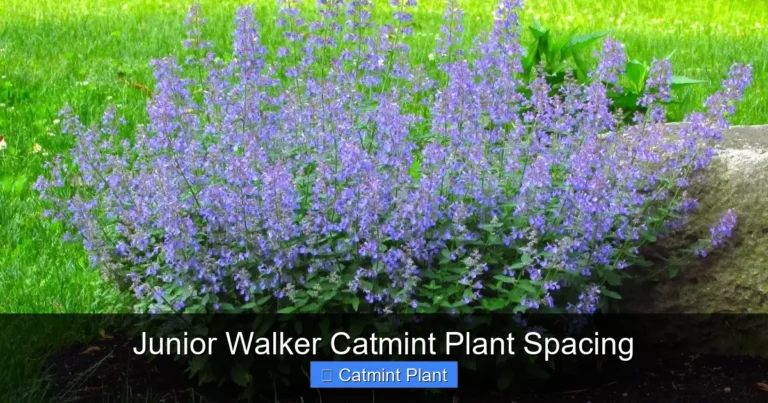
Catmint thrives in full sun and well‑drained soil, making it a low‑maintenance perennial for any garden. Plant it in early spring or fall, space plants 18‑24 inches apart, and water regularly until established.
If you have ever walked past a garden and smelled a sweet, minty aroma, chances are you were near catmint. This hardy perennial is a favorite among gardeners because it attracts pollinators, tolerates drought, and adds a soft gray‑green texture to borders. In this guide I will walk you through every step of planting catmint so you can enjoy its beauty for years.
We will cover site selection, soil preparation, the actual planting process, watering, mulching, ongoing care, and a few common problems. By the end you will feel confident putting catmint in the ground and watching it flourish.
Key Takeaways
- Sunlight matters: Catmint needs at least six hours of direct sun each day.
- Soil drainage is crucial: Amend heavy clay with compost or sand to avoid root rot.
- Planting time: Early spring or early fall gives roots time to settle before extreme temperatures.
- Spacing: Keep 18 to 24 inches between plants for good air flow.
- Water wisely: Water deeply after planting, then reduce frequency once established.
- Prune for vigor: Cut back after the first bloom to encourage a second flush.
Quick Answers to Common Questions
When is the best time to plant catmint?
Early spring after the last frost or early fall at least six weeks before the first hard freeze.
How much sun does catmint need?
At least six hours of direct sunlight each day for optimal flowering.
What spacing should I use between catmint plants?
Space plants 18 to 24 inches apart to allow good air circulation.
How often should I water newly planted catmint?
Water deeply once or twice a week for the first four to six weeks, then reduce frequency.
Do I need to fertilize catmint?
A light application of balanced slow‑release fertilizer in early spring is sufficient; avoid heavy feeding.
📑 Table of Contents
Choosing the Right Spot for Catmint
Sunlight Requirements
Catmint loves sun. Aim for a location that receives at least six hours of direct light each day. In hotter climates a bit of afternoon shade can help prevent leaf scorch, but too much shade reduces flowering.
Soil Type and Drainage
Well‑drained soil is non‑negotiable. Catmint roots rot quickly in soggy ground. If your soil is heavy clay, mix in coarse sand or compost at a ratio of one part amendment to two parts native soil. A simple test: dig a hole, fill with water, and see if it drains within an hour.
Space Considerations
Give each plant room to spread. A spacing of 18 to 24 inches works well for most varieties. This distance promotes air circulation, which reduces fungal issues later on.
Preparing the Soil Before Planting Catmint
Testing pH
Catmint prefers a slightly alkaline to neutral pH, roughly 6.5 to 7.5. A cheap garden test kit will tell you where you stand. If the soil is too acidic, add garden lime according to package directions.
Adding Organic Matter
Work a two‑inch layer of compost into the top six inches of soil. This improves structure, adds nutrients, and helps retain just enough moisture without waterlogging.
Creating a Planting Hole
Dig a hole twice as wide as the root ball and just as deep. Loosen the sides with a fork so roots can penetrate easily. A wide hole encourages outward growth rather than a tight root ball.
Planting Catmint Step by Step
Timing the Planting
Early spring, after the last frost, or early fall, at least six weeks before the first hard freeze, are ideal windows. These periods give roots time to establish before temperature extremes.
Removing the Plant from Its Pot
Gently squeeze the pot sides and tip the plant out. If roots are circling, tease them apart with your fingers. This prevents girdling later.
Setting the Plant at the Right Depth
Place the catmint in the hole so the top of the root ball sits level with the surrounding soil. Planting too deep can suffocate the crown; planting too high exposes roots to drying air.
Backfilling and Firming
Fill the hole with the amended soil, pressing lightly around the roots to eliminate air pockets. Water thoroughly to settle the soil.
Initial Watering
Give a deep soak right after planting. This ensures good soil‑root contact and reduces transplant shock.
Watering and Mulching for Healthy Catmint
Establishment Phase
For the first four to six weeks, water when the top inch of soil feels dry. A slow, deep watering once or twice a week is better than frequent shallow sprinkles.
Established Plants
Once established, catmint is drought tolerant. Water only during prolonged dry spells. Overwatering leads to leggy growth and fewer flowers.
Mulch Benefits
Apply a two‑inch layer of shredded bark, straw, or leaf mulch around the base, keeping it a few inches away from the crown. Mulch conserves moisture, suppresses weeds, and moderates soil temperature.
Ongoing Care: Pruning, Feeding, and Dividing Catmint
Deadheading for Repeat Blooms
After the first flush of flowers fades, shear the plant back by about one‑third. This encourages a second bloom in late summer and keeps the mound tidy.
Seasonal Pruning
In late winter or early spring, cut the entire plant back to about four inches above ground. This removes old woody stems and stimulates fresh growth.
Fertilizing Lightly
Catmint does not need heavy feeding. A single application of a balanced, slow‑release fertilizer in early spring is enough. Too much nitrogen produces lush foliage at the expense of flowers.
Dividing Every Few Years
Every three to four years, dig up the clump in early spring, split it into sections with a sharp spade, and replant the divisions. This rejuvenates the plant and gives you free new plants.
Common Problems and How to Solve Them
Powdery Mildew
Humid, crowded conditions invite powdery mildew. Improve air flow by proper spacing and avoid overhead watering. If mildew appears, remove affected leaves and spray with a homemade baking‑soda solution.
Root Rot
Standing water is the main cause. Ensure excellent drainage and avoid heavy mulch against the crown. If rot is detected, dig up the plant, trim away mushy roots, and replant in fresh, well‑drained soil.
Pests: Aphids and Spider Mites
A strong blast of water often dislodges aphids. For spider mites, increase humidity around the plant and apply neem oil if infestations persist.
Leggy Growth
Insufficient light or excessive fertilizer leads to tall, weak stems. Move the plant to a sunnier spot and cut back on feeding.
Conclusion
Planting catmint is a rewarding project that pays off with months of fragrant blooms and buzzing pollinators. Choose a sunny, well‑drained site, prepare the soil with compost, plant at the correct depth, and water wisely during establishment. A little pruning and occasional division keep the plant vigorous for years. Follow these steps and you will have a thriving catmint patch that becomes a garden highlight season after season.
Frequently Asked Questions
Can catmint grow in partial shade?
Catmint tolerates light shade but produces fewer flowers and may become leggy. Full sun is recommended for best performance.
Is catmint invasive?
Catmint spreads by self‑seeding and rhizomes but is generally not considered invasive in most regions. Regular deadheading and division keep it in check.
What soil pH is ideal for catmint?
A slightly alkaline to neutral pH between 6.5 and 7.5 works best. Amend acidic soils with garden lime if needed.
How do I propagate catmint?
Division in early spring is the easiest method. You can also take softwood cuttings in late spring and root them in moist potting mix.
Why are my catmint leaves turning yellow?
Yellowing often signals overwatering or poor drainage. Check soil moisture and improve drainage if water pools around the roots.
When should I cut back catmint for winter?
Cut the plant back to about four inches above ground in late winter or early spring before new growth emerges.