How to Propagate Fiddle Leaf Fig
Propagating fiddle leaf fig is easier than you think when you follow the right steps. This guide covers water propagation, soil rooting, and air layering methods with expert tips for healthy root development and successful transplanting.
Key Takeaways
- Best time to propagate: Spring and early summer offer the highest success rates due to active growth cycles.
- Water propagation is beginner-friendly: It allows you to monitor root development visually and requires minimal supplies.
- Choose healthy stem cuttings: Select sections with 2-3 nodes and at least one healthy leaf for the best results.
- Rooting hormone boosts success: While not mandatory, it significantly increases rooting speed and reliability.
- Patience is essential: Fiddle leaf fig cuttings typically take 4-8 weeks to develop substantial roots.
- Air layering works for larger branches: This method lets you root a branch while still attached to the mother plant.
- Proper aftercare prevents shock: Gradual acclimation and consistent moisture help new plants thrive after transplanting.
Quick Answers to Common Questions
How long does it take for fiddle leaf fig cuttings to root?
Fiddle leaf fig cuttings typically take 4-8 weeks to develop substantial roots in water, and 6-10 weeks in soil. Air layering takes the longest at 2-3 months but has the highest success rate.
Can you propagate fiddle leaf fig from a single leaf?
No, a single leaf without a node will not produce a new plant. Fiddle leaf fig propagation requires a stem section with at least one node, as this is where roots emerge.
Do I need rooting hormone for fiddle leaf fig propagation?
Rooting hormone is not strictly necessary but significantly increases success rates and speeds up root development. It is especially helpful for soil propagation and air layering.
Why are my fiddle leaf fig cutting leaves turning brown?
Brown leaves usually indicate low humidity, underwatering, or the cutting is losing more water through leaves than its minimal roots can absorb. Increase humidity and ensure consistent moisture.
When should I transplant my water-rooted cutting to soil?
Transplant when roots are 2-3 inches long with visible side branches. This usually occurs at 6-8 weeks. Plant in well-draining mix and keep humidity high during transition.
📑 Table of Contents
- Introduction
- Understanding Fiddle Leaf Fig Propagation Basics
- Method 1: Water Propagation Step by Step
- Method 2: Soil Propagation Step by Step
- Method 3: Air Layering for Advanced Propagation
- Caring for Newly Propagated Plants
- Troubleshooting Common Propagation Failures
- Creative Ways to Use Your Propagated Plants
- Conclusion
Introduction
So you have a gorgeous fiddle leaf fig and you want more of them. Good news! Learning how to propagate fiddle leaf fig plants is one of the most rewarding skills a plant parent can master. These stunning tropical trees with their iconic violin-shaped leaves can be multiplied right at home without spending a dime on new plants.
I remember my first attempt at propagation. I was nervous about damaging my prized plant. But after a few tries and some research, I discovered that fiddle leaf figs are actually quite generous when it comes to making babies. Whether you want to share plants with friends, create a fuller look by planting multiple stems together, or simply save a leggy plant, this guide will walk you through every method step by step.
Understanding Fiddle Leaf Fig Propagation Basics
When Is the Best Time to Propagate?
Timing matters more than most people realize. The absolute best window for how to propagate fiddle leaf fig successfully falls in spring through early summer. During these months, your plant is in active growth mode. Longer daylight hours and warmer temperatures trigger natural growth hormones that make rooting faster and more reliable.
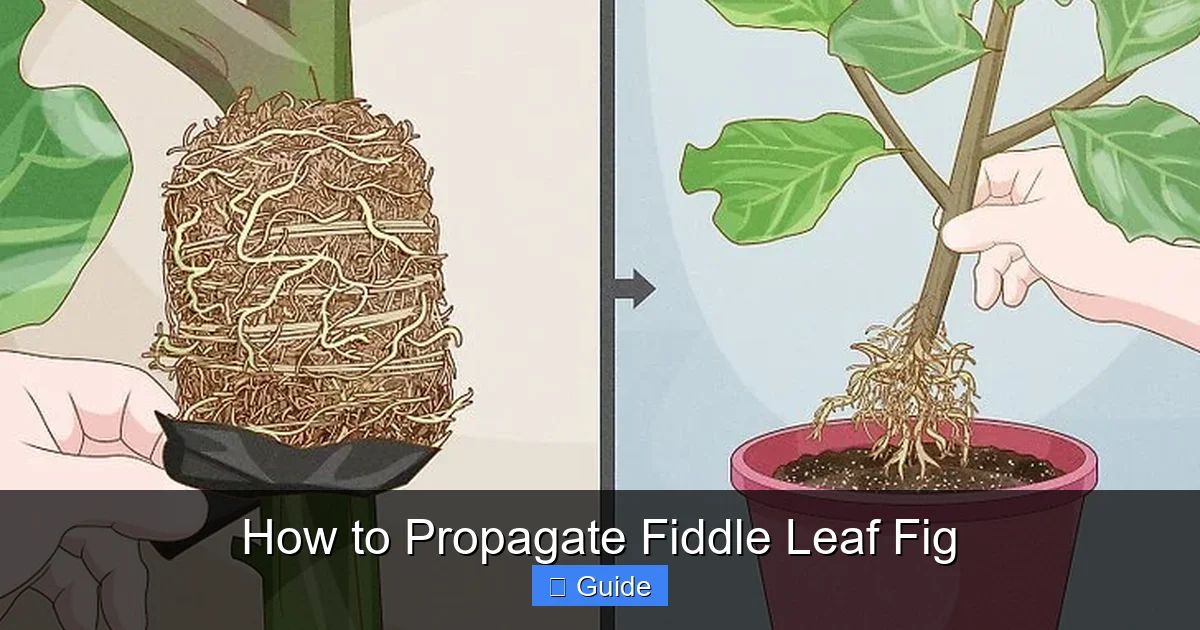
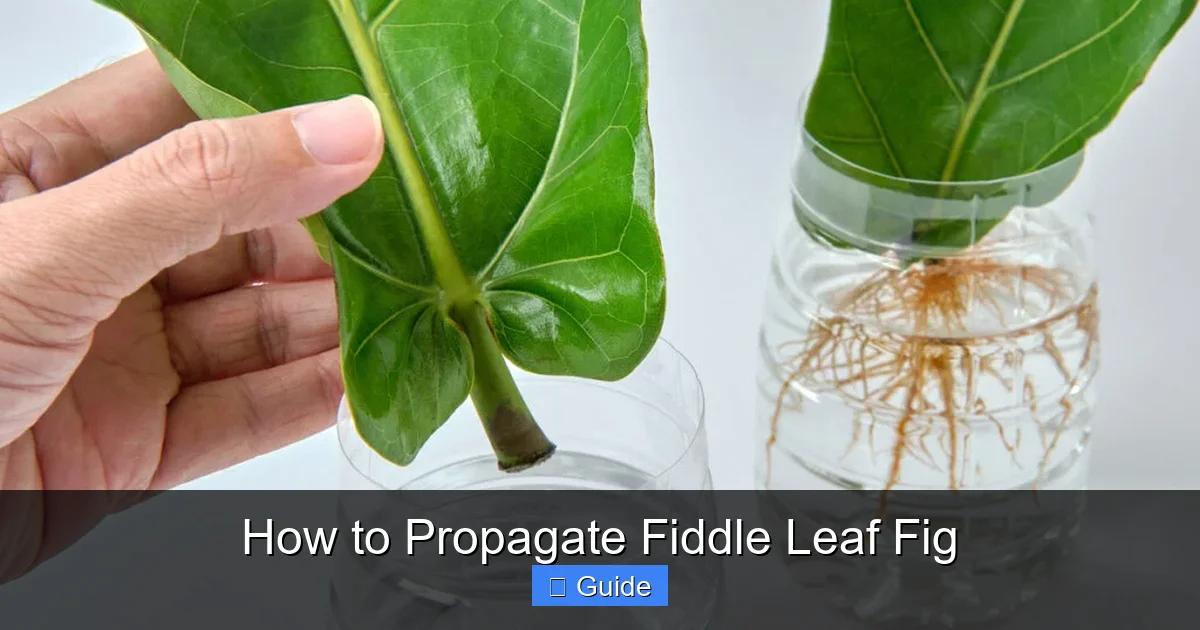
Visual guide about How to Propagate Fiddle Leaf Fig
Image source: wikihow.com
You can technically propagate year-round indoors if you provide supplemental light and warmth. However, fall and winter cuttings often take twice as long to root. They also face higher failure rates due to lower light levels and the plant’s natural dormancy period. If you must propagate in cooler months, use a heat mat and grow lights for the best shot at success.
What You Need Before Starting
Gather your supplies before making any cuts. Preparation prevents stress on both you and the plant. Here is your essential propagation toolkit:
- Clean, sharp pruning shears or a sterile knife
- Rooting hormone powder or gel (optional but recommended)
- Clear glass jars or propagation stations for water method
- Small pots with drainage holes for soil method
- Well-draining potting mix (perlite and peat moss blend works well)
- Clear plastic bags or a humidity dome
- Sphagnum moss and plastic wrap for air layering
- Rubbing alcohol for sterilizing tools
- Labels and waterproof marker
Sterilize your cutting tools with rubbing alcohol before each use. This simple step prevents introducing bacteria or fungus that could kill your cutting before it ever has a chance to root.
Selecting the Perfect Cutting
Not every stem makes a good candidate. The success of how to propagate fiddle leaf fig starts with choosing the right material. Look for a healthy stem section that meets these criteria:
- At least 6-12 inches long
- Contains 2-3 nodes (the bumps where leaves attach)
- Has 1-3 healthy leaves attached
- Shows no signs of pests, disease, or damage
- Is semi-woody rather than completely green or fully hardened
The nodes are critical. This is where roots will emerge. A cutting without nodes will never root, no matter what you do. The top node should have a leaf attached since photosynthesis fuels root development. If your cutting has large leaves, you can trim them in half horizontally to reduce water loss while maintaining some photosynthetic capacity.
Method 1: Water Propagation Step by Step
Why Choose Water Propagation?
Water propagation is the most popular method for beginners learning how to propagate fiddle leaf fig plants. The biggest advantage? You can see exactly what is happening. There is no guesswork about whether roots are forming. You can monitor progress daily and catch problems early. It also requires the least equipment and creates minimal mess.
However, water roots differ from soil roots. They are more fragile and adapted to an aquatic environment. This means transitioning to soil requires extra care. Some cuttings struggle with the switch. But for most home growers, the visibility benefit outweighs this drawback.
Setting Up Your Water Propagation
Follow these steps for water propagation success:
- Fill a clean glass jar with room temperature water. Let tap water sit overnight to allow chlorine to dissipate, or use filtered water.
- Remove any leaves that would sit below the water line. Submerged leaves rot quickly and contaminate the water.
- Dip the cut end in rooting hormone if using. Tap off excess powder.
- Place the cutting in the jar so nodes are submerged but leaves remain above water.
- Position in bright, indirect light. Direct sun will cook the cutting and promote algae growth.
- Change the water every 3-5 days to prevent bacterial buildup and keep oxygen levels high.
Roots typically appear as small white bumps at the nodes within 2-4 weeks. Wait until roots are at least 2-3 inches long and have developed side branches before considering transplant. This usually takes 6-8 weeks total.
Common Water Propagation Problems
Cloudy water with a foul smell indicates bacterial growth. Immediately change the water and rinse the cutting gently. If the stem turns brown or mushy at the base, rot has set in. Cut above the rot with sterilized tools and restart in fresh water.
Algae growth on the glass or roots is common but harmless. It just looks unsightly. Use an opaque container or wrap the jar in paper to block light from hitting the water. This prevents algae without harming the cutting.
Method 2: Soil Propagation Step by Step
Benefits of Direct Soil Rooting
Many experienced growers prefer soil propagation for how to propagate fiddle leaf fig because it eliminates the transition shock. Roots grown in soil are immediately adapted to their permanent medium. They tend to be stronger and more branched than water roots. The tradeoff is you cannot see progress, so patience and trust in the process are required.
Soil propagation also more closely mimics natural conditions. In nature, fallen branches root directly in the forest floor. Your cutting will develop the exact root structure it needs for long-term health in potting mix.
Preparing the Perfect Propagation Mix
Standard potting soil holds too much moisture for delicate new roots. Create a propagation-specific blend:
- 50% perlite or pumice for aeration and drainage
- 50% peat moss or coconut coir for moisture retention
- Optional: handful of vermiculite for additional water holding capacity
Moisten the mix until it holds together when squeezed but releases no dripping water. Fill small pots (3-4 inches) with this blend. Small pots prevent excess soil from staying soggy around minimal roots.
Planting Your Cutting in Soil
Here is the soil planting process:
- Make a hole in the center of the moist mix using a pencil or dibber.
- Dip the cutting end in rooting hormone. This step is more important for soil than water.
- Insert the cutting so at least one node is buried. Two buried nodes is even better.
- Firm the mix gently around the stem for good contact.
- Water lightly to settle the mix.
- Cover with a clear plastic bag or place in a propagation box to create a humidity dome.
- Prop the bag up with sticks so it does not touch the leaves.
- Place in bright, indirect light at 70-75°F (21-24°C).
Check daily for condensation. If the inside of the bag is dripping wet, vent it for a few hours. Too much humidity causes fungal issues. The mix should stay lightly moist but never soggy. Tug gently on the cutting after 4-6 weeks. Resistance means roots have formed.
Transitioning Soil-Rooted Cuttings
Once roots are established, begin hardening off. Remove the humidity dome for increasing periods each day over a week. Start with one hour and add an hour daily. This prevents shock from sudden humidity drop. After a week uncovered, the cutting can be treated as a young plant and potted up if needed.
Method 3: Air Layering for Advanced Propagation
When to Use Air Layering
Air layering is the secret weapon for how to propagate fiddle leaf fig when you want to root a large branch or save a tall, leggy plant. Unlike cuttings, the branch stays attached to the mother plant while roots form. It continues receiving water and nutrients, so there is zero risk of the cutting dying before rooting. This method works beautifully for branches thicker than a pencil that would struggle as traditional cuttings.
It is also the best way to reduce the height of an overly tall fiddle leaf fig while creating a new plant at the same time. You essentially turn the top portion into a new rooted plant before severing it.
Air Layering Step by Step
This process takes longer but boasts near 100% success rates when done correctly:
- Select a healthy branch at least 12-18 inches from the tip.
- Remove leaves from a 4-6 inch section where you want roots to form.
- Using a sterile knife, make two parallel cuts around the branch circumference about 1 inch apart.
- Connect the cuts with a vertical slit and peel away the bark ring, exposing the cambium layer.
- Scrape the exposed wood lightly to remove the cambium completely. This prevents the bark from healing over.
- Dust the wound with rooting hormone.
- Soak sphagnum moss in water, squeeze out excess, and pack it thickly around the wound.
- Wrap the moss ball tightly with clear plastic wrap, sealing both ends with twist ties or tape.
- Cover with aluminum foil to block light. Roots grow better in darkness.
- Check monthly by peeling back foil. Keep moss moist by injecting water with a syringe if needed.
Roots usually appear through the plastic in 2-3 months. Once you see a healthy root mass, cut below the rooted section. Pot the new plant immediately in well-draining mix. The mother plant will often branch at the cut point, becoming fuller.
Caring for Newly Propagated Plants
The Critical First Month
The first 30 days after transplanting or separating determine long-term success. Your new fiddle leaf fig is vulnerable. It has a limited root system and no established reserves. Treat it like a newborn:
- Keep in bright, indirect light only. No direct sun.
- Maintain consistent moisture. Never let the soil dry completely.
- Hold off on fertilizer for at least 6-8 weeks.
- Provide extra humidity with a pebble tray or humidifier.
- Avoid moving the plant unnecessarily. Stability reduces stress.
- Watch for drooping leaves, which signal water issues.
Some leaf drop is normal during transition. The plant may shed older leaves to balance its reduced root capacity. Do not panic. Focus on new growth emergence as the true health indicator.
Potting Up and Soil Selection
When roots fill the propagation pot (you see them circling the bottom or emerging from drainage holes), it is time for a slightly larger container. Go up only 1-2 inches in diameter. Fiddle leaf figs prefer being slightly root-bound. A pot too large holds excess moisture and causes root rot.
Use a high-quality, well-draining potting mix. A good recipe: 2 parts peat-based potting soil, 1 part perlite, 1 part orchid bark or coarse sand. This mimics their native environment where roots get air between rain events. Ensure the new pot has drainage holes. Cache pots without holes are decorative only. Always plant in a nursery pot inside the decorative one.
Fertilizing Young Plants
Wait until you see active new growth before fertilizing. This signals the root system is functional. Start with a diluted balanced liquid fertilizer at quarter strength. Apply monthly during the growing season (spring through early fall). Stop fertilizing in winter when growth naturally slows.
Organic options like worm castings tea or fish emulsion work well for sensitive young plants. They provide gentle nutrition without risk of fertilizer burn. Whatever you choose, less is more. Over-fertilizing kills more young fiddle leaf figs than under-fertilizing.
Troubleshooting Common Propagation Failures
Why Cuttings Fail to Root
Even when you follow how to propagate fiddle leaf fig instructions perfectly, sometimes cuttings just refuse. The most common culprits:
- Wrong season: Attempting in winter without supplemental heat and light.
- Poor cutting selection: Using woody old growth or soft new growth without nodes.
- Dirty tools: Introducing pathogens that cause stem rot.
- Water issues: Not changing water often enough (water method) or overwatering (soil method).
- Low humidity: Leaves lose water faster than minimal roots can replace it.
- Temperature swings: Cold drafts or heat vents stress the cutting.
- Impatience: Disturbing the cutting to check roots before they are ready.
If a cutting shows no progress after 8-10 weeks in optimal conditions, it likely will not root. Discard it and try again with a fresh cutting. Do not reuse the same water or soil.
Dealing with Pests on New Plants
Spider mites, mealybugs, and scale love stressed plants. Inspect weekly, especially under leaves and at stem joints. Quarantine new propagations from your main collection for at least two weeks. Treat any pests immediately with insecticidal soap or neem oil, following label directions. Healthy plants resist pests better, so focus on optimal care as prevention.
Leaf Issues and What They Mean
Your new plant communicates through its leaves. Learn the language:
- Brown crispy edges: Low humidity or inconsistent watering.
- Yellowing lower leaves: Normal aging, overwatering, or nutrient deficiency.
- Drooping leaves: Usually underwatering, but can be overwatering with root rot.
- Red spots on new leaves: Edema from inconsistent watering. Harmless but indicates watering issues.
- Small, pale new leaves: Insufficient light or nutrient deficiency.
Creative Ways to Use Your Propagated Plants
Creating a Multi-Stem Specimen
One of the most popular reasons for learning how to propagate fiddle leaf fig is to create those lush, full, multi-trunk trees you see in design magazines. Plant 3-5 rooted cuttings together in one large pot. Space them evenly in a circle. As they grow, their trunks will thicken and create a stunning clustered effect. This looks far more impressive than a single trunk and happens in a fraction of the time.
Choose cuttings of similar height for a balanced look. You can also stagger heights intentionally for a more natural, forest-like appearance. Pinch the growing tips occasionally to encourage branching and density.
Gifting and Sharing
Propagated fiddle leaf figs make incredible gifts. They are personal, living, and grow more valuable over time. Pot them in attractive containers with care instructions included. Your friends will think you are a plant wizard. Plus, sharing plants builds community and spreads the joy of growing.
Rescuing Leggy Plants
If your fiddle leaf fig has become a tall, bare stick with a tuft of leaves at the top, propagation saves it. Air layer the top section. Once rooted, cut it off and pot it up. The remaining trunk will often push out new branches lower down, creating a bushier plant. You essentially get two better-shaped plants from one leggy one.
Conclusion
Mastering how to propagate fiddle leaf fig plants opens up a world of possibilities for your indoor jungle. Whether you choose the visual satisfaction of water propagation, the seamless transition of soil rooting, or the high-success reliability of air layering, each method has its place in your plant parent toolkit.
Remember that propagation is part science, part art, and part patience. Not every cutting will make it, and that is okay. Each attempt teaches you something about your specific growing conditions and plant preferences. The first time you see those tiny white roots emerging, or spot a new leaf unfurling on a plant you created from a snippet, you will understand why plant people get addicted to this process.
Start with one method that feels approachable. Water propagation is perfect for beginners. Gather your supplies, select a healthy cutting, and begin. In a few months, you could have brand new fiddle leaf figs to enjoy, share, or style into stunning multi-trunk specimens. Your plant collection is about to grow, and so are your skills. Happy propagating!
Frequently Asked Questions
What is the best time of year to propagate fiddle leaf fig?
Spring through early summer is the optimal time for propagating fiddle leaf fig. The plant is in active growth mode with longer daylight hours and warmer temperatures, which significantly increases rooting success and speed.
Can I propagate fiddle leaf fig in winter?
Yes, you can propagate in winter indoors, but success rates are lower and rooting takes longer. Use a heat mat to maintain 70-75°F soil temperature and provide 12-14 hours of grow light daily for best results.
How do I know if my fiddle leaf fig cutting has rooted in soil?
Gently tug the cutting after 4-6 weeks. Resistance indicates roots have formed. You may also see new growth at the top or roots emerging from drainage holes. Avoid checking too early as it damages fragile new roots.
Should I cut the leaves in half when propagating fiddle leaf fig?
Trimming large leaves in half horizontally reduces water loss through transpiration while maintaining some photosynthetic capacity. This is helpful for cuttings with large leaves but not necessary for smaller ones.
Why is my water-propagated cutting growing algae?
Algae grows when light hits the water. It is harmless but unsightly. Use an opaque container, wrap the jar in paper, or place it in a darker spot while keeping the leaves in bright indirect light.
Can I put multiple fiddle leaf fig cuttings in one pot?
Yes, planting 3-5 rooted cuttings together creates a fuller, multi-trunk specimen. Ensure the pot is large enough and use well-draining soil. This is a popular technique for achieving a lush, tree-like appearance faster.