Juniper Root Rot Treatment
Juniper root rot treatment starts with early detection, proper drainage, and targeted fungicide use. Follow a clear step‑by‑step plan to stop the disease and keep your junipers healthy.
Key Takeaways
- Early detection: Spot yellowing needles and soft roots before the disease spreads.
- Improve drainage: Well‑drained soil is the single best prevention.
- Use labeled fungicides: Apply a juniper root rot treatment product at the first sign of infection.
- Practice sanitation: Remove infected debris and disinfect tools.
- Monitor regularly: Check roots and soil moisture each season.
- Consider biological options: Beneficial microbes can boost soil health.
- Call a professional: Severe cases may need expert intervention.
Quick Answers to Common Questions
What is the first sign of juniper root rot?
Yellowing needle tips that progress inward are usually the first visible clue.
Can I treat juniper root rot without chemicals?
Yes, improving drainage, removing infected roots, and applying beneficial microbes can control mild cases.
How often should I apply fungicide for juniper root rot treatment?
Follow the product label; most require a soil drench every 4‑6 weeks during active growth.
Is mulch helpful or harmful for juniper root rot?
A thin layer of coarse mulch helps regulate soil moisture, but keep it away from the trunk to avoid excess wetness.
When should I replace a severely infected juniper?
If the plant shows no new growth after two full treatment cycles, removal is often the safest option.
📑 Table of Contents
Understanding Juniper Root Rot
Juniper root rot is a fungal disease that attacks the root system of juniper shrubs and trees. The most common culprits are Phytophthora and Pythium species. These pathogens thrive in wet, poorly drained soils. When roots stay soggy, the fungi invade and destroy tissue. The plant then cannot take up water or nutrients. You will see the above‑ground symptoms before you ever dig up a root.
What Causes It
Excess moisture is the primary trigger. Heavy clay soils, low spots, and over‑watering create the perfect environment. Compacted soil reduces oxygen, making roots more vulnerable. Infected nursery stock can also introduce the pathogen into a clean garden.
Signs and Symptoms
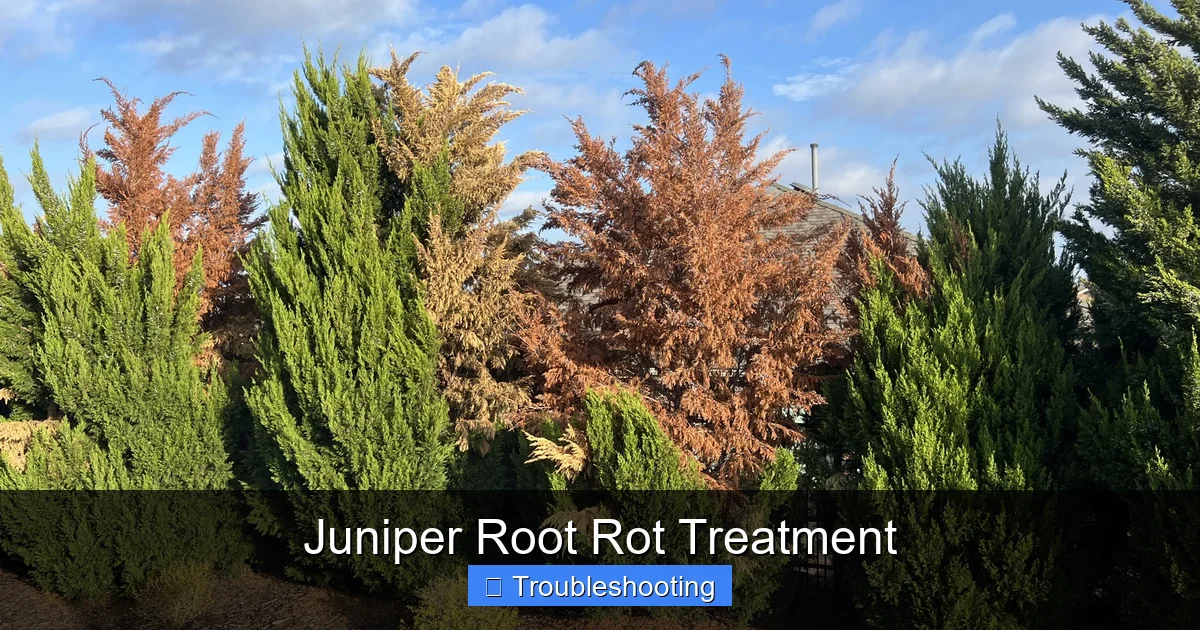
Look for needle discoloration that starts at the tips and moves inward. Needles may turn yellow, then brown, and finally drop. The bark near the base can become dark and mushy. If you gently pull a root, it may feel soft and break easily. A foul, musty smell often accompanies advanced infection.
Why It Spreads
Fungal spores move with water. Rain splash, irrigation runoff, and contaminated tools carry them from plant to plant. Once established, the pathogen produces resting spores that survive in soil for years. This makes juniper root rot treatment a long‑term commitment.
Prevention Strategies
Preventing the disease is far easier than curing it. A few cultural habits can keep your junipers safe for decades.
Visual guide about Juniper Root Rot Treatment
Image source: s3.amazonaws.com
Soil Drainage
Test drainage by digging a hole 12 inches deep and filling it with water. If it does not drain within an hour, amend the soil. Mix in coarse sand, perlite, or composted bark. Raised beds or mounded planting sites also improve water flow.
Planting Practices
Choose disease‑free nursery stock. Inspect roots before buying; they should be firm and white. Plant at the same depth as the container. Backfill with the amended soil and water thoroughly to settle air pockets.
Watering Habits
Water deeply but infrequently. Allow the top 2‑3 inches of soil to dry between irrigations. Drip irrigation or soaker hoses deliver water to the root zone without wetting foliage. Avoid overhead sprinklers, especially in the evening.
Diagnosing the Problem
Accurate diagnosis ensures you apply the right juniper root rot treatment. Guessing can waste time and money.
Visual Inspection
Start at the base. Peel back a small section of bark. Healthy tissue is white or light tan. Diseased tissue is dark brown or black and may feel mushy. Check several roots around the plant. A pattern of soft roots confirms the issue.
Soil Testing
Send a soil sample to a university extension lab. Request a pathogen assay for Phytophthora and Pythium. Results tell you which species are present and their population levels. This guides fungicide selection.
Lab Confirmation
If you need absolute certainty, submit root pieces to a plant pathology lab. They will culture the fungus and identify it to species. This step is useful for valuable landscape specimens or when treatment fails.
Juniper Root Rot Treatment Options
Once confirmed, you have several tools. Combining methods gives the best results.
Cultural Controls
Improve drainage immediately. Remove any standing water. Prune out dead or dying branches to reduce stress. Apply a thin layer of coarse mulch (no more than 2 inches) to keep soil temperature stable and reduce splash. Do not pile mulch against the trunk.
Chemical Controls
Use a fungicide labeled for juniper root rot treatment. Products containing mefenoxam, phosphorous acid, or fosetyl‑Al are common. Follow label rates exactly. Apply as a soil drench so the active ingredient reaches the root zone. Repeat applications according to the label, usually every 4‑6 weeks during the growing season.
Biological Controls
Beneficial microbes such as Trichoderma spp. and Bacillus subtilis can suppress root rot fungi. Apply a commercial bio‑fungicide as a soil drench or incorporate into the planting hole. These organisms compete for space and produce enzymes that inhibit pathogen growth. They work best when combined with good cultural practices.
Step‑by‑Step Treatment Plan
- Confirm diagnosis with visual inspection and, if needed, lab test.
- Improve drainage by amending soil or re‑grading the site.
- Remove infected material – prune dead roots and dispose of them off‑site.
- Apply fungicide as a soil drench at label rate. Water in thoroughly.
- Add biological agent one week after fungicide to recolonize the rhizosphere.
- Mulch lightly with coarse bark, keeping mulch away from the trunk.
- Monitor weekly for new growth and any return of symptoms.
- Repeat fungicide per label schedule until the plant shows vigorous new growth.
Aftercare and Monitoring
Treatment does not end with the last fungicide application. Ongoing care prevents recurrence.
Mulching and Fertilizing
Maintain a 2‑inch mulch layer year‑round. Use a slow‑release, balanced fertilizer in early spring. Avoid high nitrogen late in the season; it encourages succulent growth that is more susceptible to infection.
Regular Checks
Inspect roots annually in early spring. Gently expose a few roots near the drip line. Firm, white roots indicate recovery. Soft, discolored roots mean the pathogen is still active. Adjust irrigation and consider another round of juniper root rot treatment if needed.
When to Call a Pro
If the plant continues to decline after two full treatment cycles, consult a certified arborist or plant pathologist. They can perform advanced diagnostics, prescribe stronger systemic products, or recommend removal to protect nearby plants.
Conclusion
Juniper root rot can look devastating, but a systematic approach turns the tide. Start with good drainage, choose healthy stock, and water wisely. When symptoms appear, act fast: diagnose, improve the environment, and apply a targeted juniper root rot treatment plan that blends cultural, chemical, and biological tools. Keep monitoring, mulch properly, and fertilize sensibly. With patience and consistency, your junipers will regain their vigor and grace the landscape for years to come.
Frequently Asked Questions
What causes juniper root rot?
Juniper root rot is caused by soil‑borne fungi such as Phytophthora and Pythium that thrive in wet, poorly drained conditions.
How do I know if my juniper has root rot?
Look for yellowing needles, soft dark roots, a musty smell, and dieback starting at the base of the plant.
Can juniper root rot spread to other plants?
Yes, spores move with water and contaminated tools, so nearby susceptible plants can become infected.
What fungicides work best for juniper root rot treatment?
Products containing mefenoxam, phosphorous acid, or fosetyl‑Al are commonly recommended and should be applied as a soil drench.
Are there organic options for juniper root rot treatment?
Biological controls like Trichoderma and Bacillus subtilis, combined with improved drainage and sanitation, provide organic management.
How long does it take to see recovery after treatment?
Visible improvement often appears within 4‑8 weeks, but full root regeneration may take a full growing season.