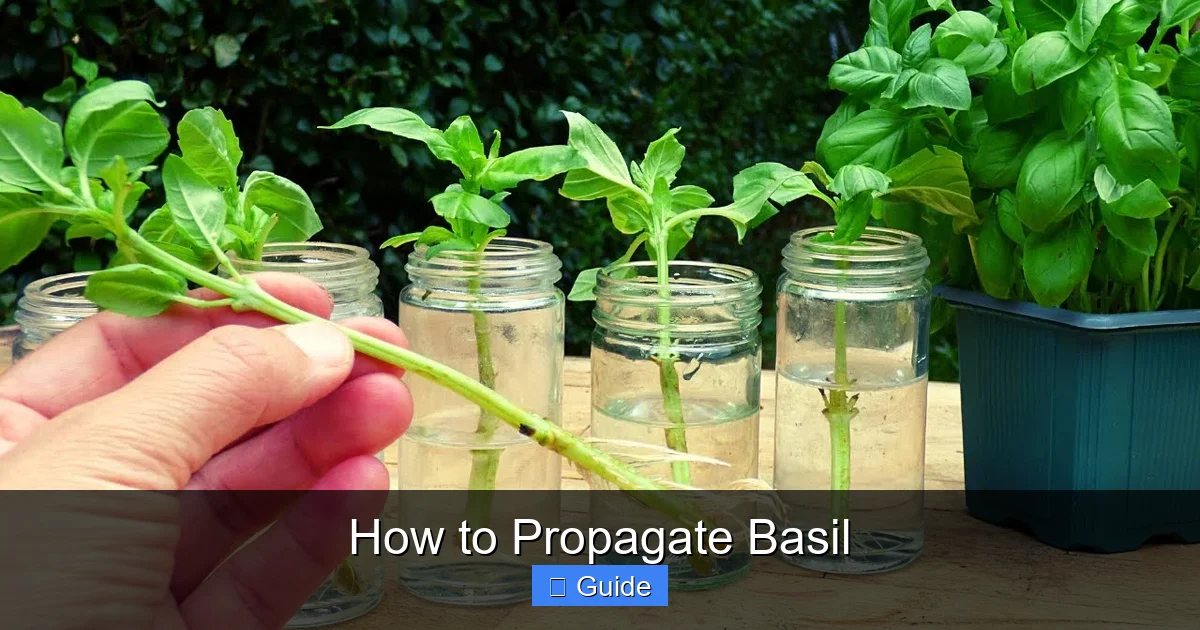
How to Propagate Basil
Propagating basil is simple and rewarding. You can grow new plants from stem cuttings in water or soil within weeks. This guide covers every method so you never buy basil again.
There is something deeply satisfying about snipping a stem from your basil plant, placing it in water, and watching roots appear like magic. Learning how to propagate basil changes everything. You stop buying those plastic clamshells at the grocery store. You start sharing plants with neighbors. Your kitchen always smells like summer.
I remember my first attempt. I had a leggy basil plant on my windowsill. It was flowering, the leaves turning bitter. A gardener friend told me to just cut it back and stick the stems in a jar. Skeptical but desperate, I tried it. Ten days later, I had six new plants with thick white roots. That was years ago. I have not purchased a basil plant since.
This guide walks you through every method of how to propagate basil successfully. Whether you have a sunny windowsill, a backyard garden, or just a grow light setup, you will find a technique that works. We cover water propagation, soil propagation, seed starting, and even some advanced tricks for year-round harvests. Let us dig in.
Key Takeaways
- Water propagation works fastest: Basil cuttings root in 7-14 days in a glass of water on a sunny windowsill.
- Soil propagation builds stronger roots: Planting cuttings directly in moist potting mix creates hardier plants for transplanting.
- Choose healthy stems: Select 4-6 inch stems from mature plants, cutting just below a leaf node for best results.
- Remove lower leaves: Strip leaves from the bottom 2 inches of each cutting to prevent rot and encourage root growth.
- Provide bright indirect light: Place cuttings in a warm spot with 6-8 hours of filtered sunlight daily.
- Change water regularly: Swap water every 2-3 days for water propagation to prevent bacteria buildup.
- Harvest strategically: Regular pruning of mature plants provides endless cutting material for continuous propagation.
Quick Answers to Common Questions
How long does it take basil cuttings to root in water?
Basil cuttings typically root in 7-14 days in water. You will see tiny white root nubs around day 4-7, with transplant-ready roots by day 10-14.
Can you propagate basil from a grocery store plant?
Yes, absolutely. Supermarket basil plants are often overcrowded seedlings. You can divide the root ball or take stem cuttings from the healthiest stems.
Do I need rooting hormone for basil cuttings?
No, basil roots easily without hormone. However, rooting hormone speeds up the process and increases success rates, especially for soil propagation.
Why are my basil cuttings wilting?
Wilting usually means the cutting has too much leaf surface for its limited water uptake. Remove lower leaves, cut large remaining leaves in half, and increase humidity with a dome or bag.
Can basil be propagated in winter?
Yes, with grow lights and a heat mat. Keep temperatures above 65°F and provide 14 hours of light daily. Rooting will be slower than in summer but still successful.
📑 Table of Contents
- Why Propagate Basil Instead of Buying New Plants
- Understanding Basil Biology for Better Propagation
- Method One: Water Propagation (Easiest for Beginners)
- Method Two: Soil Propagation (Stronger Roots, Less Transplant Shock)
- Method Three: Growing Basil from Seed (For Variety and Volume)
- Advanced Propagation Techniques
- Caring for Newly Propagated Basil Plants
- Common Propagation Problems and Solutions
- Seasonal Strategies for Year-Round Basil
- Creative Uses for Your Propagated Basil Bounty
- Conclusion
Why Propagate Basil Instead of Buying New Plants
Save Money All Season Long
A single basil plant from the nursery costs three to five dollars. A packet of seeds costs two dollars. But once you know how to propagate basil, one healthy mother plant yields dozens of new plants for free. If you cook with basil regularly, this saves hundreds of dollars over a growing season.
Preserve Your Favorite Varieties
Maybe you found the perfect Genovese basil at a farmers market. Or a spicy Thai basil that transforms your curries. Propagation clones that exact plant. You keep the flavor profile you love without hunting for the same variety next year.
Extend Your Harvest
Basil is an annual. It flowers, sets seed, and dies. But propagation resets the clock. Each cutting becomes a new juvenile plant that produces tender leaves for months. You effectively cheat the lifecycle.
Share the Abundance
Extra rooted cuttings make wonderful gifts. Pot them up in cute containers for housewarming presents, teacher gifts, or neighborly gestures. Everyone loves a living herb plant.
Understanding Basil Biology for Better Propagation
Node Magic: Where Roots Begin
Every basil stem has nodes. These are the slightly swollen points where leaves attach. Nodes contain meristematic tissue. This is plant speak for cells that can become anything. Roots. Shoots. Flowers. When you cut below a node and provide moisture, those cells activate and form roots.
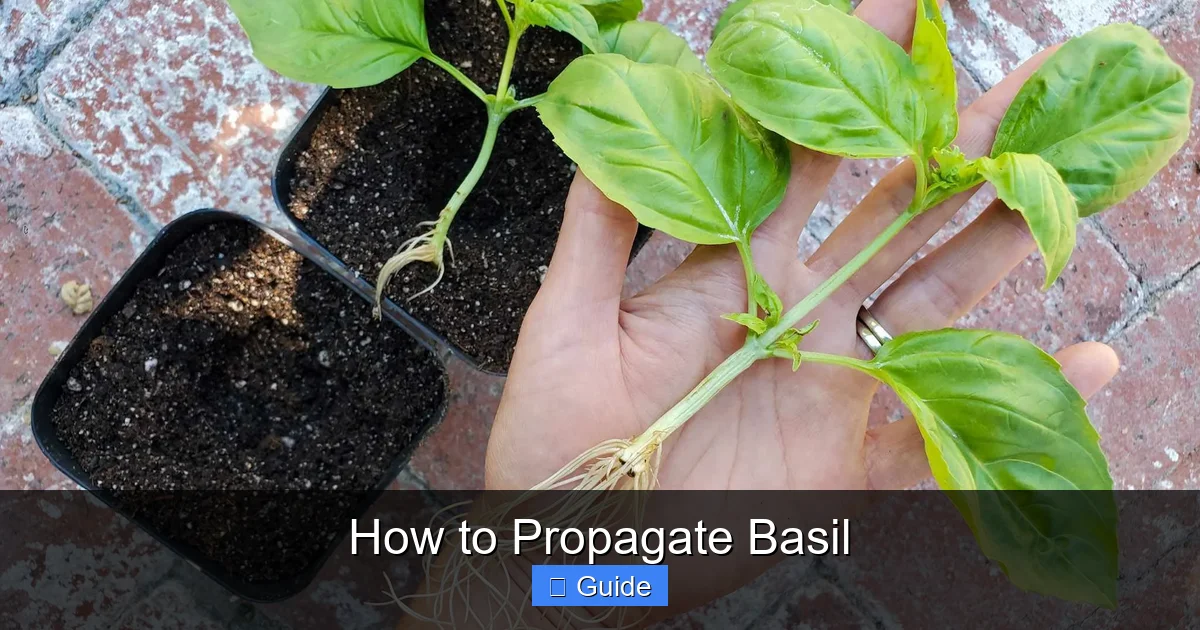
Visual guide about How to Propagate Basil
Image source: homesteadandchill.com
Internode Length Matters
Look at the space between nodes. Short internodes mean a compact, bushy plant. Long internodes mean the plant is stretching for light. For propagation, you want stems with relatively short internodes. They root faster and produce bushier plants.
Apical Dominance and Branching
The tip of each stem produces auxin, a hormone that suppresses side branching. When you cut the tip off for propagation, you remove that suppression. The cutting will branch. The mother plant will also branch below your cut. One cut creates two bushier plants.
Flowering Changes Everything
Once basil flowers, leaf production slows. The plant puts energy into seeds. Cuttings from flowering stems root slower. They also tend to flower quickly themselves. Always take cuttings from vegetative (non-flowering) growth. Pinch off flower buds religiously on mother plants.
Method One: Water Propagation (Easiest for Beginners)
What You Need
- Clean glass jars or propagation stations
- Sharp scissors or pruning shears
- Healthy basil mother plant
- Filtered or dechlorinated water
- Bright windowsill or grow light
Step-by-Step Water Propagation
Start early in the day. Plants are most hydrated in the morning. Select stems four to six inches long. Count down from the tip. You want at least three sets of leaves. Make your cut just below a node. A clean diagonal cut increases surface area for water uptake.
Strip the lower leaves. Remove every leaf that would sit below the water line. Submerged leaves rot. Rot spreads. It kills cuttings. Leave the top two or three sets of leaves intact. These photosynthesize and fuel root development.
Fill your jar with room temperature water. Cold water shocks the cutting. Chlorinated tap water can inhibit rooting. Let tap water sit overnight. Or use filtered water. Rainwater works beautifully if you collect it.
Place the cutting in the jar. Only the bare stem should be underwater. The leaves stay dry. Position the jar where it gets six to eight hours of bright indirect light. Direct afternoon sun cooks the water. It promotes algae. It stresses the cutting.
Change the water every two to three days. This is non-negotiable. Stagnant water breeds bacteria. Bacteria clog the stem’s vascular tissue. The cutting cannot drink. Fresh water brings dissolved oxygen. Roots need oxygen.
What to Expect: The Timeline
Days one through three: Nothing visible happens. The cutting hydrates. Cells at the node prepare. Days four through seven: Tiny white nubs appear at the nodes. These are root initials. Days eight through fourteen: Roots elongate. They branch. You see a root system forming. Day fourteen plus: Roots reach one to two inches. The cutting is ready for soil.
Troubleshooting Water Propagation
Yellow leaves usually mean too much light or nutrient deficiency. Move to shadier spot. Brown mushy stems mean rot. Discard. Slimy water means bacteria. Change water more often. Add a drop of hydrogen peroxide per cup of water. No roots after three weeks? The cutting may be too old or too young. Try again with a different stem.
Pro Tip: Use a Propagation Station
Those cute test tube racks? They work. Individual tubes prevent root tangling. You can pull one cutting without disturbing others. Label each tube with variety and date. Your future self will thank you.
Method Two: Soil Propagation (Stronger Roots, Less Transplant Shock)
Why Choose Soil Over Water
Water roots and soil roots are structurally different. Water roots are brittle, unbranched, adapted to aquatic life. Soil roots are tough, branched, covered in root hairs. When you move a water-rooted cutting to soil, it must grow new roots. The old ones often die. Soil propagation skips this step. The cutting grows soil roots from day one.
Preparing Your Propagation Mix
Do not use garden soil. It compacts. It carries pathogens. Use a sterile seed starting mix. Or make your own: one part peat moss or coco coir, one part perlite, one part vermiculite. This mix holds moisture but drains excess. It stays airy. Roots breathe.
Moisten the mix before filling pots. It should feel like a wrung-out sponge. No dry pockets. No soggy clumps. Fill small pots or cell trays. Two-inch pots work well. They fit many on a tray. They dry evenly.
Taking and Preparing Cuttings for Soil
Same cutting criteria as water method. Four to six inches. Cut below a node. Strip lower leaves. Here is the difference: dip the cut end in rooting hormone. Powder or gel both work. Tap off excess. Rooting hormone contains synthetic auxin. It signals the plant to make roots faster and more abundantly.
Make a hole in the moist mix with a pencil or dibber. Insert the cutting so at least one node is buried. Two nodes buried is better. Firm the mix gently around the stem. Good contact matters. Air gaps dry out the stem.
Creating a Humidity Dome
Soil cuttings lose water through leaves. They have no roots to replace it. A humidity dome reduces transpiration. Use a clear plastic dome from a seed starting kit. Or a clear plastic bag propped up with sticks. Or a cut-off soda bottle. The goal: high humidity, not zero airflow. Vent daily. Mold loves stagnant wet air.
Light and Temperature for Soil Propagation
Place the tray on a heat mat set to seventy to seventy-five degrees Fahrenheit. Bottom heat dramatically speeds rooting. Light should be bright but indirect. A north-facing window. Or grow lights twelve inches above the dome. Fourteen hours on, ten hours off.
Checking for Roots Without Disturbing
Resist the urge to tug. Gentle resistance after ten to fourteen days means roots. New leaf growth at the top is a sure sign. Once you see growth, remove the dome gradually. Hour one day one. Two hours day two. Full exposure by day five. This hardens off the cutting.
Transplanting Soil-Rooted Cuttings
When roots show out the drainage holes, pot up. Use four-inch pots with quality potting mix. Add a slow-release organic fertilizer. Water well. Keep in partial shade for a week. Then move to full sun. Your new basil plant is ready for life.
Method Three: Growing Basil from Seed (For Variety and Volume)
When Seeds Beat Cuttings
Cuttings clone. Seeds recombine genetics. If you want to try new varieties, seeds are the way. If you need fifty plants for a big garden bed, seeds are cheaper. If your mother plants are diseased or flowering heavily, seeds give you a clean start.
Choosing Basil Seeds
Genovese: classic sweet basil for pesto. Thai: licorice flavor, holds up to cooking. Lemon: citrus notes for fish and tea. Holy basil (Tulsi): medicinal, spicy, sacred in Ayurveda. Purple: ornamental and edible. Buy from reputable sources. Fresh seed germinates better. Seed older than two years drops in viability.
Indoor Seed Starting Timeline
Start seeds six to eight weeks before your last frost date. Basil hates cold. Soil temperature must stay above seventy degrees for germination. A heat mat is almost essential for consistent results.
Sowing Basil Seeds Step by Step
Fill cells with moistened seed starting mix. Sow two to three seeds per cell. Basil seeds are tiny. Press them gently into the surface. Do not cover. They need light to germinate. Mist the surface. Cover with a humidity dome. Place on heat mat under lights.
Germination takes five to ten days. Once sprouts appear, remove the dome immediately. Leggy seedlings happen fast in high humidity. Thin to one strong seedling per cell. Snip extras at soil level. Do not pull. Pulling disturbs the keeper’s roots.
Feeding and Growing Seedlings
First true leaves appear after the seed leaves (cotyledons). Start feeding with half-strength liquid fertilizer. Fish emulsion or seaweed extract works well. Weekly feeding. Keep lights close. Two to three inches above plants. Raise as they grow. Brush your hand over seedlings daily. This simulates wind. It strengthens stems.
Hardening Off and Transplanting
Two weeks before planting out, start hardening off. Hour one in shade. Add an hour daily. Protect from wind. Bring in at night if below fifty degrees. After two weeks, they handle full sun. Transplant into garden or large pots. Space twelve inches apart. Water in well.
Advanced Propagation Techniques
Layering: Propagation Without Cutting
Layering works on mature, flexible stems. Bend a low stem to the soil. Wound it slightly at a node. Bury that node under an inch of soil. Pin with a landscape staple or rock. Keep moist. Roots form while the stem still connects to the mother plant. Once rooted, sever and transplant. Zero risk of cutting failure.
Division: For Overgrown Pot Plants
Supermarket basil pots often contain twenty-plus seedlings crammed together. They compete. They die. Divide them. Tip the pot out. Gently tease the root ball apart into clumps of three to five stems. Pot each clump separately. You turn one sad pot into four healthy plants.
Microgreens: The Two-Week Harvest
Sow basil seeds thickly in a shallow tray. Harvest at cotyledon stage or first true leaf. Ten to fourteen days. Intense basil flavor. Beautiful garnish. No true propagation, but a way to use excess seed and get quick returns.
Perpetual Propagation Calendar
Plan a rolling schedule. Week one: take cuttings from mother plants. Week two: start new seeds. Week three: pot up rooted cuttings. Week four: harden off seedlings. Repeat. You always have plants at every stage. You never run out.
Caring for Newly Propagated Basil Plants
The First Two Weeks Are Critical
Newly potted cuttings and seedlings are vulnerable. Their root systems are small. They dry out fast. Check daily. Water when the top half-inch of soil feels dry. Do not let them wilt. Wilting damages the tender root hairs you worked so hard to grow.
Fertilizing Young Plants
Wait two weeks after potting up before fertilizing. Then use quarter-strength balanced fertilizer weekly. Organic options: fish emulsion, kelp meal tea, worm casting tea. Synthetic works too. Just dilute heavily. Young roots burn easily.
Pinching for Bushiness
When your propagated plant has six to eight inches of growth, pinch the top. Cut just above a node. Two new stems emerge from that node. Each produces leaves. Pinch those later. This creates the classic bushy basil shape. More stems equals more leaves equals more harvest.
Preventing Early Flowering
Stress triggers flowering. Heat stress. Drought stress. Root binding. Keep young plants comfortable. Pot up before roots circle. Water consistently. Provide afternoon shade in hot climates. Pinch flower buds the moment they appear. Flowering makes leaves bitter and tough.
Pest Monitoring
Aphids love tender new growth. Check undersides of leaves daily. Whiteflies hover when disturbed. Spider mites leave fine webbing. Fungus gnats indicate overwatering. Catch early. Blast with water. Use insecticidal soap. Yellow sticky traps for flying pests.
Common Propagation Problems and Solutions
Cuttings Wilt and Die
Cause: Too much leaf surface, not enough roots. Solution: Strip more leaves. Cut remaining large leaves in half. Increase humidity. Reduce light intensity.
Stems Turn Black at Base
Cause: Fungal damping off. Solution: Use sterile mix. Clean tools. Do not overwater. Provide airflow. Discard affected cuttings immediately.
Roots Form But Plant Stalls
Cause: Nutrient deficiency or root bound. Solution: Pot up. Feed lightly. Check for circling roots.
Leaves Yellow from Bottom Up
Cause: Nitrogen deficiency or overwatering. Solution: Check soil moisture. If wet, water less. If dry, feed with nitrogen-rich fertilizer.
Algae in Water Propagation
Cause: Light hitting water. Solution: Use opaque containers. Or wrap clear jars with foil. Change water frequently.
Mold on Soil Surface
Cause: Too wet, not enough airflow. Solution: Remove dome longer. Scrape off mold. Sprinkle cinnamon (natural antifungal). Water from bottom only.
Seasonal Strategies for Year-Round Basil
Spring: The Propagation Explosion
Spring is prime time. Days lengthen. Temperatures rise. Mother plants wake up. Take cuttings weekly. Start seeds indoors. By summer, you have an army of basil.
Summer: Maintenance Mode
Focus on harvesting and pinching. Propagate only to replace flowering plants. Heat can stress cuttings. Propagate in shade. Keep water cool.
Fall: The Indoor Transition
Before first frost, take final cuttings. Pot up the best mother plants. Bring indoors. Place under grow lights. You now have winter basil.
Winter: Slow but Steady
Growth slows. Light is limiting. Use grow lights fourteen hours daily. Keep temperatures above sixty-five degrees. Water less. Fertilize monthly. Take occasional cuttings. They root slower but they root.
Creative Uses for Your Propagated Basil Bounty
Herb Spiral Garden
Build a stone spiral. Plant basil varieties at different heights. Moisture-loving types at bottom. Drought-tolerant at top. Beautiful and productive.
Companion Planting
Basil loves tomatoes. Plant them together. Basil repels tomato hornworms. Improves tomato flavor. Also good with peppers, oregano, marigolds.
Basil Bouquets
Flowering basil stems smell amazing. Use in cut flower arrangements. They last a week in water. Bonus: they may root in the vase.
Preserving the Excess
Pesto freezes beautifully. Ice cube trays. Pop out cubes for winter pasta. Basil oil. Basil vinegar. Dried basil (though fresh is infinitely better). Share with friends.
Conclusion
Learning how to propagate basil is one of those skills that keeps giving. A single afternoon of snipping and sticking stems in water yields months of harvest. The methods are forgiving. The materials are cheap. The results are delicious.
Start simple. Try water propagation this week. Grab a jar. Snip a few stems. Watch the magic happen. Once you see those first white roots, you will understand why gardeners get addicted. You will find yourself eyeing every basil plant as a potential mother plant. You will become that person gifting potted herbs at every gathering.
Your kitchen windowsill is about to become a basil nursery. Your cooking is about to level up. And the best part? You did it yourself. From a stem. In a jar of water. With a little patience and a lot of wonder.
Now go get your scissors. Your basil is waiting.
Frequently Asked Questions
What is the best time of year to propagate basil?
Spring through early fall is ideal when days are long and temperatures are warm. However, with indoor grow lights and a heat mat, you can propagate basil successfully year-round.
Should I remove flowers from my basil mother plant before taking cuttings?
Yes, always remove flower buds from mother plants. Flowering stems root poorly and the resulting plants tend to flower quickly. Pinch buds regularly to keep the plant in vegetative growth.
How many leaves should I leave on a basil cutting?
Leave 2-3 sets of leaves at the top of the cutting. Remove all leaves that would sit below the water line or soil surface. This reduces water loss while maintaining enough leaf surface for photosynthesis.
Can I propagate basil directly in the garden soil?
It is possible in warm, humid climates with consistent moisture. However, success rates are much higher when rooting in controlled conditions (water or sterile mix) before transplanting to the garden.
Why did my basil cuttings rot in water?
Rot usually occurs when leaves are submerged, water is not changed frequently, or the container gets too much direct sun. Always strip lower leaves, change water every 2-3 days, and provide bright indirect light only.
How do I know when my basil cutting is ready to transplant?
For water propagation, transplant when roots are 1-2 inches long with visible branching. For soil propagation, look for new leaf growth at the top or gentle resistance when tugging the stem.